
Summary of Contents for UPG 173RM17A
- Page 1 UPG173RM17A1URackmount Console User Guide Abstract This guide provides operational guidance for UPG 173RM17A 1U Rackmount Console. Model Number: 173RM17A February 5, 2018 Edition: A...
- Page 2 UPG Company LLC, 2018 The information contained herein is subject to change without notice. The only warranties for UPG products and services are set forth in the express warranty statements accompanying such products and services. Nothing herein should be construed as constituting an additional...
-
Page 3: Table Of Contents
.............................. 18 Maintenance guidelines ............................18 Cleaning the monitor ........................... 18 Shipping instructions ..............................19 Moving a rack with the UPG [173RM17A] 1U Console installed ................19 Regulatory compliance notices ......................... 20 Regulatory compliance identification numbers ....................... 20 Federal Communications Commission notice ......................20 FCC rating label ............................ - Page 4 Electrostatic discharge ......................... 26 Preventing electrostatic discharge ..........................26 Grounding methods to prevent electrostatic discharge ....................26...
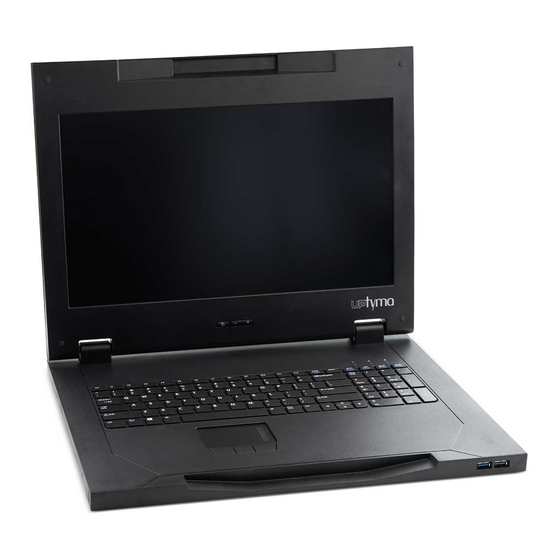
- Page 5 Introduction Main features Callout Feature Function OSD activation button • Launches OSD menus • Selects • Exits menus and OSD OSD scroll up and Used to scroll in the OSD menu and adjust down button functions LCD module 17.3 inch diagonal Scroll lock LED Lights when Scroll lock is on Cap lock LED...
-
Page 6: Introduction
Rear connectors Callout Connectors USB 3.0 pass-through DisplayPort VGA input connector A/C Power connector USB 2.0 keyboard and mouse port Serial firmware port NOTE: Throughout the User Guide, some views will show more connectors for different model offerings... -
Page 7: Rear Components
Installation Kit contents Item Quantity UPG 173RM173A 1U Rackmount Console M6 screws 6-32 screws UPG Adjustable Toolless Rails w/LH/RH slides Cable management arm, power adapter with brace rail Lock plates USB 2.0 cable USB 3.0 cables Video cable Power cords USB cable labels Note: This kit might contain extra hardware. -
Page 8: Installation
Installing the UPG 173RM173A 1U Rackmount Console Align the UPG 1U Adjustable Toolless Rails with the holes marked on the rack, and snap them into place. Snap one end of the UPG 1U Adjustable Toolless Rail into the retma rail. -
Page 9: Installing The Upg Rackmount Keyboard Monitor Kvm Console
Extend the inner slide members until they lock into place. Align the unit with the extended inner slide, and then insert the unit into the rack. -
Page 10: Installing Brace Rail Assembly
From the rear of the rack, slide the brace rail assembly in between the UPG 1U Adjustable Toolless Rails. Align the screw holes on the brace rail with the screw holes on the UPG 1U Adjustable Toolless Rails. . Using two 6-32 screws, secure the brace rail to the UPG 1U Adjustable Toolless Rails. - Page 11 Remove the two 6-32 screws from the rear of the unit. Attach the cable management arm to the rear of the unit with two 6-32 screws.
-
Page 12: Connecting And Routing Cables
Connect and route the cables through the cable management arm and unit opening. Installation is complete! HINT: In some cases, the rack has equipment above and below the specific U space designated for the console. In that case, on a large table, one can install console on slide/rail asm, install brace rail/CMA asm, attach CMA to console and route the cables through CMA. -
Page 13: Removing The Upg 1U Adjustable Toolless Rails
Removing the UPG 1U Adjustable Toolless Rails Locate the spring. Place your hand on the outside of the UPG 1U Adjustable Toolless Rail so that you can move the spring release. Gently flex the spring release toward the inside of the rack (1) while moving the UPG 1U Adjustable Toolless Rail in direction shown (2). -
Page 14: Operational Overview
Operational overview On-screen display The buttons (item 1 & 2) are used to operate the UPG 1U Rackmount Console OSD menus. Callout Component Function • Launches OSD menu OSD activation button • Selects menu options • Exits menus and OSD... -
Page 15: On-Screen Display
Press the OSD activation button to select the Exit function and exit the OSD menu. OSD menu The OSD menu provides access to display settings and functions, enabling the user to customize the UPG 1U Rackmount Console display settings. Auto Configuration The Auto Configuration option performs four functions automatically: •... -
Page 16: Image Control
The Clock option displays a slider bar to enable the adjustment of the Horizontal Clocks. Phase The Phase option displays a slider bar to enable the adjustment of the analog signals phase. DisplayPort will automatically be displayed on UPG KVM Console... -
Page 17: Input Control
Input control menu list: Exit sub-menu Note: DisplayPort has priority over VGA. So, if DisplayPort is hot plugged when VGA is running, DisplayPort will take priority and graphics from DisplayPort will automatically be displayed on UPG 1U Rackmount Console screen. Advanced The Advanced option provides access to the following options: •... -
Page 18: Factory Settings
Factory settings The Factory settings option enables the user to set the UPG 173RM17A back to its original factory settings. The following options are available in the Factory settings menu list: • • • Exit sub-menu Language The Language option allows the user to change the language in which the menu options are displayed. The following languages are available: •... -
Page 19: Maintenance
Do not attempt to service this product yourself. Adjust only those controls that are covered by the operating instructions. If the unit is not operating properly or has been dropped or damaged, contact your UPG authorized dealer, reseller, or service provider. Cleaning the monitor To clean the display: Turn off and unplug the unit. -
Page 20: Shipping Instructions
Shipping instructions Keep the original packing box in a storage area in case you must move or ship your UPG 1U Rackmount Console. Moving a rack with the UPG 173RM17A Console installed When moving the UPG 1U Rackmount Console installed in a rack, UPG recommends that you install the lock plates (L &... -
Page 21: Regulatory Compliance Notices
Regulatory compliance notices Regulatory compliance identification numbers For the purpose of regulatory compliance certifications and identification, this product has been assigned a unique regulatory model number. The regulatory model number can be found on the product nameplate label, along with all required approval markings and information. When requesting compliance information for this product, always refer to this regulatory model number. -
Page 22: Declaration Of Conformity For Products Marked With The Fcc Logo, United States Only
Modifications The FCC requires the user to be notified that any changes or modifications made to this device that are not expressly approved by UPG Company LLC may void the user’s authority to operate the equipment. Cables Connections to this device must be made with shielded cables with metallic RFI/EMI connector hoods in order to maintain compliance with FCC Rules and Regulations. -
Page 23: European Union Regulatory Notice
Ecodesign Directive 2009/125/EC, where applicable CE compliance of this product is valid if powered with the correct CE-marked AC adapter provided by UPG. The compliance is indicated by one of the following conformity markings placed on the product: For non-telecommunications products and for EU harmonized telecommunications products, such as Bluetooth®... -
Page 24: Japanese Notice
Japanese notice BSMI notice Korean notice Class A equipment Class B equipment... -
Page 25: Chinese Notice
Chinese notice Class A equipment China energy regulations... -
Page 26: Disposal Of Waste Equipment By Users In Private Households In The European Union
Disposal of waste equipment by users in private households in the European Union This symbol on the product or on its packaging indicates that this product must not be disposed of with your other household waste. Instead, it is your responsibility to dispose of your waste equipment by handing it over to a designated collection point for the recycling of waste electrical and electronic equipment. - Page 27 Electrostatic discharge Preventing electrostatic discharge To prevent damaging the system, be aware of the precautions you need to follow when setting up the system or handling parts. A discharge of static electricity from a finger or other conductor may damage system boards or other static-sensitive devices.
Need help?
Do you have a question about the 173RM17A and is the answer not in the manual?
Questions and answers