Advertisement
Quick Links
Advertisement

Subscribe to Our Youtube Channel
Summary of Contents for Richter RR10
- Page 1 POCKET DIGITAL RADIO MODEL: RR10 DAB+ | FM TUNER User Manual...
- Page 2 Safety Instructions: Do not use this radio near water. Clean with a dry cloth. Do not block any ventilation openings. Do not use near hot objects or appliances. Use accessories provided by manufacturer. Remove the battery when the unit is not being used for long period of time.
- Page 3 Specifications: Model: POCKET RR10 Radio: Digital DAB+ & FM Radio FM Frequency: 87.5-108MHz with RDS DAB+ Frequency: Band III (174.0-240.0MHz) Headphones: 32Ω, in-ear style Output Power: 1.5W (Speaker), 15mW (headphone) Power Source: Micro USB (5V, 0.6A) Charging Time: Approx. 2.5 Hours Usage Time: Approx.
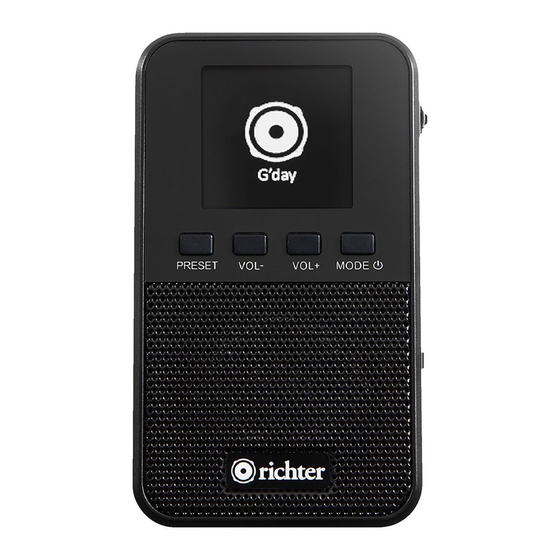
- Page 4 POCKET RR10 (1) Preset (2) Volume Down (3) Volume Up (4) On/Off & Mode Select (5) Telescopic Antenna (6) LCD Display (7) Speaker (8) Scan, Select Scroll Wheel (9) Lock/Unlock (10) Micro USB Charging Socket (11) Li Battery Compartment (12) Stereo Earphone Jack...
- Page 5 Inserting the Battery Open the Battery cover (You can use a fingernail or small screw driver) being careful not to damage the radio. Remove the Battery from Plastic bag and align the contacts at the bottom of the battery with the contacts of the radio.
- Page 6 Charging the radio: The POCKET RR10 features a 3.7V, 1000mAh Rechargeable Lithium battery and is supplied with one ‘USB to micro-USB’ cable for power charging. Please note: Before first use, fully charge the battery (supplied) for best performance. Carefully plug the micro USB cable into...
- Page 7 power supply such as a computer USB port or USB power adaptor. The radio will begin charging the battery. It will take approximately 2.5 hours to fully charge the battery. The charging icon will move during charging and stop when the radio is fully charged.
- Page 8 4. The display will show the RICHTER logo and then enter DAB mode (FM mode if you selected FM before turning off), “DAB” logo will be shown on the middle top of the display in DAB mode whereas “FM”...
- Page 9 2. Extend the antenna and move it around to obtain the best reception. 3. When using Headphones, the Headphone cable acts as the antenna when plugged into the 3.5mm Headphone jack. DAB+/FM Band Select: Press “ /MODE” button to select DAB+ or FM mode, you will see the icon “DAB”...
- Page 10 Search and select Station: DAB+ mode: Make sure the radio is in DAB+ mode. Press and hold the “SCAN” Scroll Wheel for approx. 2 secs, the radio will scan and memorise all the stations found automatically. (Cancel auto-scan by pressing both the “SCAN” Scroll Wheel and “VOL+”...
- Page 11 memorised until another scan is performed. Service Information: DAB+ mode The Service Information display - Technical information on the status of the station being broadcasted. While listening to DAB+, the display will show the followings if applicable 1. Program type 2.
- Page 12 6. Volume level 7. Signal Strength Presets: DAB+ mode Make sure you are in DAB+ mode. When you are listening the DAB+ station that you would like to preset, press and hold the “PRESET” button for 3 seconds, a list with heading “MEMORY” will show on the display, you will see vacant 1, vacant 2...etc.
- Page 13 (If the preset space is occupied, the original preset station will be overwritten.) To play the preset stations Press the “PRESET” button once and select the preset station (the name of station will be displayed) by scrolling up and down using the “SCAN” Scroll Wheel, then press the “SCAN”...
- Page 14 Make sure the radio is in FM mode. Scroll up using the “SCAN” Scroll Wheel to higher frequency and vice versa. Scroll up and hold the “SCAN” Scroll Wheel to scan the next station at higher frequency, and vice versa. Service Information: FM mode While listening to FM radio, the display will show the followings if applicable...
- Page 15 5. Signal Strength Presets: FM mode Make sure you are in FM mode. When you are listening to the FM station you would like to preset, press and hold the “PRESET” button for 3 seconds, a list with heading “MEMORY” will show on the display, you will see vacant 1, vacant 2...etc.
- Page 16 the original preset station will be overwritten.) To play the preset stations, press the “PRESET” button once and select the preset station (the name of channel will be displayed) by scrolling up and down using the “SCAN” Scroll Wheel, then press the “SCAN”...
- Page 17 to enter sleep mode, you will see ‘0 min.’ flashing. Scroll up and down to select the duration from 5 min. to 90 min. (Select ‘0min’ to exit the sleep mode or wait for 5secs to exit sleep mode automatically.) Press “SCAN”...
- Page 18 The lock switch is located at the right-hand side of the radio. When the lock switch is set to “LOCK>” position, “Vol+”, “Vol- ““PRESET” and “ / MODE” buttons will be disabled. Display will show a “lock icon” on the top of the display.
- Page 19 Press and hold “SCAN” scroll wheel for 5 seconds. Scroll up and down to select languages. Press “SCAN” scroll wheel to exit Language menu Power Off andaintenance Please turn off the power when not in use. Please do not wipe it with rough materials.
- Page 20 or change inner parameter. Removing the Battery Open the Battery cover (You can use a fingernail or small screw driver). (Please refer to the (1)) Remove the Lit battery from the product. (Please refer to the (2))
- Page 21 Speaker & Headphones: The POCKET RR10 features a high-quality 8 Ω 1.5W inbuilt speaker. Also supplied, are a pair of high-quality earphones which also act as the radio antenna. The earphone jack is for use with stereo headphones or earpieces.
-
Page 22: Our Warranty
OUR WARRANTY THE ENCLOSED TERMS AND CONDITIONS RELATE TO THE WARRANTY PROVIDED BY RICHTER AUDIO PTY LTD (“Richter Audio”) (ABN 22 613 067 815) products purchased within Australia. This warranty applies for a period of 1 Year (12 months) from the date of purchase (“WarrantyPeriod”) - Page 23 Consumer Law. You are entitled to a replacement or refund for a major failure and compensation for any other reasonably foreseeable loss or damage. You are also entitled to have the goods repaired or replaced if the goods fail to be of acceptable quality and the failure does not amount to a major failure.
- Page 24 Australian Consumer Law. Subject to Clause 1 above and the terms below, as your Standard Warranty, Richter Audio agrees to repair or replace at cost the Richter product, and any accessory supplied with the product, purchased by you in Australia when the product does not perform in accordance with the manufacturer’s specifications...
- Page 25 Contact Richter Audio through our website www.richter.com.au for customer support. Refund or replacement via your Richter Audio’s Authorised Retailer is available for aperiod of 14 days after purchase for goods that have been inspected and determined to have a major failure. Refund and exchange is not applicable if you change your mind after purchase.
- Page 26 Replacement of the product or a part does not extend or restart the Warranty Period. If the product presented for repair is capable of retaining user-generated data, you are advised that repair of the product may result in loss of the data. Richter...
- Page 27 The product will be at the owner’s risk whilst in transit to and from the Richter Audio Service Centre, unless transported by Richter Audio or 3rd party transport booked by Richter Audio.
-
Page 28: Exclusions And Limitations
The owner of the goods will cover any return transport cost. Products returned to Richter Audio by a courier and are damaged in transit by insufficient packing will be quoted and the cost of the repair will be covered by the owner of the goods. - Page 29 If the product has not been installed, operated, maintained or used in accordance with the manufacturer’s instructions or specifications provided with the product. To damage, malfunction or failure resulting from alterations, accident, misuse, abuse,fire, liquid spillage, mis-adjustment of customer controls, use on an incorrect voltage, power surges and dips, thunderstorm activity, acts of God,...
- Page 30 voltage supply problems, tampering or unauthorised repairs by any persons, use of defective or incompatible accessories, the operation of a computer virus of any kind, exposure to abnormally corrosive conditions or entry by any insect, vermin or foreign object in the product.
- Page 31 or any parts thereof to and from the owner, unless otherwise specified in this Warranty. To any third-party software or hardware not contained in the product as originally configured by the manufacturer. To any failure, to the extent that the failure is not a failure of the product to perform in accordance with its specifications.
- Page 32 You are also entitled to have the goods repaired or replaced if the goods fail to be of acceptable quality and the failure does not amount to a major failure. RR10-01-FEB-18...
Need help?
Do you have a question about the RR10 and is the answer not in the manual?
Questions and answers