Advertisement
Available languages
Available languages
Quick Links
ASSEMBLY INSTRUCTIONS
Model: #8682C
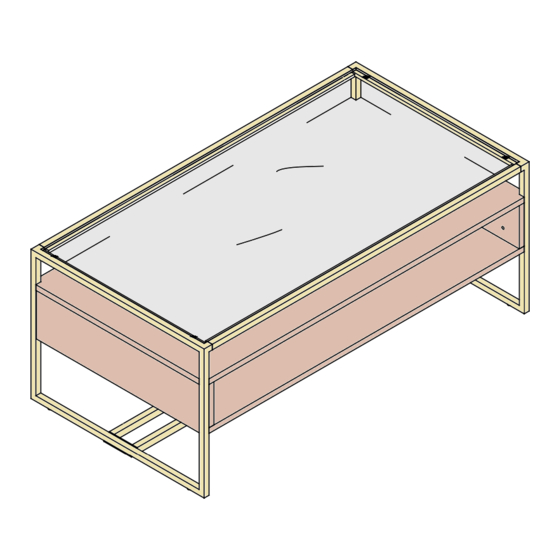
MōDRN Retro Glam Marion Sleigh Base Co ee Table
Lot Number: _________________
Date of Purchase: ___ / ___ / ____
WARNING The maximum load capacity as listed above may not be exceeded and is assumed
!
to be distributed evenly. Exceeding load capacity may result in collapse and possible injury.
THIS INSTRUCTION BOOKLET CONTAINS IMPORTANT SAFETY INFORMATION. PLEASE READ AND KEEP FOR FUTURE REFERENCE.
Thank you for your purchase. We want to make sure it is to your complete satisfaction. Hardware is separated individually for easy
identi cation. Please, identify and count all parts and hardware to make sure they match with the illustrations herein and are all
present.
If any parts are missing or defective please contact our customer service department.
Customer Service - 1-866-528-8364 / support@dimensionsfurniture.com
Your satisfaction is our top priority. Our products are designed and manufactured to meet the highest quality. In the event that
you have assembly questions, or parts are missing or damaged, please do not return the product.
Our customer service department would appreciate the opportunity to provide any help necessary regarding assembly and to
provide any necessary parts.
Manufactured by: Dimensions Furniture, Inc
341 Gradle Drive, Carmel, IN 46032
1-866-528-8364 / support@dimensionsfurniture.com
100 lbs
Maximum load
distributed evenly
1/11
Advertisement

Related Manuals for MoDRN 8682C


Summary of Contents for MoDRN 8682C
- Page 1 ASSEMBLY INSTRUCTIONS Manufactured by: Dimensions Furniture, Inc Model: #8682C 341 Gradle Drive, Carmel, IN 46032 MōDRN Retro Glam Marion Sleigh Base Co ee Table 1-866-528-8364 / support@dimensionsfurniture.com Lot Number: _________________ Date of Purchase: ___ / ___ / ____ Maximum load...
-
Page 2: Pre-Assembly Preparation
PRE-ASSEMBLY PREPARATION: CAUTION ! Please read below statements before beginning assembly. Assembly should take place in a secure environment that is clean and dry. Assembly can be done by one person, but two persons are recommended. Allen wrench available for assembly. - Page 3 PRE-ASSEMBLY PREPARATION: PARTS LIST Central Leg 2pcs 3/11...
- Page 4 STEP-BY-STEP ASSEMBLY Step 1 Lay a Side Frame on a at surface with the connection posts sticking up as shown. Guide the Cross Rails over the connection posts on the Side Frame with the glass shelf supports facing inward as shown. glass shelf support connection...
- Page 5 STEP-BY-STEP ASSEMBLY Step 2 Handtighten the Cross Rails to the Side Frame using four Short Bolts with Washers as shown. NOTE: To avoid likely alignment issues, bolts need to remain loose until otherwise instructed. Carefully lay the assembly over onto its side as shown. Short Bolt with Washers (1/4”x5/8”) 5/11...
- Page 6 STEP-BY-STEP ASSEMBLY Step 3 Insert two Wood Dowels into the side of the Table Body , as shown below. Join the Table Body to the Assembly by rst aligning the corresponding holes and allowing the extended edge of the Table Body to insert between the frame and lip over the wood panel on the Side Frame .
- Page 7 STEP-BY-STEP ASSEMBLY Insert two Wood Dowels into the other side of the Table Body , as shown below. Step 4 Join the other Side Frame to the Assembly by inserting the Connection Posts on the Side Frame into the Cross Rails .
- Page 8 STEP-BY-STEP ASSEMBLY Step 5 Insert four Short Bolts with Washers through the Cross Rails into the Connection Post of the Side Frame in the locations shown below and handtighten them. If holes do not align, begin tightening the long bolts inside the case with an Allen Wrench to draw the Side Frame into the Cross Rails...
- Page 9 STEP-BY-STEP ASSEMBLY Step 6 Attach both Central Legs to the assembly, as shown, using eight Short Bolts with Washers . Be sure to leave bolts loose until each bolt is inserted properly then go back and tighten evenly. NOTE: Do not over tighten. With help, ip the co ee table upright.
- Page 10 STEP-BY-STEP ASSEMBLY Step 7 With help, move the Co ee Table to its desired location. With help, carefully place the Glass Top inside the frame so that it rests on top of the rubber bumpers as shown. r u b b e r bumper 10/11...
-
Page 11: Limited One-Year Warranty
STEP-BY-STEP ASSEMBLY Step 8 Assembly is now complete. It may be necessary to raise or lower leg height to eliminate wobble. Rotate the adjustable foot RAISE LOWER glides right to lower stool. Rotate left to raise bench. LIMITED ONE YEAR WARRANTY Warranty available to original purchaser only. - Page 12 Printed in China...
- Page 13 INSTRUCIONES DE ENSAMBLAJE Fabricado por: Dimensions Furniture, Inc Modelo: #8682C 341 Gradle Drive, Carmel, IN 46032 MōDRN Retro Glam Marion Sleigh Base Co ee Table 1-866-528-8364 / support@dimensionsfurniture.com Número de Lote: _________________ Fecha de Compra: ___ / ___ / ____ Peso máximo...
- Page 14 PREPARACION DE PRE-ENSAMBLAJE: ¡ATENCIÓN! Por favor lea las instrucciones antes de comenzar el ensamblaje. El ensamblaje debe realizarse en un ambiente seguro, limpio y seco. El ensamblaje puede hacerlo una sola persona pero se recomienda dos personas. ...
- Page 15 PREPARACIÓN PRE-ENSAMBLAJE LISTA DE PIEZAS Pata Central 2 piezas 3/11...
- Page 16 ENSAMBLAJE PASO POR PASO Paso 1 Coloque un Marco Lateral en una super cie con los postes de conexión hacia arriba como se muestra. Guíe las Barras Transversales sobre los postes de conexión en el Marco Lateral con los soportes del estante de vidrio mirando hacia adentro como se muestra en la gura.
- Page 17 ENSAMBLAJE PASO POR PASO Paso 2 Ajuste con la mano las Barras Transversales al Marco Lateral usando cuatro Pernos Cortos con Arandelas como en la gura. NOTA: Para evitar problemas de alineación probables, los pernos deben permanecer sueltos hasta que se indique lo contrario.
- Page 18 ENSAMBLAJE PASO POR PASO Paso 3 Inserte dos tarugos de madera en el costado del cuerpo de la mesa , como se muestra en la gura. Una el Cuerpo de la Mesa al ensamblaje alineando primero los agujeros correspondientes y permitiendo que el borde prolongado del Cuerpo de la Mesa se inserte entre el marco y el borde sobre el panel de madera en el Marco Lateral Ajuste a mano el Cuerpo de la Mesa...
- Page 19 STEP-BY-STEP ASSEMBLY Paso 4 Inserte dos tarugos de madera en el costado del cuerpo de la mesa , como se muestra en la gura. Una el otro Marco Lateral al ensamblaje insertando los Postes de Conexión en el Marco Lateral en las Barras Transversales .
- Page 20 ENSAMBLAJE PASO POR PASO Inserte cuatro Pernos Cortos con Arandelas a través de las Barras Transversales en el poste de conexión del Marco Paso 5 Lateral en los lugares que se muestran abajo y ajústelos con la mano. Si los agujeros no se alinean, comience a ajustar los pernos largos dentro de la caja con una Llave Allen para atraer el Marco Lateral a las Barras Transversales...
- Page 21 ENSAMBLAJE PASO POR PASO Paso 6 pernos sueltos hasta que cada perno se inserte correctamente, luego vuelva y ajústelos uniformemente. NOTA: No ajuste excesivamente. Perno corto con arandelas (1/4”x5/8”) Llave Allen 9/11...
- Page 22 ENSAMBLAJE PASO POR PASO Paso 7 Con ayuda, mueva la mesa de centro a su ubicación deseada. Con ayuda, coloque con cuidado la Super cie de Vidrio dentro del marco de modo que descanse sobre los topes de goma como se muestra en la gura. Tope de G o m a t 10/11...
-
Page 23: Garantía Limitada De Un Año
ENSAMBLAJE PASO POR PASO Paso 8 El ensamblaje ya está listo. Para subir o bajar la altura para eliminar el bamboleo, gire los pies ajustables hacia la SUBIR BAJAR derecha para bajar y gire hacia la izquierda para subir. GARANTÍA LIMITADA DE UN AÑO Garantía disponible solo para el comprador original. - Page 24 Impresso en China...
Need help?
Do you have a question about the 8682C and is the answer not in the manual?
Questions and answers