Table of Contents
Advertisement
Quick Links
Advertisement
Table of Contents

Related Manuals for acid rain technology Maestro

Summary of Contents for acid rain technology Maestro
- Page 1 Maestro Firmware V1.1 (Updated March 19, 2021)
- Page 2 - easily compatible with slim/shallow cases - Maestro requires 65mA of current on the +12V rail and 18mA on the -12V rail of a eurorack power supply. Please ensure you have enough power available in your case before installing Maestro.
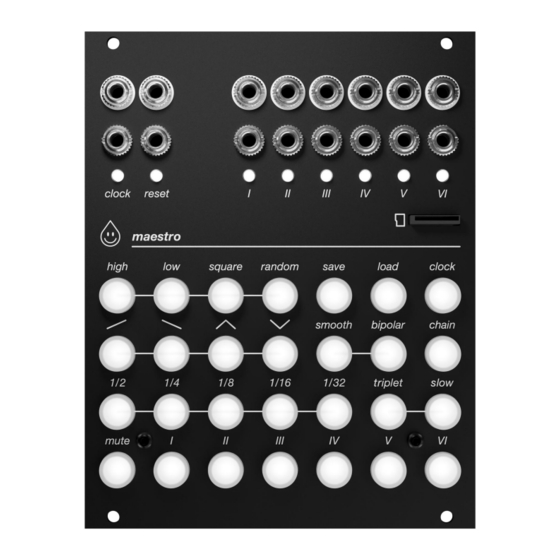
- Page 3 (6) and Maestro’s clock and reset are shown on LEDs (3). Maestro uses a micro SD card (7) to store channel data for saving and loading, as well as firmware updates and other settings.
- Page 4 - The tempo is displayed on the clock LED. The timing buttons range from ½ note to a ¹⁄₃₂ note multiplication (see table below) - The number of clock pulses Maestro uses to define a quarter note can be set by the user in the clock menu (see page 6) - “Slow”...
- Page 5 Triplet & slow Waveform and Modifier Buttons - Maestro has 8 waveform options, and two waveform modifier options to apply to any channel. Each waveform will be generated with a full cycle equal to the channel’s timing button setting as described above.
- Page 6 - With no external clock patched in, pressing “clock” brings you into the internal clock menu with options for adjusting Maestro’s internal clock settings. By default the internal clock tempo is set to 120 beats per minute (bpm) at 4 pulses per quarter note.
- Page 7 External Clocking - Maestro has clock and reset inputs at the top left of the module. Plugging a cable into the clock input will automatically bypass the internal clock. Maestro will wait for a clock signal to begin running. - Maestro can follow both straight and swung clock signals, but will not function well with uneven trigger or gate patterns on the external clock input.
- Page 8 After triggering the final waveform in the chain, the chain will repeat. - This functionality can turn Maestro into an unusual envelope generator, and opens interesting self patching opportunities, particularly by patching a chain with square and high / low waveforms into the channel input of another channel.
- Page 9 - The attenuated output state of a channel is displayed accordingly on the chanel’s LED - To exit the internal attenuation menu, press the “high” or “mute” button again - Channel attenuation settings are saved and loaded with channel data Maestro Firmware V1.1...
- Page 10 - Inside you will find a FW.BIN file - move this onto the root directory of the micro SD card - Eject micro SD card safely from your computer and insert it back into the Maestro with the your case power off...
Need help?
Do you have a question about the Maestro and is the answer not in the manual?
Questions and answers