Table of Contents
Advertisement
Available languages
Available languages
Quick Links
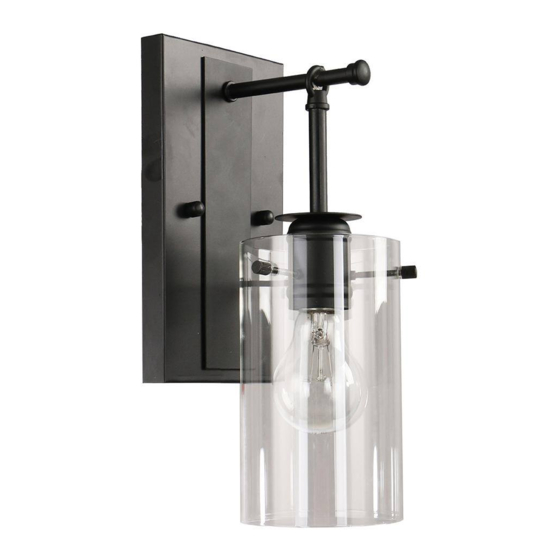
Item # 305 202 732
Model # DS18114
USE AND CARE GUIDE
1-LIGHT WALL SCONCE
Questions, problems, missing parts? Before returning to the store,
call Design Solutions International Customer Service
Mon-Fri 9:30 am to 3:00 pm EST
1-800-388-6141 ext. 216
For customer service support and the fastest response, please email us at
CustomerSupport@DSILighting.com
Advertisement
Chapters
Table of Contents

Subscribe to Our Youtube Channel
Related Manuals for DSI LIGHTING DS18114

Summary of Contents for DSI LIGHTING DS18114
- Page 1 Item # 305 202 732 Model # DS18114 USE AND CARE GUIDE 1-LIGHT WALL SCONCE Questions, problems, missing parts? Before returning to the store, call Design Solutions International Customer Service Mon-Fri 9:30 am to 3:00 pm EST 1-800-388-6141 ext. 216 For customer service support and the fastest response, please email us at CustomerSupport@DSILighting.com...
-
Page 2: Table Of Contents
Table of Contents Table of Contents ............2 Hardware Included ..............3 Safety Information ............2 Package Contents ..............4 Warranty ................. 2 Installation ..............5 Five (5) Year Warranty ............... 2 Care and Cleaning ............7 What is Covered ................ 2 Troubleshooting ............. -
Page 3: Pre-Installation
Pre-Installation PLANNING INSTALLATION Read all instructions before installing. To avoid damaging this product, place it on a soft, non-abrasive surface, such as carpet or cardboard. IMPORTANT: Inspect the wire insulation for any cuts, NOTE: This product requires one 60W maximum medium abrasions, or exposed copper that may have occurred base (E26) type "ST64"... -
Page 4: Package Contents
Pre-Installation (continued) PACKAGE CONTENTS Part Description Quantity Fixture body Rubber washer Thumbscrew Glass shade... -
Page 5: Installation
Installation Preparing the mounting bracket Installing the mounting bracket □ □ Fasten the support screws (long) (CC) into the mounting Fasten the mounting bracket (AA) onto the outlet box using bracket (AA), and secure it using the hex nuts (DD). two outlet box screws (short) (BB). - Page 6 Installation (continued) Assembling the fixture body to the Installing the glass shades outlet box □ Place the glass shade (D) over the socket, align the holes of the □ Place the fixture body (A) over the outlet box, and ensure the glass shade (D) with the holes of the cap of the fixture body (A), heads of the support screws (long) (CC) come through the then secure the glass shade with the rubber washers (B) and...
-
Page 7: Care And Cleaning
Care and Cleaning □ Do not use any cleaners with chemicals, solvents, or harsh abrasives. Use only a dry, soft cloth to dust or wipe carefully. □ To clean the fixture, disconnect power by turning off the circuit breaker or by removing the fuse at the fuse box. Use a dry or slightly dampened, clean cloth to wipe the exterior surface of the fixture. -
Page 8: Service Parts
Service Parts MODEL: DS18114 Part Description Mounting bracket Outlet box screw (short) Support screw (long) Hex nut Green ground screw (Pre-assembled to mounting bracket (AA)) Wire connector Cap nut Fixture body Rubber washer Thumbscrew Glass shade... - Page 9 Questions, problems, missing parts? Before returning to the store, call Design Solutions International Customer Service Mon-Fri 9:30 am to 3:00 pm EST 1-800-388-6141 ext. 216 For customer service support and the fastest response, please email us at CustomerSupport@DSILighting.com Retain this manual for future use.
- Page 10 Artículo núm. 305 202 732 Modelo núm. DS18114 GUÍA DE USO Y MANTENIMIENTO LÁMPARA DE PARED DE UNA BOMBILLA ¿Tiene alguna pregunta o algún problema? ¿Le faltan piezas? Antes de volver a la tienda, llame al Servicio de atención al cliente de Design Solutions International De lunes a viernes, de 9.30 a 15 h EST...
- Page 11 Tabla de contenidos Tabla de contenidos............2 Tornillería incluida..............3 Información de seguridad..........2 Contenidos del paquete............. 4 Garantía................2 Instalación............... 5 Garantía de cinco (5) años............2 Mantenimiento y limpieza..........7 Reparación de averías............ 7 ¿Qué cubre?................2 ¿Qué no cubre?................. 2 Piezas de repuesto............
-
Page 12: Preinstalación
Preinstalación PLANIFICACIÓN DE LA INSTALACIÓN Lea las instrucciones antes de comenzar la instalación. Para evitar dañar este producto, colóquelo sobre una superficie suave, no abrasiva, como una alfombra o un cartón. IMPORTANTE: Inspeccione el aislamiento del cable para OBSERVACIÓN: Este producto necesita una bombilla detectar cualquier corte, abrasión o exposición del cobre de base media (E26) de 60 W como máximo de tipo “ST64”... -
Page 13: Contenidos Del Paquete
Preinstalación (continuación) CONTENIDOS DEL PAQUETE Pieza Descripción Cantidad Cuerpo de la lámpara Arandela de goma Tornillo de ajuste manual Pantalla de cristal... -
Page 14: Instalación
Instalación Preparación del soporte Instalación del soporte □ □ Apriete los tornillos de soporte (largos) (CC) en el soporte (AA) Fije el soporte (AA) en la caja de distribución mediante dos y fíjelos con las tuercas hexagonales (DD). tornillos de la caja de distribución (cortos) (BB). OBSERVACIÓN: Cuando se instale, los tornillos de soporte (largos) (CC) deben sobresalir lo justo por la base del cuerpo de la lámpara (A). - Page 15 Instalación (continuación) Montaje del cuerpo de la lámpara a la Instalación de las pantallas de cristal caja de distribución □ Coloque la pantalla de cristal (D) sobre el casquillo; alinee □ Coloque el cuerpo de la lámpara (A) sobre la caja de los orificios de la pantalla de cristal (D) con los orificios del distribución y asegúrese de que las cabezas de los tornillos casquillo del cuerpo de la lámpara (A);...
-
Page 16: Mantenimiento Y Limpieza
Mantenimiento y limpieza □ No emplee productos de limpieza que contengan químicos, disolventes ni abrasivos. Utilice únicamente un paño seco para quitar el polvo o limpiar con cuidado. □ Para limpiar la lámpara, desconecte la alimentación apagando el disyuntor del circuito o retirando el fusible de la caja de fusibles. Utilice un paño suave seco o ligeramente mojado para limpiar la superficie exterior de la lámpara. -
Page 17: Piezas De Repuesto
Piezas de repuesto MODELO: DS18114 Pieza Descripción Soporte Tornillo de la caja de distribución (corto) Tornillo de soporte (largo) Tuerca hexagonal Tornillo de toma a tierra verde (preinstalado en el soporte [AA]) Conector de cables Tuerca ciega Cuerpo de la lámpara... - Page 18 ¿Tiene alguna pregunta o algún problema? ¿Le faltan piezas? Antes de volver a la tienda, llame al Servicio de atención al cliente de Design Solutions International De lunes a viernes, de 9.30 a 15 h EST 1-800-388-6141 ext. 216 Para obtener ayuda de nuestro Servicio de atención al cliente y la respuesta más rápida, envíenos un correo electrónico a CustomerSupport@DSILighting.com Conserve este manual para futuras consultas.
Need help?
Do you have a question about the DS18114 and is the answer not in the manual?
Questions and answers