Advertisement
Quick Links
english
combInAtIon burners
Assembly InstructIons
And use And cAre mAnuAl
the InstructIon mAnuAl contAIns ImportAnt InFormAtIon
necessAry For the proper Assembly And sAFe use oF the ApplIAnce.
reAd And Follow All wArnIngs And InstructIons beFore
AssemblIng And usIng the ApplIAnce. Follow All wArnIngs And
7:30 AM to 3:30 P.M. CST • Monday through Friday
And wArnIngs could result In FIre, explosIon, burn hAzArd or
cArbon monoxIde poIsonIng whIch could cAuse property dAmAge,
outdoor cooKers
jet And
model/serIAl #
InstructIons when usIng the ApplIAnce.
Keep thIs mAnuAl For Future reFerence.
Metal Fusion, inc.
712 St. George Avenue.
Jefferson, LA 70121
If you have any problems or questions
call us toll Free at
1-800-783-3885
(504) 736-0201
www.kingkooker.com
FAIlure to Follow these InstructIons
personAl Injury or deAth.
__________
Advertisement

Summary of Contents for Metal Fusion King Kooker 90B
- Page 1 And Follow All wArnIngs And InstructIons beFore AssemblIng And usIng the ApplIAnce. Follow All wArnIngs And InstructIons when usIng the ApplIAnce. Keep thIs mAnuAl For Future reFerence. Metal Fusion, inc. 712 St. George Avenue. Jefferson, LA 70121 If you have any problems or questions...
- Page 2 dAnger for your safety If you smell gas: 1. shut off gas to the appliance. 2. extinguish any open flame. 3. If odor continues, keep away from the appliance and immediately call your Fire department. FAIlure to Follow these InstructIons could result In FIre or explosIon whIch could cAuse property dAmAge, personAl Injury or deAth.
- Page 3 Keep the fuel supply hose away from any heated surfaces. only the lp hose/regulator assembly specified by metal Fusion, Inc. should be used with this appliance. this appliance is not for frying turkeys.
- Page 4 13) Introduction of water or ice from any source into the oil/grease may cause overflow and severe burns from hot oil and water splatter. when frying with oil/ grease, all food products must be completely thawed and towel dried before being immersed in the fryer.
- Page 5 reAd And understAnd All InstructIons beFore usIng your KIng KooKer ® product tAble oF contents warnings ..................... . . 2-4 table of contents .
- Page 6 Damages. This warranty does not cover incidental and consequential damages arising in any way out of the use of this outdoor cooker. The liability of Metal Fusion, Inc. is, in any event, limited to the amount of the original purchase price of this outdoor cooker, and remains in force only as long as the product remains in its original, as-built configuration.
- Page 7 owner’s regIstrAtIon Dear Customer, Thank you for purchasing a King Kooker ! Please take a moment to fill ® out your registration form and return it to us. We are always happy to hear suggestions and comments from our customers about our products. Completion of this registration allows us to contact you if the need arises.
- Page 8 TAPE HERE FOLD ________________________ ________________________ Place Stamp ________________________ Here metAl FusIon, Inc. 712 St. George Avenue Jefferson, LA 70121 FOLD...
- Page 9 9090 - cooker stand, lp hose and regulator, thermometer If any of the above parts are missing, contact Metal Fusion, Inc. at 1-800-783-3885 between the hours of 7:30 a.m. and 3:30 p.m. CST Monday through Friday for replacements. Read assembly instructions, and understand sequence of assembly, before commencing to assemble your cooker.
- Page 10 c90pK, c90pKb, c90h/spK And c90sspK Assembly InstructIons a. Locate the three separate plates. Lay the plates on a flat surface as shown in Figure 1 below. If one of the plates has a cutout along the inner edge, this plate must be installed around the adjustable baffle’s extension when following the steps below.
- Page 11 94/90tKd Assembly InstructIons see below illustration for part identification. Also included - 6 bolts, 8 lockwasher and 8 nuts Lighting Hole Windshroud Top Frame Figure 1 Jet Pipe Cylinder Collar Cylinder Heat Shield Bottom Frame Wheels, Axles, Lockwashers Tank Ring and nuts 1.
- Page 12 6. Locate the three separate heat plate pieces. Lay the plates on a flat surface as shown in Figure 3. Place the rounded inner edge of one plate against the vertical jet pipe located on the bottom frame. The bottom of the plate should be located above the the “bent” prongs when installed (3 “bent”...
- Page 13 94/90tKd hose Assembly InstructIons 1. Wrench tighten the 3/8” female flare swivel to the brass adapter. If assembling a hose to a cast burner, determine if your hose has a 3/8” female flare swivel end or a 1/8” male pipe thread end. If your cooker has a 3/8”...
- Page 14 c180pKhd Assembly InstructIons a. Locate the three separate plates. Lay the plates on a flat surface as shown in Figure 1 below. b. Place the rounded inner edge of one plate against the vertical jet pipe in center of cooker. The plate will fit around the appliance leg using the cutouts provided on the plate.
- Page 15 9090 Assembly InstructIons 1. Remove unit from box and remove all packing materials between cooker frame and aluminum pot. All packaging materials must be removed before operation of the appliance. 2. Make sure the spigot drain valve is in the OFF/CLOSED position as pictured below. VAlVe In spIgot oFF/closed...
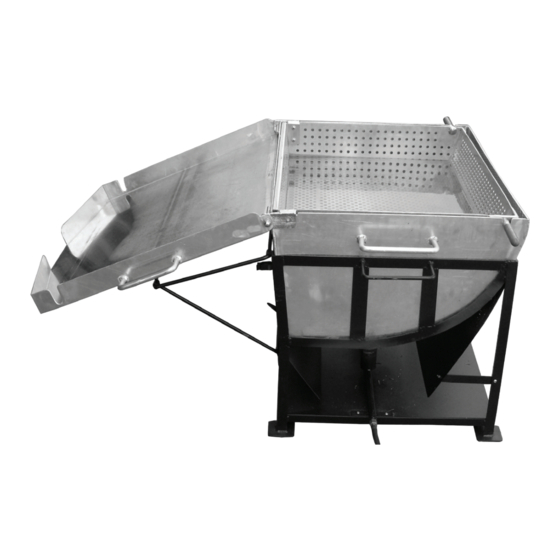
- Page 16 9090 AdjustAble lId support system InstructIons Your cooker includes an adjustable rod system that can be used to support the pot’s lid when opened. Food contents within the pot’s basket can be emptied onto the lid when supported by the support rod system and then distributed into food trays or containers.
- Page 17 Angled lId posItIon FIgure 2 FIgure 3 lower “lower” “center” lower tAb lower To install the adjustable lid support system in the angled position, remove the rods from the clamps. Rotate the “lower” bar downward and the “center” bar upward. Place the “lower” bar onto lower set of tabs (2) which are attached to the cooker frame as shown in Figure 2 and Figure 3 above.
- Page 18 9090 - operAtIon oF spIgot pot reAd And understAnd All InstructIon beFore usIng thIs product. ALWAYS ALLOW COOKInG LIQUID AnD VALVE TO COOL BEFORE OPERATInG SPIGOT (BELOW 100°F (38°C)). COOKInG LIQUID CAn REMAIn DAnGEROUSLY HOT HOURS AFTER USE. ALWAYS USE A THERMOMETER TO CHECK TEMPERATURE OF THE COOKInG LIQUID BEFORE OPERATInG THE SPIGOT.
Need help?
Do you have a question about the King Kooker 90B and is the answer not in the manual?
Questions and answers