Table of Contents
Advertisement
Available languages
Available languages
Quick Links
894-04 RED Detector
Safety and Warranty
1. Avoid use in a wet and dusty environment for extended
periods of time.
2. Keep receiving window clean. Avoid scratches.
3. Do not disassemble or modify the detector by yourself –
in doing so will void the warranty.
4. Storage temperature - 20° C ~ +60° C
5. Please avoid impact or vibration.
6. Please do not push roughly on the buttons.
7. Use only a dry clean, soft cloth to clean the detector.;
Do not use detergent or petroleum based scourers.
8. If the detector is not to be used for an extended period
of time - remove the battery.
9. Please do not operate this detector in strong electromagnetic
field or in an intense light environment.
10.This detector is also susceptible to sunlight, flashing lights,
fluorescent light, and alternating induction radio signals, and
the source of these signals can affect the actual measurement
of this detector, producing certain errors.
The performance parameters
Corresponding models:
This detector will detect red lines laser operated in pulse mode
at frequncy of 5 KHz (it will not detect rotating levels).
Detection range:
1 ~ 50 meters, vertical: 1 ~ 35 meters
Precision: High accuracy ± 1.5 mm.
Low accuracy ± 2.5 mm.
Power source: Laminated 9V battery
Dimensions: 164mm. (H) x 52mm. (W) x 27mm. (D)
Weight: 140 g (including battery)
Indicator light
UPPER/RIGHT indicator ON (RED) MIDDLE indicator ON (BLUE) LOWER / LEFT indicator ON (RED)
Laser line is below the central red
HORIZONTAL LINE
line - the detector should be moved
down until blue indicator lights on.
Laser line to the left of the central
VERTICAL LINE
red line: The detector should be
(VERTICAL VIAL UP)
moved left until blue indicator
lights on.
AUDIBLE SIGNAL
B-B-B-B-B
(less frequent beep)
USER MANUAL
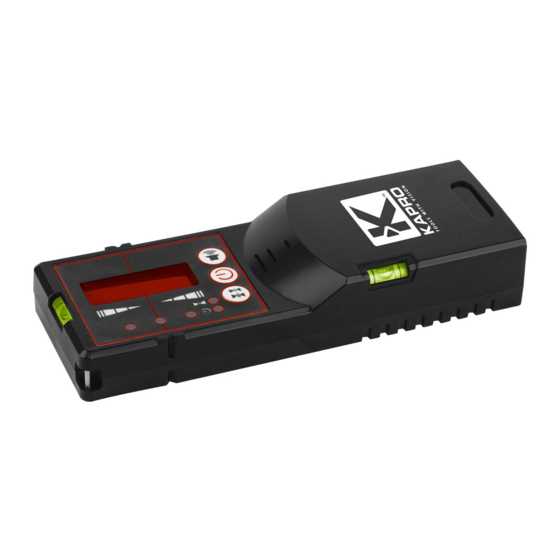
Horizontal vial
Upper indicator light (red)
Middle indicator light (blue)
Lower indicator light (red)
Power indicator light (red)
Precision indicator light (red)
Precision key
Vertical vial
Laser line and central red line
Laser line is above the central
overlapping
red line - the detector should
be moved up until blue indicator
lights on.
Laser line and central red line
Laser line to the right of the
overlapping
central red line: The detector
should be moved to the right
until blue indicator lights on.
B-------- (steady beep)
BBBBBBBB (frequent beep)
Function - introduction
1. Bright indicator lights on the front and the reverse sides of
the detector.
Intense brightness signal lights used to indicate the laser
line position together with mutable audible signal.
2. Automatic shutdown.
Detector will shut down automatically if receives no laser
line and no key pressed for 7 minutes.
3. Low voltage alarm.
When the battery voltage is low, the power indicator light
Receiving window
will flash to notify the user to replace the batteries.
Directions for use
Central red line
1. Install the battery:
Central locating slot
Insert the laminated 9V battery into the battery
compartment; ensure the proper contact with the terminals.
2. The control panel:
Power key: To switch the detector ON and OFF. At start-up
Audio key
the power indicator light will be lit and glowing steadily.
If the power indicator light is flashing - the battery voltage is
Power key
too low. Please replace the battery.
Precision key: To switch between high and low accuracy. At
Buzzer
start-up, the detector will be low accuracy and the
corresponding indicator light is off. Press the key to switch to
higher precision mode. The precision indicator light will turn on.
3. Audio switch button:
Turns the buzzer on and off.
4. Detect the laser line:
Note: When using this receiver, confirm that the multiline laser is
in the "PULSE" mode.
To detect the horizontal line place the detector vertically with
horizontal vial at the top, to detect the vertical line place the
detector with vertical vial at the top.
When the laser line is in the red receiving window, one of the
three red / blue indicator lights will light up to indicate the line
position. If the buzzer is on, a corresponding audible signal will
be heard at this time.
The red indicator light indicates to move the detector according
to the respective direction arrow in order to bring the laser line to
the middle of the receiving window. When the upper red light is
on – the detector should move down. When the lower red light
is on – the detector should move up. For vertical laser line
detection: when the right red light is on – the detector should
move to the left. When the left red light is on - the detector
should move to the right - see the table.
When the middle (blue) indicator lights up - the laser line is in the
middle of the receiving window overlapping with the central red
line, you can stop moving the detector and mark the line position
using the central locating slot.
EN
Advertisement
Table of Contents

Summary of Contents for Kapro 894-04
- Page 1 894-04 RED Detector Safety and Warranty USER MANUAL Function - introduction 1. Avoid use in a wet and dusty environment for extended 1. Bright indicator lights on the front and the reverse sides of periods of time. the detector. 2. Keep receiving window clean. Avoid scratches.
- Page 2 894-04 RED Detector Seguridad y garantía Función – Introducción Manual del usuario 1. Evite utilizar el dispositivo en un entorno húmedo y con polvo 1. Luces indicadoras brillantes en el parte frontal y posterior del durante largos periodos de tiempo.
- Page 3 894-04 Detector ROUGE Sécurité et Garantie MODE D'EMPLOI Fonctions - introduction 1. Ne pas utiliser en milieu humide ou poussiéreux sur une 1. Témoins lumineux brillants à l'avant et à l'arrière du détecteur. période prolongée. Témoins lumineux brillants de position de la ligne laser avec 2.
- Page 4 894-04 RED Detector Sicurezza e Garanzia Manuale dell'utente Funzioni - Introduzione 1. Evitare l'uso in ambiente umido e polveroso per lunghi periodi 1. Un spia luminoso si accende sul fronte e retro del rivelatore. di tempo. Un intenso segnale luminoso si accende per indicare la 2.
- Page 5 894-04 RED Detector Segurança e garantia Manual do utilizador Função - introdução 1. Evite o uso em ambientes húmidos e empoeirados durante 1. Luzes indicadoras brilhantes na frente e nas laterais inversas longos períodos de tempo. do detetor. 2. Mantenha a janela recetora limpa. Evite arranhões.
Need help?
Do you have a question about the 894-04 and is the answer not in the manual?
Questions and answers