
Related Manuals for Teac BD150HD

Summary of Contents for Teac BD150HD
- Page 1 Blu-Ray Disc™ Player BD150HD USER MANUAL IMPORTANT ! WARRANTY INFORMATION INSIDE. PLEASE READ www.teac.com.au Trademark of TEAC Corporation JAPAN...
- Page 3 Keep your purchase receipt to enable you to proceed quickly in the event of a Warranty Service. If you require Warranty Service, please contact the TEAC Warranty Service Hotline at 1300 553 315 for assistance. Please ensure that you have the model number, serial number and purchase receipt ready when you call.
- Page 4 The serial number of the product is missing or has been tampered with. No one is authorised to assume any liability on behalf of TEAC or impose any obligation on it, in connection with the sale of any equipment other than as stated in this warranty and outlined above.
-
Page 5: Table Of Contents
Contents Safety and Maintenance......................2 Security Instructions......................2 Blu-ray Display........................4 Remote Control........................4 -Remote Control Batteries....................5 Connections.........................5 Basic Operations.........................6 -Play Video..........................7 -Play a Blu-ray Video Disc....................8 -Play Music..........................9 -Play a Photo slideshow......................9 General Settings....................... 10 -Basic Opelration for the Menu................ -
Page 6: Safety And Maintenance
Safety and Maintenance This symbol indicates “dangerous voltage” inside the product that presents a risk of electric shock or personal injury. This symbol indicates important instructions accompanying product. WARNING: To reduce the risk of fire or electric shock, do not expose this product to rain or moisture. Appliance shall not be exposed to dripping or splashing and no objects filled with liquids, such as vases, shall be placed on the appliance. - Page 7 Trademark Notice DVD Video is a trademark of DVD Format / Logo Licensing Corporation. Blu-ray Disc and Blu-ray Disc logo are trademarks of the Blu-ray Disc Association. Manufactured under license from Dolby Laboratories. Dolby, Dolby Audio and the double-D symbol are trademarks of Dolby Laboratories.
-
Page 8: Blu-Ray Display
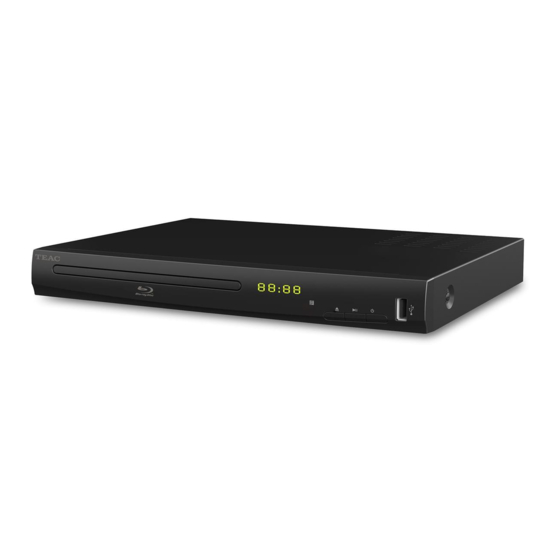
Blu-ray Display 1. Disc Compartment 2. Display panel 3. IR Sensor: Point the remote control at the IR sensor Open or close the disc compartment Start (resume) / pause play. Turn on / Turn off USB Display panel Front Panel Display Description LOAD Loading a disc. -
Page 9: Remote Control Batteries
(25) RETURN: Return to a previous display menu. (26) DOWN: Navigates through the Menus. (27) CLEAR: To clear an entry. (28) GOTO: Jump to a user specified time during playback. (29) A-B: Press A-B can repeat playback of a user defined section. (30) ZOOM: To zoom it or zoom out. -
Page 10: Basic Operations
3 Connect to Digital Amplifier / Receiver 4. Connect Analog Stereo System 5. Connect Network Basic Operations Turn On Press to turn on the Blu-ray disc player. Turn on the TV and switch to the correct video input (refer to the TV user manual) Setup Menu Press SETUP to display the setup menu on the TV screen. -
Page 11: Play Video
3. Press Right button to select OSD and press Right button again to enter the select menu, then you can select the language you want. 4. Press OK to confirm. Play a Disc 1. Press to open the disc compartment. 2. -
Page 12: Play A Blu-Ray Video Disc
Play a Blu-ray Video Disc Blu-ray video discs have larger capacity and support features such as high-definition video, multichannel surround sound, Interactive menus and so on. 1. Insert a BD-video disc. 2. Playback will automatically start, or select a play option in the menu and press OK. 3. -
Page 13: Play Music
Play Music Controlling music playback Use the remote control to control the playback for audio file. Button Action Start or resume play / Pause play. Stop Play Skip to a previous or next title or chapter Search fast-backward or fast-forward. Press repeatedly to change the search speed. -
Page 14: General Settings
3. Navigate to enter a photo folder, then press OK to start slideshow play. -Slideshow begins and continues till the end of the photo folder. -Audio continues to play until the end of the disc. -To stop the slideshow play, Press -To stop the music play, press again. -
Page 15: Display Settings
Security 1. Change Password: Changes the password for parental control menu. 2. Parental Control: to set the parental control. 3. Country Code: Select the Country code. Note: The original code is 0000. The code can be changed by user. Network •... - Page 16 When Playing Disk with BD-Live 1. Test the Network Connection Setup Menu---Network---Connection Test Connect the Ethermet Cable into the LAN interface, then enter into Network and Connection Test Setup Menu Connection Test --- General Setting --- System Internet Connection The network is OK Language Information Playback...
-
Page 17: Specifications
Specifications Playback disc formats BD, BD-R, BD-RE, DVD-R/RW, DVD+R/RW, DVD-Video, VCD, CD, CD-R/RW Video formats H.264/MPEG1/MPEG-2/MPEG4/WMV Photos JPEG, PNG, GIF, Accessories supplied • Remote control and batteries. • User manual • Composite Audio/Video cables Video • Signal system: PAL / NTSC •... -
Page 18: Troubleshooting
Troubleshooting WARNING: Before requesting professional service please check if the solution to your problem is answered in the table below. To avoid risk of shock never remove the casing of the product. To keep the warranty valid, never try to repair the product yourself. •... - Page 20 In the event of a product failure within the warranty period, please call the TEAC Warranty Service Hotline 1300 553 315 Between Monday to Friday - 8.30AM to 5PM AEST *Please have your purchase receipt and the product’s serial number ready For other enquiries and support please visit www.teac.com.au...
Need help?
Do you have a question about the BD150HD and is the answer not in the manual?
Questions and answers