
Related Manuals for rs scan iQube mini E100

Summary of Contents for rs scan iQube mini E100
- Page 1 3D Foot Scanner Model iQube mini E100 Installation and User Guide RS-PRD-00616-001 Page 1...
- Page 2 © 2017 RSscan International NV Information in this guide is subject to change without notice. No part of this document may be reproduced or transmitted in any way without the express written permission of RSscan International NV. Registered trademarks are the property of their respective owners. RS-PRD-00616-001 Page 2...
-
Page 3: Table Of Contents
Software installation ....................13 Connecting the scanner ....................13 Start the software ......................14 Your first measurement ....................14 Software user guide ..................... 14 System specifications model iQube mini E100 ............15 Appendices ........................17 10.1. Troubleshooting ......................17 10.2. -
Page 4: Introduction
Congratulations on your new purchase. The 3D Foot Scanner is intended to obtain foot dimensions for shoe size measurement and selection. This guide will assist you with the installation and usage of the 3D Foot Scanner model iQube mini E100. The installation consists of: ... -
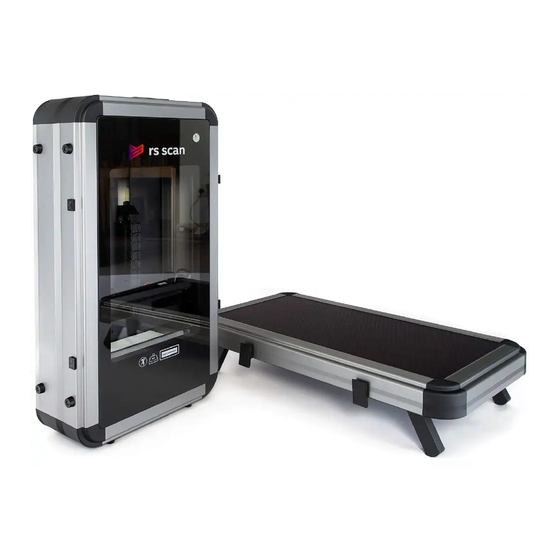
Page 5: Product Description
1.3. Product description The 3D Foot Scanner uses laser triangulation technology combined with 2D color images for a precise 3D representation of the feet. A camera and line laser are used to capture the 3D image and texture. This allows precise and fast scans of feet in normal ambient light conditions. -
Page 6: Product Overview
1.4. Product overview 1.4.1. Model iQube mini E100 The 3D Foot Scanner model iQube mini E100 package includes: iQube 3D Foot Scanner. USB cable A-B 1.8m (71 Inches). Do not use any other USB cable! Power cord with a C13 plug, the other side will be country specific. - Page 7 Black latex gloves. In case you need to support the feet of the client during the scan, the gloves can be worn so your hands won’t be in the scan. Note: should not be worn by persons sensitive to latex. ...
-
Page 8: General Information
2. General information 2.1. Symbols The following symbols may appear on the product, packaging or documentation: Caution, read these instructions carefully. If used on the product label: Caution, consult accompanying documentation. Regulatory Mark for the European Directive 2002/96/EC on Waste Electrical and Electronic Equipment (WEEE). -
Page 9: System Requirements
2.2. System requirements Refer to the Installation Guide and User Manual for the footscan 9 software. 2.3. General safety information This section contains instructions regarding safety. Please read carefully. Prior to a measurement session, instruct the client how to stand on the 3D Foot Scanner. The client should only step or stand on the designated scan area. -
Page 10: Care Of The 3D Foot Scanner
2.5. Care of the 3D Foot Scanner To ensure client safety, clean and, if applicable, disinfect the glass plate between uses. The glass plate and other surfaces can be cleaned and disinfected with a suitable disinfectant or a mild detergent (for example Dettol, Washing up liquid), or the supplied wipes. -
Page 11: European Union (Eu) Customer Information
The warranty includes: The cost of all parts and labor in the repair or replacement of the Product, following mechanical or electrical breakdown, which are shown to the satisfaction of RSscan international to be defective due to faulty materials or workmanship. The warranty excludes: ... -
Page 12: Unpacking And Installation
3. Unpacking and installation Place the scanner at the point of use. Place the scanner level on a solid flat surface. Do not place under direct lighting or sunlight. For measurements in (semi)unloaded position or with clients in a seated position, the scanner can be mounted on a video camera tripod or Vesa mount fixed to a wall or other solid object. -
Page 13: Software Installation
4. Software installation Caution: Do not connect the 3D Foot Scanner to the USB port of the PC until the software is installed. Refer to the Installation Guide and User Manual for the installation of footscan 9 software. 5. Connecting the scanner Once the software has been successfully installed, you are ready to connect the 3D Foot Scanner. -
Page 14: Start The Software
When the hardware setup is completed, switch on the 3D Foot Scanner by switching the power switch to the ON position (Marked I). A self-test will be performed, after that the 3D Foot Scanner is ready for use. 6. Start the software Refer to the Installation Guide and User Manual for the footscan 9 software. -
Page 15: System Specifications Model Iqube Mini E100
9. System specifications model iQube mini E100 Dimensions (L x W x H): 545 x 294 x 87 mm (21.45 x 11.57 x 3.43 Inches) Weight: 6 Kg (13.22 lbs.) Scanning area (L x W x H): 348 x 180 x 80 mm ±5 mm (13.70 x 7.08 x 3.15 Inches ±0.197... - Page 16 100 V – 240 V AC 50-60 Hz Supply voltage: Power consumption: 7 W non scanning 13.5 W scanning connect to the AC mains Mains connection: mains fuse, replace with same rating (1.25A) Fuse: to switch the 3D Foot Scanner on or off, lights red when power is on and Power switch: mains connected connect the USB-B end of the USB cable, connect the USB-A end of the...
-
Page 17: Appendices
10. Appendices 10.1. Troubleshooting The power switch light does not light up Check if the power switch is in the ‘on’ position (marked I). Check if the power cord is plugged in to the AC outlet. Check the fuse. The PC does not recognize the scanner ...
Need help?
Do you have a question about the iQube mini E100 and is the answer not in the manual?
Questions and answers