Advertisement
Table of Contents
PPTEMPKIT
DUAL-ZONE DIGITAL
THERMOMETER
WITH WIRELESS REMOTE TEMPERATURE SENSOR
-4°F to 158°F
(-20°C to 70°C)
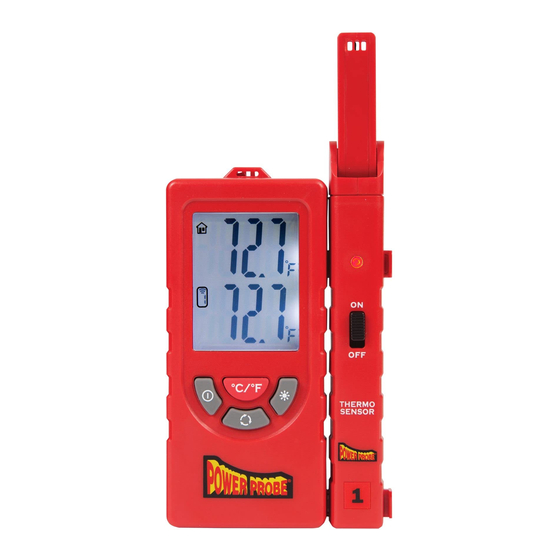
Base Unit
Temperature
Sensor
Base Unit
Temperature
Temp Sensor
Connected
Remote Unit
Temperature
°C/°F Select
Base Unit
ON/OFF
Remote
Select
Base Unit
-
Temperature Sensor &
2ch Wireless Receiver
INTRODUCTION
o Thank you for purchasing the Power Probe
PPTEMPKIT Dual Zone Thermometer with
Wireless Remote Temperature Sensor.
o Please read through this manual in it's entirety to
fully enjoy the benefits and features of this product.
o Please keep this manual for future reference.
o The PPTEMPKIT has a built in temp sensor in the
Base Unit, plus a 2
nd
transmits the Remote Unit temperature reading
back to the Base Unit.
o The Remote temp sensor can transmit temperature
readings up to 60m (195ft.) away from Base Unit.
o Monitor temperature differences – Ambient vs. AC
outlet, Inside vs. Outside Temps, and more.
o Use moveable clip to attach Remote to air vents or
grilles to monitor outlet temps.
Remote Unit
Temperature
Sensor
Movable
Vent Clip
Remote Temp Unit
Detachable Remote
Temperature Sensor &
Wireless Transmitter
Remote Unit
ON/OFF/BATT
Indicator
Remote Unit
ON/OFF Switch
Backlight
ON/OFF
Remote Unit temp sensor that
www.powerprobe.com
1-800-655-3585 info@powerprobe.com
Power Probe TeK, LLC. 890 Mariner St. Brea, CA 92821
FEATURES
o Dual Zone Readings
o Wireless Remote Sensor
o Opt. 2
Remote Sensor
nd
SPECIFICATIONS
o Operating Environment:
o Measuring Range:
o Accuracy:
o Wireless Range:
o Resolution:
o Battery Type:
-
o Battery Life:
OPERATION
Remove battery cover from rear of Base Unit.
1.
Install two (2) AA batteries into battery cavity and
2.
replace battery cover.
Press Base Unit Power button for one sec. to turn
3.
ON/OFF.
LCD display will show current temperature of Base
4.
Unit Temp Sensor above the display.
Remove battery cover from rear of Remote Unit
5.
Install two (2) AAA batteries into battery cavity and
6.
replace battery cover.
Slide Remote Unit Power switch to the ON
7.
position. Indicator Light should flash.
When paired, Remote Unit temperature will
8.
display on Base Unit second line.
Press Backlight button to turn LCD backlight
9.
ON/OFF.
Press °C/°F button to change the Base Unit
10.
display reading from Fahrenheit to Celsius.
Press the Cycle/Select button to select optional
11.
second Remote Unit.
WARRANTY
Power Probe Warranty
o
Power Probe products undergo a strict quality control inspection for workmanship,
function, and safety before leaving the factory. From the date of purchase, we will
warranty/repair Power Probe products for one (1) year against defects in parts and
workmanship. All repairs due to misuse will be charged a fee not to exceed the cost
of the tool. All warranty units must be accompanied by a copy of the original sales
receipt. In the event of a malfunction or defective unit, please call or email your
Power Probe dealer.
o Bright Backlit LCD
o °F and °C - Selectable
-4°F to 158°F
(-20°C to 70°C)
-4°F to 158°F
(-20°C to 70°C)
±2.0°F (±2.0°C)
60m (195ft.) max.
0.1°
2 x AA and 2 x AAA
400 hours
Advertisement
Table of Contents

Subscribe to Our Youtube Channel
Related Manuals for Power Probe PPTEMPKIT

Summary of Contents for Power Probe PPTEMPKIT
- Page 1 Inside vs. Outside Temps, and more. function, and safety before leaving the factory. From the date of purchase, we will warranty/repair Power Probe products for one (1) year against defects in parts and o Use moveable clip to attach Remote to air vents or workmanship.
- Page 2 Inside vs. Outside Temps, and more. function, and safety before leaving the factory. From the date of purchase, we will warranty/repair Power Probe products for one (1) year against defects in parts and o Use moveable clip to attach Remote to air vents or workmanship.
Need help?
Do you have a question about the PPTEMPKIT and is the answer not in the manual?
Questions and answers