
Summary of Contents for Sure Heat Manufacturing Altima AGR38PF
- Page 1 Altima Sure Heat Manufacturing 800-229-5647 Professional Stainless Steel Grill: 30”, 38”, 48” Models AGR38PF (shown with optional equipment USE AND CARE MANUAL FOR OUTDOOR USE ONLY MADE IN THE USA...
- Page 2 (lump charcoal or gas). Our best feature is our lifetime warranty. Sure Heat Manufacturing is very committed to customer satisfaction and excellence. Our ulti- mate goal is for our customers to enjoy our products for a lifetime.
-
Page 3: Table Of Contents
TABLE OF CONTENTS GENERAL SAFETY INSTRUCTIONS..............2 GRILL FEATURES....................3-4 INSTALLATION / ASSEMBLY................5-7 BUILT-IN INSTALLATION..................8-10 GAS REQUIREMENTS....................11-12 LEAK TESTING......................13 USING THE GRILL....................14-19 Lighting the Grill.....................14-17 Rotisserie burner....................18-19 ROUTINE CLEANING.....................20 BURNER REMOVAL AND CLEANING............... 21 TROUBLE SHOOTING................... 22-23 WARRANTY.......................24 Please retain this manual for future reference... -
Page 4: General Safety Instructions
GENERAL SAFETY INSTRUCTIONS IMPORTANT SAFETY INFORMATION - Read this manual carefully before using your grill to reduce the risk of fire, burn hazard or other injury. - Extreme care should be used because of the high temperatures produced by this appliance. CHILDREN SHOULD NOT BE LEFT UNATTENDED IN AN AREA WHERE THE GRILL IS BEING OPERATED. - Page 5 GRILL LINE-UP AGR48PF AGR38PF AGR30PF Grills shown with optional accessories...
-
Page 6: Grill Features
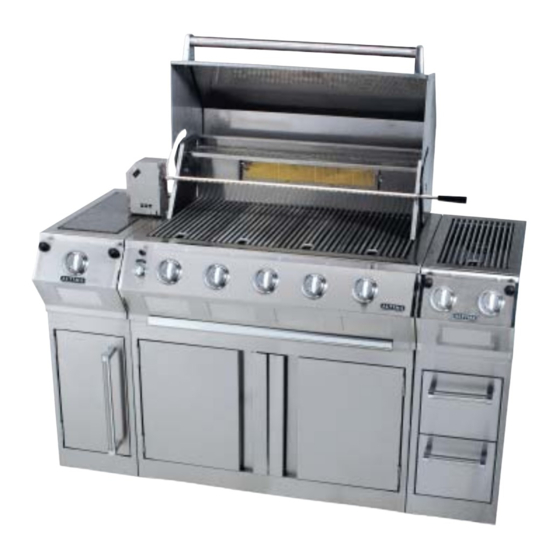
GRILL FEATURES: AGR38PF Roll top grill hood Handle Rotisserie motor assembly Warming shelf Grilling/Cooking surface Infrared back burner Steamer/fryer (optional) Side burner (optional) Electronic ignitor: steamer/fryer Electronic ignitors: main, rear & bottom infrared burners Control knob: steamer/fryer Electronic ignitor: side burner Control knob: back infra-red burner Control knobs: side burner Control knobs: main burners... -
Page 7: Installation / Assembly
INSTALLATION / ASSEMBLY Attaching Grill Head to Cart With the grill on its back, loosen all 4 bolts on the bottom side of the grill, but do not remove. (See Fig. 1) Have someone help you pick up the grill Fig. - Page 8 INSTALLATION / ASSEMBLY Ignitor Attachment Remove the ignitor cap, spring assembly, bat- tery and lock nut from ignitor. (See Fig. 4) Fig. 4 Insert the threaded section of the ignitor into the U-shaped cut out of the ignitor mounting bracket. (See Fig. 5) Insert the threaded section of the ignitor through the hole in the shelf and secure to shelf using the lock nut.
- Page 9 INSTALLATION / ASSEMBLY AGR38PF Ignitor Assembly Left Shelf (Double Wire) Right Shelf (Single Wire) AGR48PF Ignitor Assembly Left Shelf (Double Wire) Right Shelf (Double Wire) Side Shelves Attachment Loosen the bolts on the side of the grill and attach the shelves by allowing the bolt heads Fig.
-
Page 10: Built-In Installation
BUILT-IN INSTALLATION The Altima grill can be installed as a built-in unit as shown. The island that holds the built-in unit must be constructed of Non-combustible material. General Information Review the detail drawings shown and take into account the provisions shown for gas line hook-up clearance on the right side. - Page 11 BUILT-IN INSTALLATION Side cutouts are needed on each side to feed ignitor wires to the ignitor plates and allow access to side gas connections. (Size: 10”high x 5 long, set 1” back from front edge) 29” Min. *Gas Cutout 35.5” 2”...
- Page 12 SIDEBURNER or STEAMER/FRYER BUILT-IN INSTALLATION Use this drawing if installing the sideburner or steamer/fryer separate from the grill ASB2 *ASB2 12.5” 12.5” Cutout 24” 24” 2” 11.125” 11.125” *Gas connection cut out needs to be 3” wide x 3” long, set 2” back from front edge.
-
Page 13: Gas Requirements
GAS REQUIREMENTS General Information Verify the type of gas supply to be used, either Natural Gas (NG) or Liquid Propane (L.P)., and make sure the marking plate (located on the back of the unit) agrees with that of the supply. Note: Never attach an unregulated gas line to the appliance. - Page 14 GAS REQUIREMENTS L.P. Gas Installation Altima Gas Grills that are set to operate with L.P. gas come with a high capacity hose and regulator assembly. This assembly is designed to connect directly to a standard 20 lb. L.P. cylinder for the 30” model, or a 30 lb. cylinder for the 38”...
-
Page 15: Leak Testing
LEAK TESTING General Information Although all gas connections on the grill are leaked tested at the factory prior to shipment, a complete gas tightness check must be performed at the installation site due to possible mishandling in shipment, or exces- sive pressure unknowingly being applied to the unit. -
Page 16: Using The Grill
USING THE GRILL Grill Location Do not use the grill in garages, breezeway, sheds or any enclosed area. Never operate the grill in enclosed areas as this could lead to a carbon monoxide buildup, which could result in injury or death. Place the grill on a level surface. -
Page 17: Lighting The Grill
LIGHTING THE GRILL Before Lighting Do not attempt to “Light” Warning: Important! Before Lighting... the grill if the odor of gas is present!! Check the gas supply line for cuts, wear or abrasion. If the unit is L.P., screw the regulator into the tank and leak check the hose and regulator connections with a soap and water mixture before operating the grill. - Page 18 LIGHTING THE GRILL AGR38PF Grill Burner Lighting Back Knob Knob Knob Knob Knob This unit comes equipped with (2) electronic starters Infrared and (3) electrodes. The electronic starter located on the right shelf lights the Bottom Infrared Burner which is controlled by Knob #1. The electronic Left electric starter starter on the left shelf lights the 4 Main Burners, Right electric starter...
- Page 19 LIGHTING THE GRILL AGR48PF Grill Burner Lighting Back Knob Knob Knob Knob Knob Knob This unit comes equipped with (2) electronic starters Infrared and (4) electrodes. The electronic starter located on the right shelf lights the Bottom Infrared Burner which is controlled by Knob #1 and the Right Main Right electric starter Left electric starter Burners, which are controlled by Knobs 2 &...
-
Page 20: Rotisserie Burner
USING THE ROTISSERIE BURNER The grill rotisserie system is designed to cook items from the back using infrared heat. The rotisserie burner is an infrared type which provides intense searing radiant heat. Preferred by chefs over other cooking methods, this intense heat is magnificent for searing in the natural juices and nutrients found in quality cuts of meats. Once lit, the rotisserie burner will reach cooking temperatures in 1 minute. - Page 21 USING THE ROTISSERIE BURNER Rotisserie Lighting Open the lid. Push and turn the control knob a 1/4 turn to the left, then push in the safety knob located directly above the Infrared control knob. While hold- ing in the safety knob, press and hold the electronic ignitor button.
-
Page 22: Routine Cleaning
CARE and MAINTENANCE Drip Tray The drip tray located at the bottom of the grill should be cleaned periodically to prevent heavy buildup of debris. The drip tray can be lined with aluminum foil for easier cleaning. Note: Allow the drip tray to cool before attempting to clean. Cooking Grates The cooking grates can be cleaned immediately after cooking is completed and after turning off the flame. -
Page 23: Burner Removal And Cleaning
Burner Removal and Cleaning Burner Removal Before removing ensure that the gas supply is off and the knobs are in the “Off ” position. Make sure the grill is cool. Remove the cooking grates, then lift out the flavor Fig. 20 grid. -
Page 24: Troubleshooting
TROUBLESHOOTING Spider and Insect Warning Spider and insects can nest in the burners of this or any other grill, and cause the gas to flow from the front of the burner. This is very dangerous condition which can cause a fire to occur behind the valve panel, thereby damaging the grill and making it unsafe to operate. - Page 25 TROUBLESHOOTING Problem Solution Is there a spark at the ignitor? Infrared back burner won’t light. Does the infrared back burner light when attempting to match light? Burner flame is yellow or orange, in conjunction with Check the burner inlet for obstructions. the odor of gas.
-
Page 26: Warranty
Troubleshooting section and ensure that the appliance is installed correctly. If the problem persists and you feel you require service, contact your dealer for the nearest authorized agency to per- form service. Only authorized agencies can perform warranty service. Sure Heat Manufacturing will not pay for service calls to: Correct the installation.
Need help?
Do you have a question about the Altima AGR38PF and is the answer not in the manual?
Questions and answers