Table of Contents
Advertisement
Quick Links
Advertisement
Table of Contents

Related Manuals for Texlabel SPB

Summary of Contents for Texlabel SPB
- Page 1 User Guide V. 20.0316 www.texlabel.eu info@texlabel.eu +39 0444 287002...
-
Page 2: Table Of Contents
MAINTENANCE ........................... 21 CLEAR ERROR MESSAGES ........................22 PARAMETERS FOR WHITE AND COLORED STICKERS ................. 24 PARAMETERS FOR TRANSPARENT STICKERS ..................26 PARAMETERS FOR COMPOSITION LABELS..................28 PRINCIPAL REQUIREMENTS FOR INTERNATIONAL CARE LABELS ............33 www.texlabel.eu info@texlabel.eu +39 0444 287002... -
Page 3: Overview
USB Cable AC Adapter Power Adapter Printer View: 1. Cover 2. Ribbon regulator tabs 3. Ribbon supply wheel 4. Foil supply wheel 5. Foil rewind wheel 6. Print mechanism 7. Touchscreen Display www.texlabel.eu info@texlabel.eu +39 0444 287002... - Page 4 16. Pressure wheel pin lock 17. Anti-static brush 18. ON/OFF Switch 19. AC Power Port 20. Slot for SD Memory Card 21. USB Port 22. Usb 2.0 port pc connection 23. Ethernet 10/100 base-t 24. Serial interface RS-232C www.texlabel.eu info@texlabel.eu +39 0444 287002...
-
Page 5: Installing Printer
1. Option 1. a. Connect to the following link for instructions on how to download the Windows driver for the printer www.texlabel.eu/wp/download-it 2. Option 2. a. Turn on printer and wait for the writing “Ready” to appear on the display b. -
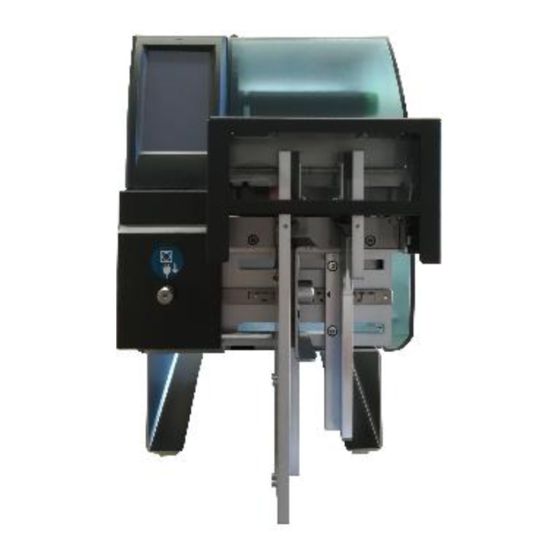
Page 6: Installing Cutter / Stacker (Optional)
1) Fastening plate bolts 2) Lateral guards screws 3) Stacker plate 4) Lateral guards Place the stacker plate onto the cutter stacker track, inserting the fastening plate bolts into the assigned holes. Fasten and secure the plate. www.texlabel.eu info@texlabel.eu +39 0444 287002... - Page 7 The lateral guards are both different from one another, one is for the left side and one is for the right side. Be careful in positioning the guards. In case of difficulty with these processes, contact TEXLABEL technical support. Once the lateral guards and stacker is installed, the cutter will look as so: ...
- Page 8 By loosening (using the allen key for regulating) the 4 screws indicated in the picture below, allows to slide the lateral guards of the stacker to increase or decrease the width needed. To lock the width at a determined width, use the measurement ruler placed between the bolts as a guide. www.texlabel.eu info@texlabel.eu +39 0444 287002...
-
Page 9: Loading Ribbons And Foils
4) keep the ribbon (2) in place. Rotate the regulator tab ring (5) clockwise, so the arrow (6) is aligned with the lock symbol. By doing so, the regulator tab will fasten onto the ribbon supply holder. www.texlabel.eu info@texlabel.eu +39 0444 287002... - Page 10 If the guides are too tight, a “belly” will form on the ribbon that will cause a bad quality of print and will probably jam the printer. If the guides are too wide, the ribbon will move during the printing process. www.texlabel.eu info@texlabel.eu +39 0444 287002...
- Page 11 Attach the foil film extremity to the center of the empty cylinder core, using a sticker (usually found on the foil seal). Once the foil is attached to the foil rewind wheel, rotate the rewind wheel until reaching the beginning of the ink strip and maintain the foil in tension. www.texlabel.eu info@texlabel.eu +39 0444 287002...
-
Page 12: Loading Labels On Continuous Module
6. Rotate the regulator ring (4) clockwise, so that the white arrow is aligned with the lock symbol. By doing so, the regulator tab will fasten onto the ribbon supply holder (3). 7. Pass the labels through the printhead. 8. Regulate the photoelectric barrier of the labels. www.texlabel.eu info@texlabel.eu +39 0444 287002... -
Page 13: How To Use Cablabel S3 Lite Software
HOW TO USE Cablabel S3 Lite SOFTWARE Click on the tab “devices” In the list of devices, select the printer “SQUIX 4/300MT”, click on “Install selected device”, and then click on the “OK” button. www.texlabel.eu info@texlabel.eu +39 0444 287002... - Page 14 In “label layout”, set the size of the label In “spacing”, set the value in mm of the space between one label and another Click the button “Next” to confirm and proceed to the creation of the label www.texlabel.eu info@texlabel.eu +39 0444 287002...
- Page 15 To use a tool, simply click on it and then click on the center of the label. The tool “Text” is used to insert a text box onto the label By clicking on the blank label, after selecting the “Text” tool, the following window will open: www.texlabel.eu info@texlabel.eu +39 0444 287002...
- Page 16 From this window, it is possible to insert the text and format it using the “Font properties” Click on the “OK” button to confirm The tool “Barcode” is used for inserting barcodes www.texlabel.eu info@texlabel.eu +39 0444 287002...
- Page 17 After selecting the tool “Barcode”, click onto the center of the label, and the following window will open: From this window, it is possible to set the size of the barcode, size of numbers, style, and type of code (EAN13, UPC, CODE39, etc.) www.texlabel.eu info@texlabel.eu +39 0444 287002...
- Page 18 In the print phase, there is an area for regulating the image quality of color or greyscale images. The following highlighted tools are used to insert lines, rows, squares, rectangles, circles and ellipses. www.texlabel.eu info@texlabel.eu +39 0444 287002...
- Page 19 YOU MUST INSERT A TEXT BOX SELECTING THE TYPE OF FONT, E.G.: THIS REFERS TO THE "CHARACTER MAP TEXLABEL – ISO" FOR THE FOLLOWING TABLE (EVERY SYMBOL CORRESPONDES TO A CHARACTER). TEXLABEL - ISO TEXLABEL fonts can also be purchased at a later time by contacting TEXLABEL. www.texlabel.eu info@texlabel.eu...
- Page 20 Separately purchased TEXLABEL fonts: TEXLABEL - ISO TEXLABEL – KR TEXLABEL – ASTM www.texlabel.eu info@texlabel.eu +39 0444 287002...
-
Page 21: Maintenance
4. Let the printhead dry for 2 – 3 minutes • PLATEN Rotate the platens (shown in the figure) and clean them with a cloth that does not release impurities, dampened with alcohol, until the complete removal of the dirt accumulated. www.texlabel.eu info@texlabel.eu +39 0444 287002... -
Page 22: Clear Error Messages
“The printer is receiving data” (See symbol table below), press the “Feed” button to start printing. CUTTER BLOCKED: Press the “Cancel” button, switch printer off, remove any material in case it got jammed, and switch printer back on. If any of these problems persist, contact TEXLABEL technical support. www.texlabel.eu info@texlabel.eu +39 0444 287002... - Page 23 SYMBOLS Depending on the printer configuration, in the row state of the display, the following symbols may appear. These symbols allow to rapidly check the printer state. www.texlabel.eu info@texlabel.eu +39 0444 287002...
-
Page 24: Parameters For White And Colored Stickers
“New” and enter the size of the format you want to create. Set the print orientation by selecting Portrait. By selecting the "Graphics" tab you can set the dithering. For sticker labels select "None". www.texlabel.eu info@texlabel.eu +39 0444 287002... - Page 25 AFTER PRINTING NONE / CUT / TEAR OFF). After printing, if the label does not align exactly at the tear point, you can adjust the parameter by adding or removing (”-“ minus sign) 1mm or more millimeters. www.texlabel.eu info@texlabel.eu +39 0444 287002...
-
Page 26: Parameters For Transparent Stickers
PARAMETERS FOR TRANSPARENT STICKERS For transparent stickers, the parameters set in "Page Setup" and "Graphics" are the same as white or colored stickers. In the "Stock" tab settings, set the parameters to the settings as shown below. www.texlabel.eu info@texlabel.eu +39 0444 287002... - Page 27 WARINING: We do not recommend using the default "Use Printer Current Setting" parameters, but always indicate METHOD: THERMAL TRANSFER, CONTINUOUS TYPE / LABEL WITH SPACE / LABEL WITH SIGNALS, ACTION AFTER PRINTING NONE / CUT / TEAR OFF. www.texlabel.eu info@texlabel.eu +39 0444 287002...
-
Page 28: Parameters For Composition Labels
WARINING: We do not recommend using the default "Use Printer Current Setting" parameters, but always indicate METHOD: THERMAL TRANSFER (CONTINUOUS TYPE / LABEL WITH SPACE / LABEL WITH SIGNALS, ACTION AFTER PRINTING NONE / CUT / TEAR OFF). www.texlabel.eu info@texlabel.eu +39 0444 287002... - Page 29 We also recommend setting the “Orientation” parameter to “Portrait 180°” so that the label is pulled out of the printer with the unprinted part. For care labels it is advisable to set Dithering to "Error Diffusion". www.texlabel.eu info@texlabel.eu +39 0444 287002...
- Page 30 In the "Stock" tab, set "Thermal transfer" as the printing method and "Type" set to "Continuous", and select "None" for the "Post-Print Action" drop down menu. If the cutter is installed on the printer, set the parameters in the "stock" tab as follows: www.texlabel.eu info@texlabel.eu +39 0444 287002...
- Page 31 The higher the intensity, the more marked the printing is. All materials are available at TEXLABEL. From wax, wax/resin to resin. Ribbons with a wide range of sizes and colors according to your needs, ready for delivery and without minimum order.
- Page 32 An example of a quality print: RIBBON: NNS As a guideline, nylon (polyamide) is printed at low temperatures (0 - 5), while satin and polyester requires higher temperatures (7 - 13). The SPB printer is compatible with the software TEXLABEL and DUEMILA MODA www.texlabel.eu info@texlabel.eu...
-
Page 33: Principal Requirements For International Care Labels
PRINCIPAL REQUIREMENTS FOR INTERNATIONAL CARE LABELS For any further information or assistance, please contact the support service of TEXLABEL www.texlabel.eu info@texlabel.eu www.texlabel.eu info@texlabel.eu +39 0444 287002...
Need help?
Do you have a question about the SPB and is the answer not in the manual?
Questions and answers