Table of Contents
Advertisement
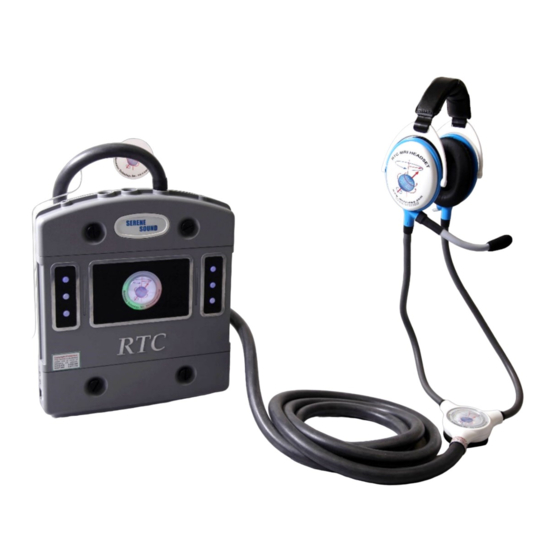
Quick Links
Advertisement
Table of Contents

Related Manuals for Resonance Technology Serene Sound

Summary of Contents for Resonance Technology Serene Sound
- Page 1 Installation / Operation Manual S e r e n e S o u n d A u d i o S y s t e m Resonance Technology, Inc. 18121 Parthenia Street Northridge, California 91325, USA +1 (818) 882-1997 +1 (800) 428-MRTV www.mrivideo.com...
- Page 2 Notice: This document contains proprietary information protected by copyright. All rights reserved. Rx only. Caution: federal law restricts this device to sale by or on the order of a physician. No part of the document may be photocopied or reproduced without the prior written consent of Resonance Technology, Inc.
-
Page 3: Table Of Contents
5.6. Phillips Auto Voice Connection ....................13 5.7. Control Room Setup ........................14 6. Operation ................... 15 6.1. Serene Sound Controller ......................15 6.2. Touch Screen Tablet ........................16 6.3. Technologist Remote Control ....................16 6.4. Patient Setup ..........................18 6.5. -
Page 5: Introduction
MRI scans. This installation/operation manual outlines how to properly install and operate the system. Thank you for choosing to purchase this system from Resonance Technology, Inc., the leader in fMRI and MRI patient comfort systems. -
Page 6: Safety Information
Safety Information 2. Safety Information At Resonance Technology, Inc., patient safety is our top priority. Please review this section completely as its contents are vital to the safety of the installer, the clinician/operator, and the patient. 2.1. Important Warnings for Patient and Operator Safety WARNING Prior to every use, inspect all system components that come in contact with the patient. -
Page 7: General Warnings For Electronic Products
MRI suite. Resonance Technology, Inc. will not be held liable for any injuries or property damage which may occur as the result of improper use or installation of this product. By agreeing to this notice, users certify that they are familiar with basic safety procedures in an MRI room environment and that they have read and understand these safety precautions. -
Page 8: Installation Materials
Installation Materials 3. Installation Materials Your Serene Sound system comes complete with all the necessary components to complete the system installation at your facility. The following checklist is provided for materials verification purposes: Main System Components Installation MR Safe Part Number... - Page 9 RTC-650-069-1521-X01 Earbud Ear tips and Foam Magnet room 5-pin Round Female to 5-pin Round Female Cable RTC-101-239-001-001 (12M/39ft) Control Room Custom Headrest for 8-channel head coil RTC-651-000-453-000 Page 5 Resonance Technology, Inc. CinemaVision System Installation / Operation Manual: RTC-CVSS Rev...
-
Page 10: Room Layout Overview For Installation
WARNING: Absolutely no ferromagnetic tools should be brought inside the MRI Suite! Below is the standard setup for the Serene Sound system. Your individual installation may vary, but will generally be distributed in three areas: 1) Control Room, 2) Computer/Equipment Room and 3) Magnet Room. -
Page 11: Block Diagram
Usually ran thru the ceiling. -Diagram for demonstration purposes only- Optimal position is Pen Panel Cabinet Tablet Control Room Speakers Tech Remote Control Patient Headset Serene Sound Transducer Serene Sound Controller Fiber Optic cable Transducer MR Penetration Power Supply Panel Page 7 Resonance Technology, Inc. -
Page 12: Installing The Mr Laser Link Cable And Transducer Power Supply Cables
Avoid running the power cable close and/or in parallel with the high-energy RF cables for the magnet, as the RF energy may interfere with reliable operation of the system. Page 8 Resonance Technology, Inc. CinemaVision System Installation / Operation Manual: RTC-CVSS Rev... -
Page 13: Magnet Room Component Interconnection
Installation Procedure Magnet Room Component Interconnection 5.1. Place the Serene Sound Transducer in a secure area away from traffic as illustrated below. Install 5.1.1. the audio headset firmly into the Transducer using the bracket provided. Be sure to connect the headset and fiber before powering on the unit. - Page 14 WARNING: Avoid creating loops in the cable as it may cause MRI image noise. Also, make sure to route the cable away from walkways inside the magnet room. Page 10 Resonance Technology, Inc. CinemaVision System Installation / Operation Manual: RTC-CVSS Rev...
-
Page 15: Control Room Component Interconnection
Apply power to the Controller first and then turn on the Transducer Power Supply. Wait until the system is fully synchronized (logo lights rotating on the Transducer inside the Magnet Room). Page 11 Resonance Technology, Inc. CinemaVision System Installation / Operation Manual: RTC-CVSS Rev... -
Page 16: Ge Auto Voice Installation
5.3.1. The GE Auto Voice has an interface box to interface the Serene Sound Controller to the MRI signal. Remove the cable from GE OSG J7 and connect to the Interface box “J7-In”. And connect a cable from “J7-Out” back to the GE OSG J7 location. -
Page 17: Canon Auto Voice Connection
Interface box where the X-16 was removed from the Interface box to X16 using a short 9pin Female-Male Cable. Using a DB9 M-F Cable connect Phillips Auto Voice Interface Box “OUTPUT” to X16 Page 13 Resonance Technology, Inc. CinemaVision System Installation / Operation Manual: RTC-CVSS Rev... -
Page 18: Control Room Setup
Below is an illustration how to connect the control room components: (Typical Control Room Setup) Page 14 Resonance Technology, Inc. CinemaVision System Installation / Operation Manual: RTC-CVSS Rev... -
Page 19: Operation
Operation Serene Sound Controller 6.1. Bluetooth Audio connection Serene Sound Controller Bluetooth audio connection to connect to any Bluetooth audio source device like a tablet, cell phone, iPad or some of the newer laptop/desktop computers. Step/Description Photo (example) On the Bluetooth audio source device, go to the appropriate menu section for Bluetooth and Turn on the Bluetooth. -
Page 20: Touch Screen Tablet
Tech remote control to adjust patient headset and AV Console (Controller) operator volume settings. It is possible that the Serene Sound Controller can lose sync/pairing with the Bluetooth device when the unit goes to sleep. Touch Screen Tablet 6.2. - Page 21 Release the TALK button and wait for the system to re-synchronize. Both the CinemaVision Controller and Transducer front panel logo lights should have color lights rotating once synchronized. Page 17 Resonance Technology, Inc. CinemaVision System Installation / Operation Manual: RTC-CVSS Rev...
-
Page 22: Patient Setup
Your patient is now ready for your scan procedure. Warning: Although all of the audio signals present in the Serene Sound system have absolutely no high- voltages that might harm the patient, Resonance Technology, Inc. recommends to never touch the patient when handling any powered component of the Serene Sound system including the Transducer. - Page 23 Step 1: With clean hands, slowly roll plug into a thin, crease-free cylinder. Step 2: While compressed, insert plug onto Earbud Headset by inserting the plastic tube from the ear tip into the housing of the Earbud headset. Page 19 Resonance Technology, Inc. CinemaVision System Installation / Operation Manual: RTC-CVSS Rev...
-
Page 24: Cleaning
After cleaning, let dry until further use. Daily cleaning of these items is recommended. Visual Inspection is recommended before each use and after some wear and tear on heavily used items like the headset ear cushions, Resonance Technology, Inc. recommends order replacements to keep the devices safe for use on each patient. - Page 25 Operation Page 21 Resonance Technology, Inc. CinemaVision System Installation / Operation Manual: RTC-CVSS Rev...
-
Page 26: Troubleshooting
Power Reset Switch Resonance Technology Inc offers a Remote Power Switch to enable the user to turn the power to the power supply ON/OFF. This device can be used on the Controller or Transducer Power Supply. One remote can be programmed to control two or more Wall Power Switch devices. -
Page 27: Support Information
Power Reset Switch Resonance Technology Inc offers a Remote Power Switch to enable the user to turn the power to the power supply ON/OFF. This device can be used on the Controller or Transducer Power Supply. One remote can be programmed to control two or more Wall Power Switch devices. - Page 28 Error! Reference source not found. Resonance Technology, Inc. Product Recycling Program: Resonance Technology Inc. actively supports the protection of the environment by efficiently recycling all our electronic products. Our everyday pollution prevention activities reduce the need for electronic waste to go into landfills.
- Page 29 Notes Page 25 Resonance Technology, Inc. CinemaVision System Installation / Operation Manual: RTC-CVSS Rev...
Need help?
Do you have a question about the Serene Sound and is the answer not in the manual?
Questions and answers