Table of Contents
Advertisement
Quick Links
Advertisement
Table of Contents

Summary of Contents for Data Video AD-10
- Page 1 AUDIO DELAY BOX AD-10...
-
Page 2: Table Of Contents
Table of Contents TABLE OF CONTENTS ....................2 FCC COMPLIANCE STATEMENT .................. 4 WARNINGS AND PRECAUTIONS ................4 WARRANTY ....................... 5 ..................... 5 TANDARD ARRANTY ....................6 HREE ARRANTY DISPOSAL ........................7 1. PRODUCT OVERVIEW .................... 8 1.1 F ........................ 8 EATURES FRONT PANEL .................... - Page 3 Disclaimer of Product and Services The information offered in this instruction manual is intended as a guide only. At all times, Datavideo Technologies will try to give correct, complete and suitable information. However, Datavideo Technologies cannot exclude that some information in this manual, from time to time, may not be correct or may be incomplete.
-
Page 4: Fcc Compliance Statement
FCC Compliance Statement This device complies with part 15 of the FCC rules. Operation is subject to the following two conditions: 1. This device may not cause harmful interference, and 2. This device must accept any interference received, including interference that may cause undesired operation. -
Page 5: Warranty
10. Make sure that the total amperes of all the units that are plugged into a single wall outlet do not exceed 15 amperes. 11. Never push objects of any kind into this unit through the cabinet ventilation slots, as they may touch dangerous voltage points or short out parts that could result in risk of fire or electric shock. -
Page 6: Three Year Warranty
All non-Datavideo manufactured products (product without Datavideo logo) have only one year warranty from the date of purchase. Damage caused by accident, misuse, unauthorized repairs, sand, grit or water is not covered under warranty. Viruses and malware infections on the computer systems are not covered under warranty. -
Page 7: Disposal
Disposal For EU Customers only - WEEE Marking This symbol on the product or on its packaging indicates that this product must not be disposed of with your other household waste. Instead, it is your responsibility to dispose of your waste equipment by handing it over to a designated collection point for the recycling of waste electrical and electronic equipment. -
Page 8: Product Overview
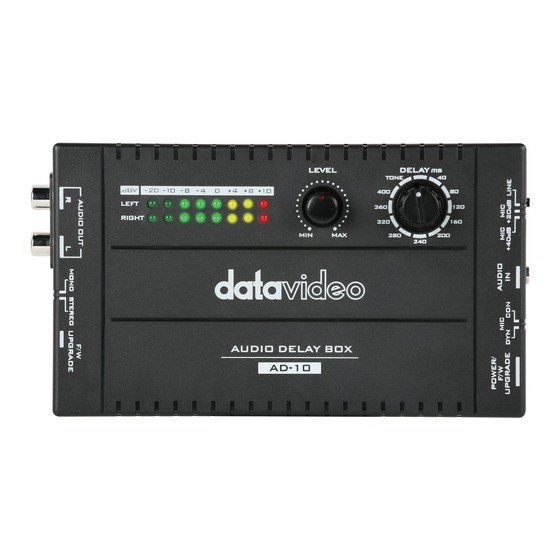
1. Product Overview The Datavideo AD-10 is a low cost and easy-to-use audio delay box which is designed for achieving audio and video synchronization. The AD-10 provides a 3.5mm audio input interface which is suitable for the output of the popular MP3 format music which is used by smartphones. -
Page 9: Front Panel
Front Panel Audio Delay Time Adjustment Knob This knob provides you 10 segments for adjusting the audio delay time from 40ms to 400ms. Moreover, it also provides TONE function for you to output a 1K TONE signal to be the test signal. Audio Level Adjustment Knob This knob allows you to adjust the volume level of the input audio. -
Page 10: Right Panel
USB Type A to USB Type C adapter cable or a USB Type C to USB Type C cable to connect from your laptop to your AD-10. After that, you can use a special firmware update tool for updating the... - Page 11 MIC DYN/CON This adjustable switch allows you to switch between the dynamic microphone or the condenser microphone. AUDIO IN This AUDIO IN interface allows you to connect to a 3.5mm condenser microphone/dynamic microphone or other Line in audio input sources MIC +40dB/MIC +20dB/LINE When you use a microphone, this switch allows you to select MIC +40dB or MIC 20dB.
-
Page 12: Left Panel
Type-C cable from your laptop to the [POWER F/W UPGRADE] USB Type-C interface which is located on the right panel of the AD-10. After the connection is done, please release the [F/W UPGRADE button]. After that, please use the [EP Console] firmware update tool for updating the firmware of the AD-10. -
Page 13: Dimensions
5. Dimensions... - Page 14 6. Specifications Model Name AD-10 Product Name 1 x 3.5mm Jack Socket Tip: Mic/Line (Left)、Ring: Mic/Line (Right)、Sleeve: Audio Input 16K ohms, Max Line Input Level: +10dBV 2 x unbalanced stereo audio, RCA sockets 600ohm, Audio Output MAX=+10dBV Audio Output Switch...
- Page 15 Isolation > 65dB Microphone Input Bandwidth 20Hz~20KHz < +/- 3dB > 70 dB @1KHz,0dB,+20dB S/N Ratio > 60 dB @1KHz,0dB,+40dB < 0.03% @1KHz,0dB,+20dB T.H.D. < 0.1% @1KHz,0dB,+40dB > 60dB @+20dB Isolation > 50dB @+40dB General Operating Temperature 0°C to 40°C (32°F to 104°F) Storage Temperature -20°C to 60°C (-4°F to 140°F) Humidity...
-
Page 16: Appendix Firmware Update
Appendix Firmware Update Firmware Update Procedure for AD-10 1. Introduction Firmware update is performed by connecting the target AD-10 Audio Delay Box to a USB3.0 based Windows laptop. This firmware update procedure applies to the following product. Product Model AD-10... -
Page 17: Firmware Update Preparation
The following items are required to perform this firmware update. Please prepare these items in advance before performing the update. AD-10 x 1 The AD-10 which is needed for updating the firmware. USB Type-A to USB Type-C adapter cable x 1... -
Page 18: Preparing The Firmware
After that, you can see the following firmware files for the AD-10. 2.5 Install the EPConsole Software The EPConsole software is the software which is used for the AD-10 firmware update. Please follow the following steps for installing the EPConsole software. 2.5.1. Install the EPConsole Software Please go to the Koryo EPConsole website http://ap.koryo.com.tw/download/EPConsole/publish.htm... -
Page 19: Update
3.1 Updating the firmware 3.1.1. Please press the FW/UPGRADE button from the AD-10 Please press the FW/UPGRADE button from the AD-10 and then connect a USB type-A to USB type-C adapter cable from the USB type-A port of your laptop to the USB type-C port of the AD-10. - Page 20 3.1.3. Please click the EPConsole icon from the Windows Start Menu of your laptop. Please click the EPConsole icon from the Windows Start Menu of your laptop to run the EPConsole software and then the USB1, 57600 will be shown.
- Page 21 3.1.4. Please press the [FILE] button to load the latest firmware files. Please press the [FILE] button to load the latest firmware files.
- Page 22 3.1.5. Please press the [Program MCU] button and then wait until the progress bar reaches 100%.
- Page 23 3.1.6. After the progress bar reaches 100%, the [Program and Verify BAMK0 BANK1 OK!] will be shown and the firmware update procedure is done successfully.
-
Page 24: Service And Support
Datavideo Technologies Co., Ltd. All rights reserved 2020 Jul.-26.2021 Ver:E1...
Need help?
Do you have a question about the AD-10 and is the answer not in the manual?
Questions and answers