
Related Manuals for Aquatel D110-S

Summary of Contents for Aquatel D110-S
- Page 1 INSTRUCTION MANUAL Wireless Level Monitor MULTI TANK CAPABLE MODEL D110-S Aquatel NZ Ltd P.O. Box 225 Orewa 0946, New Zealand www.aquatel.co.nz...
-
Page 2: Display Unit
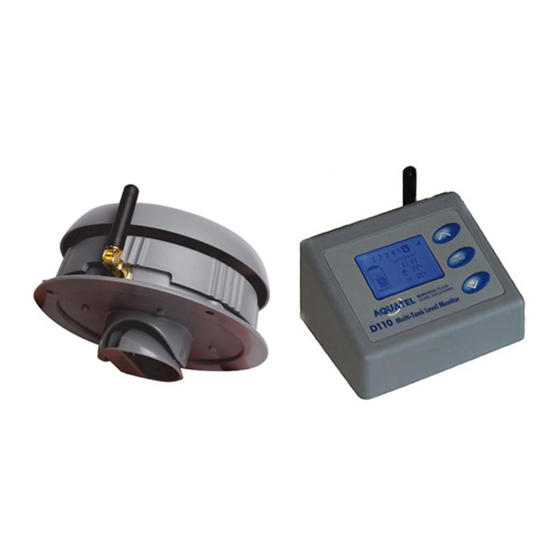
• External Power Jack (Use Aquatel certified power pack. Part No. AQPP6) 6V DC • ¼ Wave Whip Antenna D110 Multi-Tank Level Monitor • 92mm W x 73mm D x 50mm H (3 5/8” W x 2 7/8” D x 2” H) 300m* (1,000’) tank unit • Use on any non-flammable fluid (water, diesel, septic) • ¼ Wave Whip Antenna • 135mm diameter x 80mm H (5 3/8” D x 3 1/8” H) • Detection Range 0.1m to 4m (4”–13’) 14 to 140°F) • Temperature range : -10 to +60°C ( • Individually Security coded sets • Approval : AS/NZS 4268:2003 1:2005 • Housing : ABS Plastic • Circuit Boards : ROHS compliant • 433 MHz (Aus/NZ/Europe), 920 MHz (USA/Asia) -
Page 3: Main Features And Benefits
The D110 is a versatile product that not only allows remote monitoring of multiple tanks/ cistern fluid levels, it also allows you to set high and low level alarms to a height you wish to be notified at. The D110 is a Wireless tank/cistern fluid level monitor that is capable of remotely monitoring up to 6 tanks from the one Display unit. Each D110 system comes with one Display and a single Tank Unit. To monitor more than one tank/cistern, additional T110 Tank Units can be purchased and paired with your Display Unit. It is recommended that you fully read this installation manual prior to installing your D110 system. If you have any questions, please do contact us prior to use. Main features and benefits: Fully wireless remote tank/cistern monitoring Easy to read Blue backlit LCD display Monitor up to 6 tanks from the one Display Adjustable Air gap allows for mounting in tank/cistern riser Adjustable High and Low level alarms Easy to setup How it works: The Tank Unit is mounted on the top surface of the tank or on the inside top surface of an underground cistern and uses ultrasonic signals to detect the fluid levels inside. This is then wirelessly transmitted back to the Display Unit to give you up to date fluid level information. The system will warn you of any triggered High or Low fluid level alarm via the Display Unit. – 2 –... -
Page 4: Installation
Installation installing tank unit Choose location for Tank Unit on the top of the tank or cistern, close to an inspection hatch is best in case you need to adjust the sensor cone. ideal. Mount within correct. For buried incorrect. Mount unit reach of access hole tanks mount unit in away from ribbed walls center of lid, or on to prevent signal bracket mounted in riser reflection off walls For tanks less than 1500mm (5’) it’s best to deep mount unit in center of tank D rill a 50mm (2”) hole in tank. Antenna should be For thick concrete tanks make mounted on the a 75mm (3”) hole. opposite side M easure the depth of Transducer is not tank to the base (or to the pointing at the water outlet). Write this surface of the water measurement down. Insert Tank Unit in hole and W ater will not enter rotate so tank antenna is on antenna hole the lower side (to prevent water entering unit). Ensure T ransducer is parallel that the transducer cone to water underneath is pointing... - Page 5 setting up tank unit R emove cap from Tank Unit by turning counter-clockwise and insert batteries. Check that the Tank Unit is paired with the Display Unit once you have it powered up. You can check signal strength between units on the Display Unit, there will be a signal strength bar graph meter at the top right of the LCD screen, ranging from 1 to 4 bars. test mode When setting up your Tank Unit, you can set the Tank Unit into Test Mode via the display so that it sends a new reading every 8 seconds. When in Test Mode, the Tank Unit’s Test Mode LED will be ON (see picture below). When out of Test Mode the LED will be OFF. Test Mode can be turned on or off via the “System setup” then “Tank Unit Setup” then select “Configure Tank Unit”, scroll to the “Update Interval” and select Test Mode. Once you have establish that the systems range is ok you can then set an update interval that suits. The longer the Update Interval the longer the Tank Unit’s batteries will last, for example, when set to update every minute the batteries will last about 2 months, updating every 10 minutes 20 months and updating every 20 minutes 40 months. reset button The D110 Tank Unit comes factory paired to the Display Unit. If the Tank Unit’s reset button is pushed you will need to re-pair it to the Display Unit. See “Pairing Tank Unit” below. pairing tank unit To pair a new T110 or existing Tank Unit enter the “System Setup” by holding the menu button down for 3 seconds, then select “Tank Unit Setup” and select “Add new tank” you must within 10 seconds push the reset button on the Tank Unit or you will need to repeat the process. Once it has found the new Tank Unit, scroll through the setup options. At any one time there must always be one tank unit paired with the D110 Display, If you are only using the one Tank Unit, then you will need to re-pair it before you can delete the old Tank Unit location. For further information see Heat Shield Pull off to remove Antenna Test Mode LED Twist counter- clockwise to remove...
- Page 6 Set Depth. For the D110 to determine the correct fluid levels, the depth of the tank/cistern from must be input on the Display Unit via the “Tank unit Setup Menu”, to access this menu see Setting the Air Gap. Go to the “Tank Unit Setup Menu” (refer to ) , once you enter this menu scroll Air Gap* through to the “Air Gap” and then using the arrow up and arrow down buttons, select the required air gap. *Air gap: Distance between where tank unit is installed and the maximum fluid level) 100mm (min) – 1000mm (max) 3.93” (min) – 39.37” (max) ensuring maximum range T he D110 uses short range radio communications and works better with less obstructions between Aquatel units. The more obstructions there are, the lower the transmission range you will be able to achieve. For example, locating the Display Unit by a window will give stronger communication signals than if it is behind a concrete or metal wall. If you need to increase your signal strength further, simply purchase Aquatel’s AQC24 Antenna Extension Kit and remotely mount the antennas on external walls as high as possible. Booster Yagi Antennas are also available AQ920, these will increase the working range to a distance of 1 mile. – 5 –...
- Page 7 setting up display unit Display Up Button Menu Button I nsert batteries into the Select option. Display Unit. The display will turn on showing the Down Button startup message and then Silence alarm the standard information screen shown overleaf. Power Pack 6 Volts DC 300mA or higher note: display unit can Center pin positive alternatively be powered by the 6V dc power pack, part no. aQpp6 supplied with your d110 Insert 4 x AA batteries system.
-
Page 8: System Setup
system setup Programming of the D110 system is done via the Display Unit “System Setup” menu. To enter the “System Setup”, hold the menu button down for 3 seconds until you see the “System Setup” screen. Set clock and change how long the display stays on Add, delete & rename Tank Units, Adjust alarm levels etc Adjust Tank Unit update interval, turn reading beeps on/ off etc Note: changes made in display unit are not instantly transmitted to the tank unit. the tank unit will only update at the next scheduled reading interval. to force an update remove the tank unit lid and press the reset button. - Page 9 (For aquatel authorised installers only): System installers can lock the unit to prevent tampering and changes to alarm level settings. (Changes can still be made to the clock and measurement interval) note: only aquatel authorised installers are able to obtain unlock codes from the login section of the aquatel website. Factory reset: Reset all settings to factory defaults. note: the unit can not be reset if the unit is locked.
- Page 10 Display Unit Beeps The Display Unit will beep to advise you of an event, or alert you to something that needs your attention. H – represents a high tone m – represents a medium tone l – represents a low tone lH – A valid reading has been received from the Tank Unit. (This beep can be turned off in Settings.) HHl – Display Unit reads , there are no signal strength bars and the Tank Unit icon displays . Display Unit can not communicate with Tank Unit. Check batteries in Tank Unit. Move Display Unit closer to Tank Unit. Alarms Alarms display on the Display Unit screen and sound every six seconds for one minute. To silence the alarm press the menu button – the Display Unit will beep (H L) to acknowledge. Then investigate the cause of the problem such as weak communication signal, low battery level ? Tank icon shows and Tank Unit temperature shows . (as shown in image). There is no communication with Tank Unit. Tank icon shows , both Tank Unit temperature and signal strength are displayed. Tank Unit can communicate with Control Unit but cannot detect a valid level. Battery icon beside Display Unit or Tank Unit signal strength icon. Battery levels low – replace batteries. High level alarm low level alarm l m H H m l Fluid level is above 'High Fluid level is below Level' setting. (This alarm is...
- Page 11 3000 feet). To obtain the greatest range use two high gain antennas at each end. note: check your local regulations regarding using this type of antenna (does not comply with emc and may require a license). aquatel part: aQ433 for 433 mHz (australasia, europe) aQ920 for 920 mHz (usa, asia) Any other questions please email support@aquatel.co.nz – 10 –...
-
Page 12: Warranty Terms And Conditions
Warranty Terms and Conditions (This warranty is subject to the provisions of the Trade Practices Act and Goods and Consumer Protection Legislation of various States and Countries) 1. A quatel NZ Ltd warrants this product will operate as designed for a period of 12 months from date of purchase from an authorized Aquatel re-seller. Subject to the conditions that follow, Aquatel NZ Ltd will repair or replace any defective products free of charge upon return of the faulty product to the authorized Aquatel re-seller. 2. T his warranty excludes transportation costs to return the faulty product to the authorized Aquatel re-seller. It excludes problems resulting from failure to comply with installation instructions, from neglect or misuse, from installation outside the specified operating temperature ranges, or operation for any purposes other than those specified. 3. T his warranty applies only to the original owner and cannot be transferred to subsequent owners. 4. T his warranty is subject to any consumer protection legislation in the government jurisdiction where the unit is installed. 5. P roof of purchase will be required for any warranty claims. Please record the date of purchase, dealer name, model, and serial number below and attach the sales receipt. Keep this document in a safe place. 6. A quatel shall not be liable for any incidental or consequential damages resulting from the malfunctioning of its products or from any delays in repairing or replacing defective products.
Need help?
Do you have a question about the D110-S and is the answer not in the manual?
Questions and answers