Advertisement
Available languages
Available languages
Quick Links
TM
SML654BK/BL/P/V
INSTRUCTION MANUAL/ MANUAL DE INSTRUCCIONES/
MODE D'EMPLOI
www.singingmachine.com
The Singing Machine® is a registered trademark of The Singing Machine Co., Inc.
The Singing Machine® es marca registrada de The Singing Machine Co., Inc.
The Singing Machine® est une marque déposée de The Singing Machine Co., Inc.
Advertisement

Related Manuals for The Singing Machine SML654BK


Summary of Contents for The Singing Machine SML654BK
- Page 1 MODE D’EMPLOI www.singingmachine.com The Singing Machine® is a registered trademark of The Singing Machine Co., Inc. The Singing Machine® es marca registrada de The Singing Machine Co., Inc. The Singing Machine® est une marque déposée de The Singing Machine Co., Inc.
-
Page 2: Important Safety Information
Warnings FCC WARNING: This equipment may generate or use radio frequency CAUTION energy. Changes or modifications to this equipment may cause harmful interference unless the modifications are expressly approved in the RISK OF ELECTRIC SHOCK instruction manual. The user could lose the authority to operate this DO NOT OPEN equipment if an unauthorized change or modification is made. - Page 3 Included Please make sure the following items are included. Main Unit Wired Microphone x2 Manual AC Adapter — E2 —...
-
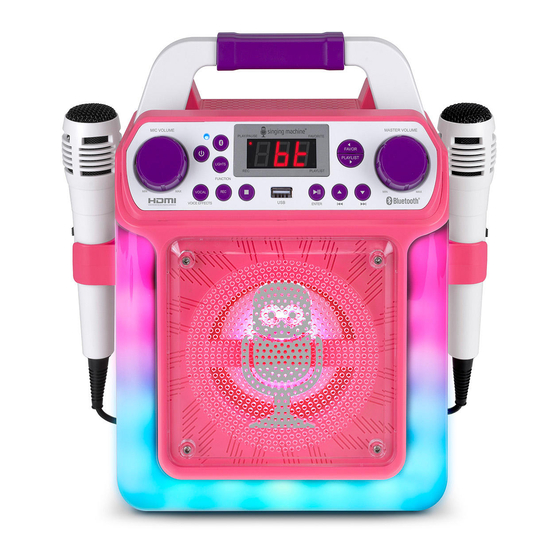
Page 4: Location Of Controls (Front)
Location of Controls (Front) 1. Play/Pause indicator 12. Speaker 2. Record indicator 13. Handle 14. Display Bluetooth Button 15. Favorite indicator 4. Bluetooth indicator 16. FAVOR / Navigation Button ON/STANDBY Button 17. MASTER VOLUME Control 6. MIC VOLUME Control 18. PLAYLIST / Navigation Button 7. -
Page 5: Location Of Controls (Rear)
Location of Controls (Rear) 1. MIC 1 Jack 4. HDMI Jack 2. MIC 2 Jack 5. AUX IN Jack 3. Extendable MIC holders 6. DC IN Jack Location of Controls (Playback Display) Song Current Total Time Playlist Song Title Song Record Status Elapsed Time Lead Vocal Status... - Page 6 Connection Connecting the Microphone(s) Microphones: Connect a microphone into Mic jack 1 u as well as Mic jack 2 v (when desired). Note: Do not drop or tap the Mic as damage to the Mic or speakers may occur. Do not twirl the microphone cord as it will cause damage to the encased wiring.
- Page 7 Connection Connecting to AC Power Insert the AC power cord into a conveniently located AC outlet having AC 120V, 60Hz. Note: Make all connections before connecting to AC power. Inserting Batteries Slide the battery door in the direction the arrow indicate to reveal the battery compartment.
- Page 8 Connection Connecting to AUX IN Jack Connect an external device by using an appropriate cable (3.5mm audio cable not included) as shown. Note: See page E20 to select and use the Aux In AUDIO OUTPUT / HEADPHONE JACK function. AUX IN To External Unit Cradle —...
-
Page 9: Operation
Operation Voice Effects Repeatedly press the VOCAL/VOICE EFFECTS button to select different vocal effect. Display will show: EF0 - OFF EF1 - ECHO EF2 - FEMALE EF3 - MALE EF4 - CHIPMUNK EF5 - ROBOT EF6 - RADIO Speaker Lights When the unit is turned on, the Light mode 1 is automatically activated. - Page 10 Operation Playing Songs from the USB Connect the unit as described previously. Press the button to turn the unit on. Insert a USB flash drive containing MP3 or MP4 files into the USB port on the unit. We have a large selection of karaoke music available for download through our Karaoke Store.
- Page 11 Operation Playing Songs from the USB (Continued) Adjust the volume to a comfortable level using the MASTER VOLUME control. Note: If connected to a TV, adjust the volume of the TV using its own volume control. Connect microphone(s) and slide the ON/OFF switch on the microphone to the ON position.
- Page 12 Operation Playing Songs from the USB (Continued) VOCALS: To sing with the lead singer on the recording, press and hold the VOCAL/VOICE EFFECTS button. To listen to music only, press and hold the VOCAL/VOICE EFFECTS button again. Note: The song must be downloaded with separate vocals (aka multiplex recording) in order to utilize the Lead Vocal function.
- Page 13 Operation Playing Songs from the USB (Continued) CREATING THE PLAYLIST: To create a personalized playlist, select a song Added using the / and / buttons. Press the PLAYLIST/ button to confirm the operation; “Added” will appear. Repeat this step to add more songs.
- Page 14 Operation Playing Songs from the USB (Continued) PRIORITY: a. Select PRIORITY using the / and / buttons then navigate down to the song you want to prioritize. b. Press the FAVOR/ and PLAYLIST/ buttons and the numbers will change to 0001, 0002, etc. According to the numbers displayed the songs will be listed in that order from top to bottom.
- Page 15 Operation Playing Songs from the USB (Continued) CREATING FAVORITES: To create a favorite playlist, select a song using the / and / buttons. Press the FAVOR/ button to confirm the operation; the icon will turn from white to orange. Repeat this step to add more songs.
- Page 16 Operation Using a Bluetooth Device Connect the unit as described previously. Press the button to turn the unit on. Press the button or repeatedly press the LIGHTS/FUNCTION button to select the Bluetooth mode; “bt” will appear in the display. The unit automatically searches for and pairs a previously paired Bluetooth device (if previously paired).
- Page 17 Operation Using a Bluetooth Device (Continued) To control your Bluetooth device from this unit, press the /ENTER button to start playback (music app must be open). Press the /ENTER button during playback to pause the song. Adjust the volume to a comfortable level using the MASTER VOLUME control on this unit as well as the volume on your Bluetooth device.
- Page 18 Operation Using a Bluetooth Device (Continued) RECORD YOUR VOCAL PERFORMANCE: To record your singing as well as the music, press the REC button; recording will begin and the record indicator will start flashing. When done recording, press the REC button again; the Record indicator will turn off.
- Page 19 Operation Playing Songs from the Recorded Files Connect the unit as described previously; it should be connected to a TV. Press the button to turn the unit on. Repeatedly press the LIGHTS/ FUNCTION button to select the Recordings mode "rEC" will appear in the display.
- Page 20 Operation Playing Songs from the Recorded Files (Continued) Adjust the volume to a comfortable level using the MASTER VOLUME control. Note: If connected to a TV, adjust the volume of the TV using its own volume control. Connect microphone(s) and slide the ON/OFF switch on the microphone to the ON position.
- Page 21 Operation Using the AUX IN Jack Connect the unit as described previously. Press the button to turn the unit on. Connect the external unit to the AUX IN Jack on the rear of this unit. Connecting an external unit will allow the audio to be played through your Singing Machine.
- Page 22 Operation Using the AUX IN Jack (Continued) Adjust the MIC VOLUME control as desired. Increasing this control will increase the volume of both microphones. VOICE EFFECTS: Repeatedly press the VOCAL/VOICE EFFECTS button to select from ECHO, FEMALE, MALE, CHIPMUNK, ROBOT or RADIO vocal effect.
- Page 23 Karaoke Store PC Installation The Karaoke Store application can be installed on Microsoft Windows computers running Vista, Windows 7, and Windows 8 or higher. The Karaoke Store application requires connection to the Internet (a high-speed connection is recommended). Insert the USB flash drive (not included) into a powered USB slot on your computer.
- Page 24 Karaoke Store Mac Installation The Karaoke Store application can be installed on Apple Macintosh computers running OS X 10.8 and higher. The Karaoke Store application requires connection to the Internet (a high- speed connection is recommended). Insert the USB flash drive (not included) into a powered USB slot on your computer.
-
Page 25: Troubleshooting Guide
Troubleshooting Guide Should this unit exhibit a problem, check the following before seeking service: No Power • Power is not on; press the ON/STANDBY button to turn unit on. • Confirm that the AC adapter is connected securely to the back of the unit. •... -
Page 26: Specifications
The Bluetooth® word mark and logos are registered trademarks owned by Bluetooth SIG, Inc. and any use of such marks by The Singing Machine Company, Inc. is under license. Other trademarks and trade names are those of their respective owners. - Page 27 Advertencias AVISO DE LA FCC: Este equipo puede generar o usar energía de radio PRECAUCIÓN frecuencia. Los cambios o modificaciones realizados en el aparato pueden provocar interferencia perjudicial, a menos que dichas modificaciones estén RIESGO DE DESCARGA ELÉCTRICA. autorizadas en el manual de instrucciones. El usuario puede perder toda NO ABRIR autoridad para operar el equipo si realiza cambios o modificaciones sin autorización.
- Page 28 Se incluyen Contenido de la caja. Unidad principal Micrófono con cable x2 Manual Adaptador de CA — S2 —...
- Page 29 Ubicación de controles (Delantero) Indicador de Reproducir/Pausar (PLAY/ 12. Altavoz PAUSE) 13. Manija Indicador de grabación 14. Pantalla Botón Bluetooth Indicador de Favoritos Indicador de Bluetooth navegación /FAVOR 16. Botón de Botón de ENCENDIDO/ESPERA (ON/ 17. Control de VOLUMEN PRINCIPAL (MASTER STANDBY) VOLUME) Control de VOLUMEN DEL MICRÓFONO...
- Page 30 Ubicación de los controles (Reverso) Entrada para MICRÓFONO 1 (MIC 1) SALIDA DE HDMI Entrada para MICRÓFONO 2 (MIC 2) Conector de entrada de Aux Porta micrófonos extensibles Conector de CC Ubicación de los controles (Pantalla de reproducción) Tiempo total Lista de reproducción actual de la canción Estado de grabación...
- Page 31 Conexión Conexión de la Microphono(s) Micrófonos: Inserte el enchufe de un micrófono en la entrada u y el otro enchufe de para micrófono 1 v (si micrófono en la entrada para micrófono 2 lo desea). Nota: No arroje o dé golpecitos al micrófono, puede dañar el micrófono o los parlantes.
- Page 32 Conexión Conexión a alimentación de corriente alterna Introduzca el cable de alimentación de CA en un tomacorriente de CA de ubicación conveniente con 120V de CA, 60 Hz. Nota: Haga todas las conexiones antes de enchufar a la alimentación de CA. Cómo colocar las pilas Deslice la tapa de la pila en la dirección de las flechas para...
- Page 33 Conexión Conexión a entrada de AUX Conecte su dispositivo externo utilizando un cable adecuado (no se incluye el cable de audio de 3,5mm) como se muestra. Nota: Consulte la página S20 para seleccionar y SALIDA DE AUDIO utilizar la función de entrada de Aux. /AURICULARES AUX IN A unidad externa...
-
Page 34: Modo Bluetooth
Funcionamiento Efecto de sonido Oprima repetidamente los botones de CANTANTE /EFECTOS DE VOZ para seleccionar diferentes efectos vocales. La pantalla mostrará lo siguiente. La pantalla mostrará lo siguiente: EF0 - NINGUNO, EF1 - ECO, EF2 - FEMENINA, EF3 - MASCULINA, EF4 - ARDILLA, EF5 - ROBOT, o EF6 - RADIO. - Page 35 Funcionamiento Reproducir canciones desde el USB Conecte la unidad como se describió antes. Oprima el botón de ENCENDIDO/APAGADO (ON/OFF) para encender la unidad. Introduzca un dispositivo flash USB con archivos MP3+G o MP4 en el puerto USB en la unidad, mirando hacia arriba. Tenemos una amplia selección de música de karaoke disponible para descargar a través de nuestra Tienda de Karaoke...
- Page 36 Funcionamiento Reproducir canciones desde el USB (Continuación) Ajuste el volumen a un nivel conveniente, usando el control de VOLUMEN PRINCIPAL. Nota: Si se conecta a un televisor u otra fuente de audio, ajuste el volumen del televisor con su propio control de volumen. Conecte el/los micrófono y ubique el interruptor de ENCENDIDO/APAGADO (ON/OFF) del Micrófono en la posición...
- Page 37 Funcionamiento Reproducir canciones desde el USB (Continuación) VOCAL: Para cantar con el cantante principal en la grabación, oprima y mantenga presionado el botón EFECTO DE VOZ/VOCAL (VOCAL/ VOICE EFFECTS). Para escuchar música solamente, oprima y mantenga presionado nuevamente el botón EFECTO DE VOZ/VOCAL (VOCAL/VOICE EFFECTS).
- Page 38 Funcionamiento Reproducir canciones desde el USB (Continuación) CREAR LA LISTA DE REPRODUCCIÓN: Para crear una lista de reproducción Added personalizada, seleccione una canción usando los botones / . Presione el botón LISTA DE REPRODUCCIÓN (PLAYLIST)/ para confirmar la operación; aparecerá “Agregado”...
- Page 39 Funcionamiento Reproducir canciones desde el USB (Continuación) PRIORIDAD: a. Seleccione PRIORIDAD (PRIORITY) usando los botones y luego navegue hacia abajo hasta la canción que desee priorizar. b. Presione el botón FAVOR/ y LISTA DE REPRODUCCIÓN (PLAYLIST)/ y los números cambiarán a 0001, 0002, etc.
- Page 40 Funcionamiento Reproducir canciones desde el USB (Continuación) CREAR FAVORITOS: Para crear una lista de reproducción favorita, seleccione una canción usando los botones / . Presione el botón FAVOR/ para confirmar la operación; el ícono pasará de ser color blanco a anaranjado. Repita este paso para agregar más canciones.
- Page 41 Funcionamiento Utilizar un dispositivo Bluetooth Conecte la unidad como se describió antes. Oprima el botón de ENCENDIDO/ para encender APAGADO (ON/OFF) la unidad. Oprima el botón o oprima varias veces el botón LUZ/FUNCIÓN (LIGHTS/ FUNCTION) para seleccionar el modo Bluetooth; “bt” aparecerá en la pantalla. La unidad automáticamente busca y se empareja con un dispositivo de Bluetooth anteriormente emparejado (si...
- Page 42 Funcionamiento Utilizar un dispositivo Bluetooth (Continuación) Para controlar su dispositivo con Bluetooth desde esta unidad, oprima /ACEPTAR para comenzar la reproducción (la aplicación de música debe estar abierta). Presione el botón /ACEPTAR durante la reproducción para pausar la canción. Ajuste el volumen a un nivel conveniente usando el control de VOLUMEN PRINCIPAL (MASTER VOLUME) de esta unidad así...
- Page 43 Funcionamiento Utilizar un dispositivo Bluetooth (Continuación) GRABAR SU INTERPRETACIÓN VOCAL: Para grabar lo que canta y la música, oprima el botón Grabar (REC); comenzará la grabación y el indicador de grabar comenzará a parpadear. Cuando finalice la grabación, oprima otra vez el botón Grabar (REC); el indicador de grabar se apagará.
- Page 44 Funcionamiento Reproducir canciones desde archivos grabados Conecte la unidad como se describió previamente; se debe conectar a un televisor. Oprima el botón de para encender la unidad. Oprima el botón LUZ/FUNCIÓN (LIGHTS/FUNCTION) varias veces para seleccionar el modo de Grabaciones (Recordings); “REC” aparecerá...
Need help?
Do you have a question about the SML654BK and is the answer not in the manual?
Questions and answers