Table of Contents
Advertisement
Quick Links
www.Megalocators.com
G e o p hys i c a l M e a s u r i n g I n s t r u m e n t s
• Visual exploration of all Deep buried treasures
• All in one device to meet the needs of
all treasure hunters
Complete Set of Detection Tools for
Professional Treasure Hunters
SEARCH SYSTEMS
· Most Powerful 3D Ground Scanner
· Complete Solution for Professional Treasure Hunters
· Unearth All Buried Deep Treasures Visually
· New Detection Technologies: M.G.S, V.S.T
· 3D & 2D Result Visualization on Screen or Tablet
· Multi Visual Analyzer app for Android Tablets
· Multilingual Easy to Use Software Program
Advertisement
Table of Contents

Summary of Contents for GMI MEGA DETECTION PHOENIX
- Page 1 www.Megalocators.com SEARCH SYSTEMS · Most Powerful 3D Ground Scanner · Complete Solution for Professional Treasure Hunters · Unearth All Buried Deep Treasures Visually · New Detection Technologies: M.G.S, V.S.T · 3D & 2D Result Visualization on Screen or Tablet · Multi Visual Analyzer app for Android Tablets ·...
- Page 2 USER MANUAL...
-
Page 3: Table Of Contents
CONTENTS List of contents Contents ............. Warnings . -
Page 4: Warnings
WARNINGS Do not assemble and operate the device before reading the user manual. The device may only be dismantled or repaired by MEGA DETECTION Gmbh or its authorized service centers. Unauthorized disassociation / infiltration of the internal components of the main monitor or other units for any reason cancels the warranty. -
Page 5: Property Rights
PROPERTY RIGHTS No part of this guide may be reproduced, including the products and programs described in it. Any use of material, reproduction, storage or translation of this information without prior permis- sion from MEGA DETECTION Gmbh is subject to legal liability of its owner. MEGA DETECTION invites all users to ensure that the acquisition and use of this type of equipment complies with the laws and regulations of the countries in use and is not responsible for the legal consequences if the laws state otherwise. -
Page 6: Introduction
INTRODUCTION It is the latest release of Mega Detection. The comprehensive imaging ground scanner and it is the first device in the world to include all imaging scanning technologies in one device, through three different search systems. The Phoenix device includes a completely new technology to scan the ground via the MGS multi-ground scanner and the VST high-signal transmitter and receiver probe, which provide professional surveying tools to scan the ground to large depths accurately and quickly with visual representation of the scanning results on the device screen or via the Multi Visual Analyzer‘s application on the tablet. -
Page 7: Package Contents
PACKAGE CONTENT... - Page 8 PACKAGE CONTENT Main unit V.S.T Sensor Lithium-Ion Battery Conector Base Higher Stick (Shaft) Medium Stick (Shaft) Lower Stick (Shaft) M.G.S 60 Scanner Long-Range Antennas ( x2 ) Headphones Armrest (Holder) Accesories Box including: A. M.G.S Screw and Nut (x2) B. Washer for Plastic Stick (Shaft) C.
-
Page 9: Overview
OVERVIEW GROUND SCAN SYSTEM LIVE STREAM SYSTEM PIN POINTER SYSTEM... -
Page 10: Assembly (V.s.t)
ASSEMBLY Live Stream System Pin Pointer System Power Jack Use the power jack to connect the battery Connect V.S.T Sensor to the device as it shown in the picture... -
Page 11: Assembly (Ground Scan)
ASSEMBLY Ground Scan System Attach the medium pipe inside the higher pipe. Assemble the scanner and the lower pipe using the specific screw and nut. Attach the battery to the hand holder so that the battery clip is in its specific place Connect the scanner cable into the connector base Put the device on the holder as it shown in next page Connect the battery to the device... -
Page 12: Assembly (Stack Holder)
ASSEMBLY Attach the main unit on the holder Prepare the main unit and the stack unit Fit the main unit and the holder rail as Parallel position Put the main unit into the rail until you hear a sound come from the lock pin... - Page 13 ASSEMBLY De attach the main unit from the holder Press the Lock pin on the holder Lock pin Pull the main unit to front side...
- Page 14 ASSEMBLY To fit the view degree of main unit on the holder, there is an option users can use. This option helps to fit device position on holder that users can see the display screen as well as possible. Unscrew the screw on the holder counter clockwise fit the main unit as the prefared degree and Close the screw again...
-
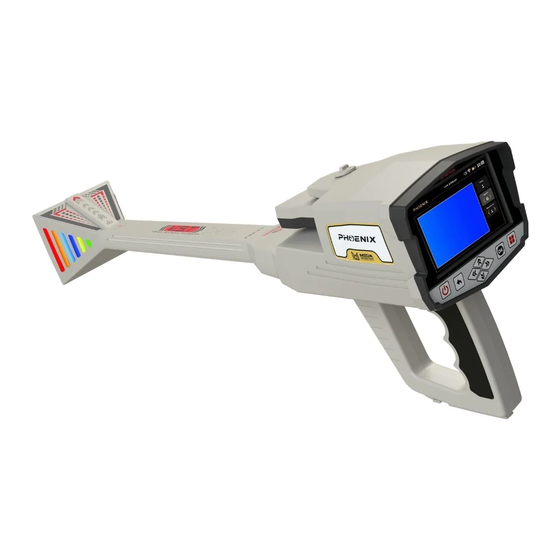
Page 15: Panel Keys
PANEL KEYS Back Key (Backward) Power Key OK Key Home Key 5. Control Settings Arrow Keys (Right - Left - Up - Down) -
Page 16: Settings
SETTINGS Power ON To power on the main unit, connect the battery to the main unit then power on the battery by pressing one time on battey power button, then press on on the main unit. Power OFF To turn off the main unit, just press the power , when confirmation message appears, choose "Yes"... - Page 17 SETTINGS Use this option to save power when using the device. With this option, the battery life can be increased by at least 50% , it depends on the search system and the type of connected probe Date 1. Use the left/right arrows To select “date &...
- Page 18 SETTINGS Time 1. While you are in date and time setting menu use top/ down arrows to select “Set Time” then press 2. In this window use arrows to select the correct time then after setting each one press to save After adjusting the setting press back on device controls key...
- Page 19 SETTINGS You can use this menu to reset the device Settings. There is three type of resets 1. Reset settings: By using this option all settings in The device will back to the default Settings, but the you will keep the Information saved in the memory 2.
- Page 20 SETTINGS The device software interface is available in 12 languages, namely: 1. English 2. German 3. Spanish 4. French 5. Italian 6. Russian 7. Turkish 8. Chinese 9. Hebrew 10. Urdu 11. Arabic 12. Persian To change the language, the user has to go to the language tab, then choose "Change Language"...
- Page 21 SETTINGS This screen includes all device information 1. Device Version 2. Software version 3. Device Model 4. Serial Number 5. Country of manufacturer...
-
Page 22: Ground Scan System
GROUND SCAN GROUND SCAN The ground scan system is a completely new system in new Mega Detection devices with new and improved technology. This system helps the user to scan the ground and create a 2D visualization on the device screen or 3D visualization on any supported android tablet via Multi Visual Analyzer app. - Page 23 GROUND SCAN AUTOMATIC MODE In this case, the device will automatically scan the points without user intervention, as it scans the points automatically with an interval between each point. User only has to press on start button at start of next scan line. To choose the appropriate scan mode, use the Left / Right arrow keys, then press the OK key Path On this screen, the user can specify the direc-...
- Page 24 GROUND SCAN Start Point Here the user can specify the starting point of the scan within the area and there are two options: Left: The start of the scan is in the lower left corner of the scanning area Right: The start of the scan process is from the lower right corner of the scanning area The location of the starting point can be select- ed using the Left / Right arrow keys, then...
- Page 25 GROUND SCAN If there is an uneven area of land, first clean the area and arrange it as flat as possible before performing the actual scan. Continue scanning step-by-step according to the scanning path you selected, (One Direction or Zigzag) 60 Cm...
- Page 26 GROUND SCAN After each line of the scanning process is completed, you will see an alert on the screen which means you have to start a new scan line. Change your position to the beginning of the next line and then press the start button located under the handle of the device.
-
Page 27: Scan Files
SCAN FILES Scan Files The device includes a memory to save scan results as files. This means that the user can open a previous scanning process and re-display and analyze the results at any time, even when the device is not in the original scanning area. Select the system You can choose the "Scan Files"... - Page 28 SCAN FILES Delete File In case of selecting delete from the optipns the next view will apare. user can confirm delete prosses using this window. Screen Grid This option shows or hides the grid lines that represent the scanning area, where each cell represents one scanning step (scan point) Selected Tile Choose a Cell From The Grid...
- Page 29 SCAN FILES Color Filter Use this option to hide or show the green color (presenting normal ground), and this is useful for showing useful areas of the scan area that include metal targets or voids. Blue Percentage Avarage of all scaneed data Green Percentage Red Percentage...
-
Page 30: Live Stream System
LIVE STREAM Live Stream System [LIVE STREAM] A live streamis a system developed to detect various ferrous and non-ferrous metals in real time (real time), that is, in the form of a direct transmission with a direct visual representation of the signal according to a specific color that reflects the nature of the target, for example, precious metal, gold or tunnel. - Page 31 LIVE STREAM Notice Use the Scanner Speed option to speed up / slow down the sensor scan speed. To use it after changing , press the start button of the device to set it Scan value Scan Screen Scan Speed Sensitivity How to Use After the setup is complete, be sure to assemble the device exactly as shown in the assembly part...
- Page 32 LIVE STREAM During the Live Stream, the LED lights on the head of the V.S.T probe display the same color as the screen display, making it easier for the user to focus on the scan process instead of looking at the screen.
-
Page 33: Pin Pointer System
PIN POINTER PIN POINTER This system is used to determine the presence of a metal target or cavity with the precise identifi- cation of the location in which the metal or buried cavity is located through a sound or graphic displayed on the screen or visual representation on the tablet. - Page 34 PIN POINTER How to Use After the setup is complete, Point the head of the V.S.T probe vertically to the ground and begin to scan the ground. Make sure that there are no metal objects in your shoes and keep the distance between the probe and the ground constant.
-
Page 35: Multi Visual Analyzer
MULTI VISUAL ANALYZER Multi Visual Analyzer Introduction One of the powerfull options which is comming with new Mega Detection devices is the Android application. This application can show and analyze the scan result on the tablet or your mobile phone. To start using Multi Visual Analyzer app you have to connect the tablet to the device. - Page 36 MULTI VISUAL ANALYZER A.Width It is the number of scan lines and can be set using the Up / Down arrows B.Height This number expresses the number of scanning steps or points for each line, and it can be changed by using the Up / Down arrows C.Step Duration When user is using automatic mode for scan...
- Page 37 MULTI VISUAL ANALYZER Files After each ground scan job a file will create which includes all data about this job. This file is saved inside the device memory so when user open the scanned file within the android device the App will load this file(s) directly from the device.
- Page 38 MULTI VISUAL ANALYZER Dirt type (Soil Type) To make the depth value exact , you need to choose the type of the land soil by using this option. Colors User can change the 3D graph colors using this option. Start Scan After Setting completes a screen with all selected options will appear on the device screen.
- Page 39 MULTI VISUAL ANALYZER Settings Click on Settings icon in the main menu to open settings screen, which includes the items below : 1. Language 2. Connection 3. Animated Background 4. About Language: User can select favorite language using this option .You can see below the list of all available languages : 1.
-
Page 40: Costumer Services
• The user can obtain all auxiliary parts through GMI distributors after ensuring compatibility with the device. Sales and maintenance services are only available at GMI accredited centers. GMI is not responsible for the warranty or maintenance of any damage arising out of the use of accessories from other sources. -
Page 41: Technical Specification
TECHNICAL SPECIFICATION Specifications Package Dimensions 68 x 51 x 28 cm Package Weight 17 Kg Material ABS Plas�c Processor Type ARM 64 Bit Processor Frequency 1.4 Ghz Storage Memory 32 GB Memory Type SD Card Screen Type High Resolu�on TFT LCD Screen Size 5 Inch Screen Resolu�on... - Page 42 G e o p hys i c a l M e a s u r i n g I n s t r u m e n t s E-Mail : info@Megalocators.com sales@Megalocators.com Web : www.Megalocators.com • You can buy this product from our distributors in all around the world •...
Need help?
Do you have a question about the MEGA DETECTION PHOENIX and is the answer not in the manual?
Questions and answers