Table of Contents
Advertisement
Quick Links
Advertisement
Table of Contents

Related Manuals for opto engineering LTDVE4CH-20


Summary of Contents for opto engineering LTDVE4CH-20
- Page 1 INSTRUCTIONS MANUAL LTDVE4CH-20 Strobe controller 4 CH ACCESSORIES...
- Page 2 LTDVE4CH-20 | INSTRUCTIONS MANUAL INDEX 1. Disclaimer ....................4 2. Safety notes ..................... 4 3. Product end-of-life handling ..............4 4. General description ................. 5 4.1. Benefits of current control ....................5 4.2. Operating mode ........................5 5. Getting started ..................5 6.
- Page 3 LTDVE4CH-20 | INSTRUCTIONS MANUAL 13. Wiring diagrams ................... 21 13.1. Wiring example #1: controller triggers camera ..............21 13.2. Wiring example #2: camera triggers controller ..............22 14. Operation ....................23 14.1. Operation with Modbus ....................23 14.1.1. Comparison of Modbus/RTU, Modbus/TCP and Modbus/UDP ........23 14.1.2.
- Page 4 LTDVE4CH-20 | INSTRUCTIONS MANUAL 14.2.29. Register ETH_SUBNET_MASK_HI ................. 43 14.2.30. Register ETH_SUBNET_MASK_LO ................ 43 14.2.31. Register ETH_DEF_GATEWAY_HI ................. 43 14.2.32. Register ETH_DEF_GATEWAY_LO ................ 43 14.2.33. Register ETH_PRI_DNS_HI ..................43 14.2.34. Register ETH_PRI_DNS_LO ................... 44 14.2.35. Register ETH_SEC_DNS_HI ................... 44 14.2.36. Register ETH_SEC_DNS_LO.................. 44 14.2.37.
-
Page 5: Safety Notes
LTDVE4CH-20 | INSTRUCTIONS MANUAL 1. Disclaimer Always deploy and store Opto Engineering products in the prescribed conditions in order to ensure proper functioning. Failing to comply with the following conditions may shorten the product lifetime and/or result in malfunctioning, performance degradation or failure. -
Page 6: General Description
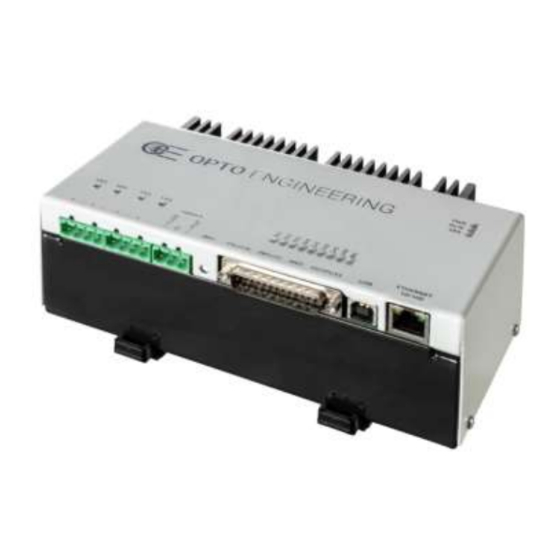
LTDVE4CH-20 | INSTRUCTIONS MANUAL 4. General description Any machine vision application employs some kind of light controller. Light controllers are widely used to both optimize illumination intensity and obtain repeatable trigger sequencing between lights and vision cameras. This controller is a compact unit that includes power supply conditioning, intensity control, timing generation and advanced triggering functions. -
Page 7: Mechanical Fixing
LTDVE4CH-20 | INSTRUCTIONS MANUAL interface and an Ethernet interface (see chapter 6. Mechanical fixing The controller must be mounted on a DIN rail. Allow free flow of air around the unit. The controller has an IP rating of 20 and should be installed so that moisture and dirt cannot enter it. -
Page 8: Reducing Generated Heat
LTDVE4CH-20 | INSTRUCTIONS MANUAL DutyCycle is the actual duty cycle The duty cycle is given by: DutyCycle [·] = PulseWidth [s] * TriggerFrequency [Hz] If the output is driven in continuous mode, the previous equations are still valid but the parameter DutyCycle becomes one because the output is always active. -
Page 9: Power And Logic Supply
LTDVE4CH-20 | INSTRUCTIONS MANUAL Figure 1: connectors on the controller front panel The connectors are briefly described below. A detailed description follows in the next sections. Connectors P1 and P2 are used to connect the four illuminators Connector P3 is used to supply power ... -
Page 10: Light Outputs
LTDVE4CH-20 | INSTRUCTIONS MANUAL drawn. The power supply low voltage and mains wiring should be separately routed. Power supply is delivered to the controller using the screw terminals of connector P3. Connector pinout, ordered from left to right, is listed in Table 2: pinout of connector P3. -
Page 11: Input/Output Synchronization
LTDVE4CH-20 | INSTRUCTIONS MANUAL Number Name Description Note LD3+ Power channel 3 output. LED anode LD3- Power channel 3 output. LED cathode LD4+ Power channel 4 output. LED anode LD4- Power channel 4 output. LED cathode Table 4: pinout of connector P2 Please note that LED3- and LED4- are not the same as 0V. -
Page 12: Synchronization Outputs
LTDVE4CH-20 | INSTRUCTIONS MANUAL The schematic of Figure 2: interface circuits for input synchronization depicts the internal input circuits. An internal constant current generator connected in series with each input allows for a broad range of input voltages without any need for a series resistor. These inputs can be directly driven by voltages up to 24V. -
Page 13: Serial Rs485 Interface
LTDVE4CH-20 | INSTRUCTIONS MANUAL SH3- Output 3. Emitter terminal SH3+ Output 3. Collector terminal SH4- Output 4. Emitter terminal SH4+ Output 4. Collector terminal Table 7: pinout of connector P4 for synchronization outputs The schematic of Figure 3: interface circuits for output synchronization depicts the internal output circuits. -
Page 14: External Temperature Sensor
LTDVE4CH-20 | INSTRUCTIONS MANUAL Pin number Name Description Note RS485 data signal. Negative terminal RS485 reference ground RS485 data signal. Positive terminal Table 9: pinout of serial interface in connector P4 The interface is electrically isolated. Note that GND is not the same as 0V. -
Page 15: Communication Interfaces
LTDVE4CH-20 | INSTRUCTIONS MANUAL For improved immunity against external disturbance sources, use a single shielded cable or multiple shielded cables, grounded at the end opposite to the controller, on the synchronization inputs, synchronization outputs, serial RS485 interface and external temperature sensor signals. -
Page 16: Visual Indicators
LTDVE4CH-20 | INSTRUCTIONS MANUAL Preferred DNS server 192.168.0.2 Alternate DNS server 192.168.0.2 Modbus address Modbus/TCP port Modbus/UDP port Table 12: default parameters for Ethernet communication The IP address, subnet mask and DHCP use flag are some of the controller parameters and can be changed using any of the available interfaces. -
Page 17: Init Button Functions
LTDVE4CH-20 | INSTRUCTIONS MANUAL Either the RUN LED or the ERR LED blinks for 500 ms at power on to identify the source used for the settings. The green RUN LED blinks when the controller starts by using the settings stored in the non-volatile memory (the last configuration saved by the customer). -
Page 18: Input Filters
LTDVE4CH-20 | INSTRUCTIONS MANUAL Figure 4: diagram of internal logic network The four synchronization inputs are shown at the left (TR1, TR2, TR3 and TR4), while the four light outputs (LD1, LD2, LD3 and LD4) and the four synchronization outputs (SH1, SH2, SH3 and SH4) are drawn at the right. -
Page 19: Input Multiplexers
LTDVE4CH-20 | INSTRUCTIONS MANUAL • No filtering (pass through) • Filtering with a 10µs time constant • Filtering with a 20µs time constant • Filtering with a 50µs time constant • Filtering with a 100µs time constant • Filtering with a 200µs time constant •... -
Page 20: Output Multiplexers
LTDVE4CH-20 | INSTRUCTIONS MANUAL 12.5. Output multiplexers The output multiplexers are used to send the inner signals to the output stages. There are eight output multiplexers organized in a 12x8 routing matrix. Each multiplexer can have its output selected from one of the following sources: •... - Page 21 LTDVE4CH-20 | INSTRUCTIONS MANUAL TonMAX TonMAX input ToffMIN output Figure 7: turn-on and turn-off times within limits The diagram in Figure 8: protection prevents too long turn-on time shows what happens when the turn-on time is too long. As visible in the diagram, the light is switched off at TonMAX, earlier than the original requirement.
-
Page 22: Free Running Oscillator
LTDVE4CH-20 | INSTRUCTIONS MANUAL the application. Similarly, the turn-off protection can be inhibited on selected outputs if required by the application. Setting of the output protection logic can be done using the serial RS485 or Ethernet interfaces. 12.7. Free running oscillator... - Page 23 LTDVE4CH-20 | INSTRUCTIONS MANUAL As shown, the power and logic supplies are derived from a common power supply. If required for the application, a safety switch may be included in the circuit to cut off supply to the power stages in order to protect the end user from photo-biological hazard. That switch would be appropriately placed on the machine chassis.
-
Page 24: Operation With Modbus
LTDVE4CH-20 | INSTRUCTIONS MANUAL The controller is triggered by camera 1 using one of the four available synchronization inputs. Camera 2 is triggered by the controller using one of the four available synchronization outputs. Generally, it is not possible to provide the details of the connections to the cameras because these are often vendor specific. - Page 25 LTDVE4CH-20 | INSTRUCTIONS MANUAL Function name Function code Note Read Holding Registers 0x03 Write Single Register 0x06 Write Multiple Registers 0x10 Table 14: function codes supported by the controller Any Modbus request containing an unimplemented function code is silently ignored by the controller and no response, of any kind, is given back to the master.
- Page 26 LTDVE4CH-20 | INSTRUCTIONS MANUAL MCU_VERSION Microcontroller firmware version 65535 FPGA_VERSION FPGA firmware version 65535 BOARD_VERSION Board version 65535 OSC_PERIOD Period of the internal oscillator 1000 FILTER_SEL0 Filter setting for input TR1 FILTER_SEL1 Filter setting for input TR2 FILTER_SEL2 Filter setting for input TR3...
- Page 27 LTDVE4CH-20 | INSTRUCTIONS MANUAL GEN_WDT_BASE0 Pulse width time base selector for generator 1 GEN_WDT_CNT0 Pulse width setting for generator 1 1023 GEN_DLY_BASE1 Pulse delay time base selector for generator 2 GEN_DLY_CNT1 Pulse delay setting for generator 2 1023 GEN_WDT_BASE1 Pulse width time base selector for...
- Page 28 LTDVE4CH-20 | INSTRUCTIONS MANUAL GEN_WDT_CNT5 Pulse width setting for generator 6 1023 GEN_DLY_BASE6 Pulse delay time base selector for generator 7 GEN_DLY_CNT6 Pulse delay setting for generator 7 1023 GEN_WDT_BASE6 Pulse width time base selector for generator 7 GEN_WDT_CNT6 Pulse width setting for generator 7...
- Page 29 LTDVE4CH-20 | INSTRUCTIONS MANUAL UNUSED UNUSED UNUSED UNUSED UNUSED UNUSED UNUSED UNUSED UNUSED UNUSED UNUSED UNUSED OUTPUT_SEL_HI0 0-511 High order byte of setting for LD1 output multiplexer OUTPUT_SEL_LO0 Low order byte of setting for LD1 output 65535 multiplexer OUTPUT_SEL_HI1 0-511...
- Page 30 LTDVE4CH-20 | INSTRUCTIONS MANUAL OUTPUT_SEL_LO8 Low order byte of setting for SH1 output 65535 multiplexer OUTPUT_SEL_HI9 0-511 High order byte of setting for SH2 output multiplexer OUTPUT_SEL_LO9 Low order byte of setting for SH2 output 65535 multiplexer OUTPUT_SEL_HI10 0-511 High order byte of setting for SH3 output...
- Page 31 LTDVE4CH-20 | INSTRUCTIONS MANUAL PRT_ENA_OFF3 Enable limitation of turn-off time for LD4 UNUSED UNUSED UNUSED UNUSED UNUSED UNUSED UNUSED UNUSED UNUSED UNUSED UNUSED UNUSED UNUSED UNUSED UNUSED UNUSED CUR_RANGE0 Current range for LD1 CUR_VALUE0 Current value for LD1 20000 CUR_RANGE1...
- Page 32 LTDVE4CH-20 | INSTRUCTIONS MANUAL UNUSED RS485_MODBUS_ADDR 1-247 Modbus address for serial RS485 interface RS485_LINE_SPEED Speed for serial RS485 interface RS485_LINE_PARITY Parity for serial RS485 interface ETH_MAC_ADDR0 Bytes 0 and 1 of Ethernet MAC address 65535 ETH_MAC_ADDR1 Bytes 2 and 3 of Ethernet MAC address...
- Page 33 LTDVE4CH-20 | INSTRUCTIONS MANUAL 65535 DNS address ETH_PRI_DNS_LO Low order word of Ethernet primary DNS 65535 address ETH_SEC_DNS_HI High order word of Ethernet secondary 65535 DNS address ETH_SEC_DNS_LO Low order word of Ethernet secondary 65535 DNS address ETH_MODBUS_ADDR 1-247 Modbus address for Ethernet interface...
- Page 34 LTDVE4CH-20 | INSTRUCTIONS MANUAL UNUSED MEASURED_VOLTAGE0 0-480 Measured voltage for light output LD1 MEASURED_VOLTAGE1 0-480 Measured voltage for light output LD2 MEASURED_VOLTAGE2 0-480 Measured voltage for light output LD3 MEASURED_VOLTAGE3 0-480 Measured voltage for light output LD4 UNUSED UNUSED UNUSED...
- Page 35 In the following sections, the 0x prefix is used to denote a hexadecimal number. The prefix 0x is used in C and related languages. 14.2.1. Register DEVICE_TYPE This register contains the device type. This information is encoded as a 16-bit unsigned number. For the standard LTDVE4CH-20 the device type is 0x0007.
- Page 36 LTDVE4CH-20 | INSTRUCTIONS MANUAL 14.2.2. Register BOOT_VERSION This register contains the bootloader firmware version for the microcontroller. This information is encoded as a 16-bit unsigned number. 14.2.3. Register MCU_VERSION This register contains the application firmware version for the microcontroller. This information is encoded as a 16-bit unsigned number.
- Page 37 LTDVE4CH-20 | INSTRUCTIONS MANUAL INPUT_SEL0: setting of input multiplexer 0 INPUT_SEL1: setting of input multiplexer 1 INPUT_SEL2: setting of input multiplexer 2 INPUT_SEL3: setting of input multiplexer 3 INPUT_SEL4: setting of input multiplexer 4 ...
- Page 38 LTDVE4CH-20 | INSTRUCTIONS MANUAL 14.2.10. Registers GEN_DLY_CNT[0:7] Each bit field [9:0] of these eight registers holds the actual count for the generation of the pulse delay in the relevant pulse generator. GEN_DLY_CNT0: pulse delay setting for generator 1 ...
- Page 39 LTDVE4CH-20 | INSTRUCTIONS MANUAL 14.2.12. Registers GEN_WDT_CNT[0:7] Each bit field [9:0] of these eight registers holds the actual count for the generation of the pulse width in the relevant pulse generator. GEN_WDT_CNT0: pulse width setting for generator 1 ...
- Page 40 LTDVE4CH-20 | INSTRUCTIONS MANUAL When 0x0000004 pulse generator 3 output is selected When 0x0000008 pulse generator 4 output is selected When 0x0000010 pulse generator 5 output is selected When 0x0000020 pulse generator 6 output is selected ...
- Page 41 LTDVE4CH-20 | INSTRUCTIONS MANUAL Allowed values are in the range from 1 (default value) to 1023 (maximum value) and are expressed in ms, so the maximum turn-on time can range from 1 ms to 1023 ms with a resolution of 1 ms. Avoid operation with non-allowed values.
- Page 42 LTDVE4CH-20 | INSTRUCTIONS MANUAL CUR_RANGE1: current range setting for light output LD2 CUR_RANGE2: current range setting for light output LD3 CUR_RANGE3: current range setting for light output LD4 Allowed values are in the range from 0 to 3 and are listed below. Avoid operation with non-listed values.
- Page 43 LTDVE4CH-20 | INSTRUCTIONS MANUAL When 0x7 the selected baud rate is 115200 bits per second Bit field [15:3] of this register is unused. When writing these bits, they must be set to zero. The default value is 3, corresponding to 9600 bits per second. The factory settings can be restored...
- Page 44 LTDVE4CH-20 | INSTRUCTIONS MANUAL 14.2.26. Register ETH_DHCP_ENABLE Bit 0 of this register holds the enable flag for the DHCP. When set to 0 the DHCP is disabled (default value) When set to 1 the DHCP is enabled Bit field [15:1] of this register is unused. When writing these bits, they must be set to zero.
- Page 45 LTDVE4CH-20 | INSTRUCTIONS MANUAL The factory settings can be restored using the INIT button (see chapter 11 for a description of the INIT button functionalities). 14.2.34. Register ETH_PRI_DNS_LO This register contains the sixteen low order bits of the primary (preferred) DNS address for Ethernet communication of the controller.
- Page 46 LTDVE4CH-20 | INSTRUCTIONS MANUAL WEB_PASSWORD1: bytes 2 and 3 of the web password WEB_PASSWORD2: bytes 4 and 5 of the web password WEB_PASSWORD3: bytes 6 and 7 of the web password The factory settings can be restored using the INIT button (see...
- Page 47 LTDVE4CH-20 | INSTRUCTIONS MANUAL can be calculated as follows: MeasuredCurrent[x] [A] = value(MEASURED_CURRENT[x]) * 0.001 These registers are updated while the outputs are activated. 14.2.45. Registers MEASURED_VOLTAGE[0:3] The controller is capable of measuring the actual output voltages for the four light outputs.
- Page 48 LTDVE4CH-20 | INSTRUCTIONS MANUAL 14.2.47. Registers CALIB_CUR_ADD[0:3] These registers contain calibration constants for measurement of light outputs currents. CALIB_CUR_ADD0: calibration constant for measurement of light output LD1 current CALIB_CUR_ADD1: calibration constant for measurement of light output LD2 current ...
- Page 49 LTDVE4CH-20 | INSTRUCTIONS MANUAL Changes to the register file are saved in non-volatile memory only when a specific command is issued to the controller using this register. The register is automatically set back to zero after the requested action has been completed.
- Page 50 LTDVE4CH-20 | INSTRUCTIONS MANUAL Figure 12: the Main web page The top part of the main web page contains the navigation menu that is used to access all the other pages necessary to configure and manage the controller. The navigation menu is always visible and accessible at the top of every page.
- Page 51 LTDVE4CH-20 | INSTRUCTIONS MANUAL Setup pulse generators GN5-GN8 Setup light outputs LD1-LD4 Setup synch outputs SH1-SH4 General setup Advanced setup In the bottom part of the main page, the following information is collected: Version information:...
- Page 52 LTDVE4CH-20 | INSTRUCTIONS MANUAL Figure 13: the Setup synch inputs TR1-TR4 web page Each synchronization input has a digital filter that can be set independently. Each of the four filters can be enabled or disabled. If enabled, it can be set to one of six predefined time constants. The available selections are: ...
- Page 53 LTDVE4CH-20 | INSTRUCTIONS MANUAL Figure 14: the Setup pulse generators GN1-GN4 web page Each pulse generator can be set independently. Each pulse generator is triggered by a selectable source and can have a different pulse delay and pulse width. ...
- Page 54 LTDVE4CH-20 | INSTRUCTIONS MANUAL Settings Pulse delay and Pulse width are expressed in μs. 14.3.4. Setup pulse generators GN5-GN8 This page allows to inspect and change all the settings related to the pulse generators from 5 to 8. Please refer to the description of page Setup pulse generators GN1-GN4 in chapter 14.3.3...
- Page 55 LTDVE4CH-20 | INSTRUCTIONS MANUAL Figure 15: the Setup light outputs LD1-LD4 web page Each light output can be set independently. Each light output can have a different activation source, a specific output current and independent maximum turn-on and minimum turn-off parameters.
- Page 56 LTDVE4CH-20 | INSTRUCTIONS MANUAL Current range selects the current range for the light output. It can be chosen between Automatic range selection (default), Low range (from zero up to 200 mA), Mid range (from zero up to 4 A) and High range (from zero up to 20 A) ...
-
Page 57: General Setup
LTDVE4CH-20 | INSTRUCTIONS MANUAL Each synchronization output can be set independently. Each one can have a different activation source chosen between Off (default), Generator GN1, Generator GN2, Generator GN3, Generator GN4, Generator GN5, Generator GN6, Generator GN7, Generator GN8, Input TR1, Input TR2, Input TR3, Input TR4 and Continuous. - Page 58 LTDVE4CH-20 | INSTRUCTIONS MANUAL Figure 17: the General setup web page A password can be used to deny the modification of the settings to unauthorized personnel. In case the password is set, it must be entered in the Current password field. If the entered password matches the saved password, the settings can be changed.
-
Page 59: Advanced Setup
LTDVE4CH-20 | INSTRUCTIONS MANUAL The fields under Ethernet interface collect all the settings related to the Ethernet interface. It is possible to enable the use of a DHCP server, to change the IP address, the subnet mask, etc. MAC address is the unique MAC address of the Ethernet interface ... - Page 60 LTDVE4CH-20 | INSTRUCTIONS MANUAL Figure 18: the Advanced setup web page The fields under Change unlock password can be used to set or modify the password employed to protect the settings of the controller from unauthorized modify. Current password is the current password (leave blank if there is not current password) ...
-
Page 61: Electromagnetic Compatibility
LTDVE4CH-20 | INSTRUCTIONS MANUAL Address is the address of the register to be written (decimal number) Value contains the value that has to be written to the register specified by the address (decimal number) Please refer to chapter 14.2 for a comprehensive list of the Modbus registers available. - Page 62 LTDVE4CH-20 | INSTRUCTIONS MANUAL Figure 20: dialog used to locate the FPGA Algo firmware file After the FPGA Algo file has been specified, the relative modal dialog is closed. The new modal dialog of Figure 21: dialog used to locate the FPGA Data firmware file will then be displayed, asking...
- Page 63 LTDVE4CH-20 | INSTRUCTIONS MANUAL Figure 21: dialog used to locate the FPGA Data firmware file After the FPGA Data file has been specified, the relative modal dialog is closed. The couple of FPGA firmware files will then be loaded from the PC disk to the PC RAM. The text box at the bottom of the main window will then be updated with some information regarding the loading process (see image in Figure 22: main window after the FPGA firmware files have been loaded).
- Page 64 LTDVE4CH-20 | INSTRUCTIONS MANUAL Figure 22: main window after the FPGA firmware files have been loaded To update the MCU firmware it is necessary to specify a single file, named the MCU file. After pressing the Load MCU file button the modal dialog of Figure 23: dialog used to locate the MCU...
- Page 65 LTDVE4CH-20 | INSTRUCTIONS MANUAL Figure 23: dialog used to locate the MCU firmware file After the MCU file has been specified, the relative modal dialog is closed. The single MCU firmware file will then be loaded from the PC disk to the PC RAM. The text box at the bottom of the main window will then be updated with some information regarding the loading process (see image in Figure 24: main window after the MCU firmware file has been loaded).
- Page 66 LTDVE4CH-20 | INSTRUCTIONS MANUAL Figure 24: main window after the MCU firmware file has been loaded The firmware update sequence is then started by pressing the Update button. The PC application connects to the controller and starts the data transfer and programming. The progress bar in the middle of the main window keeps updating to show the advancement of the process.
- Page 67 LTDVE4CH-20 | INSTRUCTIONS MANUAL Figure 26: FPGA Data firmware update sequence Last, the FPGA Algo firmware is transferred (see image in Figure 27: FPGA Algo firmware update sequence). Figure 27: FPGA Algo firmware update sequence The FPGA is programmed just after both the FPGA Data and the FPGA Algo files have been...
- Page 68 LTDVE4CH-20 | INSTRUCTIONS MANUAL Figure 28: main window after FPGA programming The information in Figure 29: main window after successful firmware update is displayed when the update process is successfully finished. Figure 29: main window after successful firmware update The whole update process takes about two minutes to complete.
- Page 69 LTDVE4CH-20 | INSTRUCTIONS MANUAL...
Need help?
Do you have a question about the LTDVE4CH-20 and is the answer not in the manual?
Questions and answers