Table of Contents
Advertisement
Quick Links
FOR AGES:
WEI GHT LIMIT:
3-7
Manual en español
ubicado en
GQBrands.com
Spanish Manual located
at GQBrands.com
CUSTOMER SERVICE
GQBrands.com • CustomerService @ GQBrands.com • 1-866-498-5269 • 4401 Samuell Blvd, Ste 150, Mesquite, TX 75149
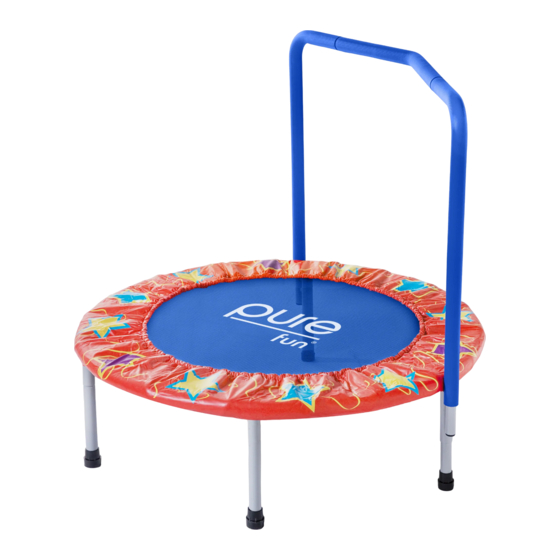
36-INCH KIDS BUNGEE TRAMPOLINE
MODEL# 9006KM
PRODUCT MANUAL - VERSION 4.21.01
TO BUILD:
75
Lbs
TO BUILD:
2
X
Advertisement
Table of Contents

Related Manuals for Pure Fun 9006KM


Summary of Contents for Pure Fun 9006KM
- Page 1 36-INCH KIDS BUNGEE TRAMPOLINE MODEL# 9006KM PRODUCT MANUAL - VERSION 4.21.01 FOR AGES: WEI GHT LIMIT: TO BUILD: TO BUILD: Manual en español ubicado en GQBrands.com Spanish Manual located at GQBrands.com CUSTOMER SERVICE GQBrands.com • CustomerService @ GQBrands.com • 1-866-498-5269 • 4401 Samuell Blvd, Ste 150, Mesquite, TX 75149...
-
Page 2: Customer Service Information
Most up to date manuals, warnings and product information can be found at: TRAMPOLINE https://www.globalqualitybrands.com/warnings MODEL# 9006KM To register you product please visit: If you have an issue with your item, do not return. Please report www.globalqualitybrands.com/product-... -
Page 3: Important Message
PROPOSITION 65 THIS PRODUCT CAN POSSIBLY EXPOSE YOU TO CHEMICALS INCLUDING Dl(2-ETHYLHEXYL) PHTHALATE (DEHP). WHICH IS KNOWN TO THE STATE OF CALIFORNIA TO CAUSE CANCER AND BIRTH DEFECTS OR OTHER REPRODUCTIVE HARM. FOR MORE INFORMATION GO TO WWW.P65WARNINGS.CA.GOV. Model# 9006KM... -
Page 4: Warning Label Locations
- Replace label if illegible or removed. 75 LBS MAX WEIGHT Global Quality Brands - PureFun.net MODEL# 9006KM 4401 Samuell Blvd, Ste 150 Mesquite, TX MADE IN CHINA 75149 CustomerService@GQBrands.com Global Quality Brands - PureFun.net CustomerService@GQBrands.com The labels shown on this page... - Page 5 Do not use the trampoline • DO NOT use the trampoline set when under without the frame pad securely in place fully the influence of alcohol, drugs or medication covering the frame and springs. which may impair the jumper’s judgment and coordination. Model# 9006KM...
-
Page 6: Basic Trampoline Skills
BASIC TRAMPOLINE SKILLS The following exercises are examples of instructions for use of this exercise trampoline. It is highly recommended to stretch and warm up for at least 10 minutes before starting any exercise. Jumpers should practice these basic techniques and perfect them. Jumping Jacks Tuck Jumps Stand with your feet together and your arms alongside... -
Page 7: Parts List
PARTS LIST Top Rail Frame 2A - Leg Cap Center Handlebar Frame Pad Left Handle Base Right Handle Base 9A - Bungee Cord with Carabiner Jump Mat Model# 9006KM... - Page 8 ASSEMBLY INSTRUCTIONS To assemble the trampoline properly, you must follow all instruction steps below. Do not attempt to alter any trampoline frame components or parts or skip any steps below. Use gloves to protect your hands from pinch points during assembly. STEP 1 Connect 3 Top Rail Frames (1) together by snapping in at the snap buttons.
- Page 9 Keep the spacing consistent so the jump mat stays centered inside of the frame until the end of the cord is reached and hook the carabiner into the loop at small end of bungee cord. Model# 9006KM...
- Page 10 ASSEMBLY INSTRUCTIONS STEP 5 Once the tension of the rope increases. You may need some help pulling to connect at the end. GQBrands.com CustomerService@GQBrands.com 1-866-498-5269...
- Page 11 ASSEMBLY INSTRUCTIONS STEP 6 When finished looping through. Connect the end with the caribiner to the loop hole on the other end to secure. Model# 9006KM...
- Page 12 ASSEMBLY INSTRUCTIONS STEP 7 To install the frame pad (6) stretch first with another person to loosen the tension. Fit securely over the frame and stretch until entire frame is completely covered. STEP 8 Install all legs (2) by screwing them onto the leg frames as shown.
- Page 13 Replace the leg cap as shown. Slide the Left Handle Base (3) on the leg on the left side that does not have a cap. Leg will click into place. Replace the leg cap as shown. Model# 9006KM...
- Page 14 ASSEMBLY INSTRUCTIONS Connect the Center Handlebar (5) to both side handrails with the pointed edge of the center handlebar facing upward. Snap into place GQBrands.com CustomerService@GQBrands.com 1-866-498-5269...
-
Page 15: Frequently Asked Questions
Thank You Coupon! As a way of saying thank you for purchasing one of our products, here is a 10% OFF coupon for your next purchase at www.PureFun.net Use Code: GQBRANDS10 at Checkout Model# 9006KM...
Need help?
Do you have a question about the 9006KM and is the answer not in the manual?
Questions and answers