Advertisement
The Compact Router Ellipse/Circle Jig allows you to use your compact plunge router to easily cut
precise ellipses and circles for picture frames, mirrors, signs and more. For safe and effective operation,
please read these instructions fully before use.
Compact Router Ellipse/
Circle Jig Instructions
Advertisement
Table of Contents

Subscribe to Our Youtube Channel
Related Manuals for Rockler Ellipse/Circle Jig

Summary of Contents for Rockler Ellipse/Circle Jig
- Page 1 Compact Router Ellipse/ Circle Jig Instructions The Compact Router Ellipse/Circle Jig allows you to use your compact plunge router to easily cut precise ellipses and circles for picture frames, mirrors, signs and more. For safe and effective operation, please read these instructions fully before use.
- Page 2 GENERAL SAFETY WARNINGS This tool is designed for specific applications as defined in the instructions and should not be modified and/or used for any other applications. Before using the Compact Router Ellipse/Circle Jig read, understand and follow all instructions and safety information provided. KEEP THESE INSTRUCTIONS. > For any tool that is used in conjunction with this > Remain alert and use good judgment when using product always read, understand and follow the this tool. Do not use this tool if you are in any way instructions and safety warnings for that tool.
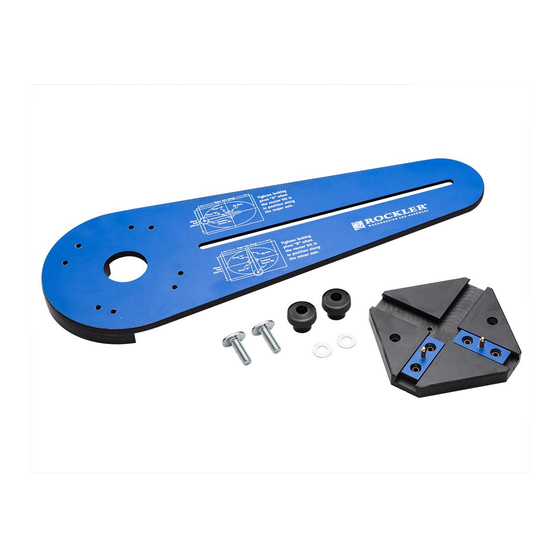
- Page 3 PARTS LIST - COMPACT ROUTER ELLIPSE/CIRCLE JIG Quantity 1 Jig Arm 2 Jig Base 3 Dovetail Key 4 5/16-18 x 1" Knobs 5 5/16" Washers 6 5/16-18 x 1" T-Bolts 7 #6 Wood Screws 8 10mm Machine Pan Head Screws...
- Page 4 2.6" 3.125" 3.125" 2.6" 2.696" 2.992" 2.992" 2.696" ROUTER MOUNTING HOLE KEY Porter Cable 450PK Bosch Colt PR20EVS Kits DeWalt DWP611PK...
- Page 5 Minor Axis Major Axis Center point Fig. 1 Jig and Workpiece Setup Recommended maximum material thickness (for through routing) is 1/2". 1. Attach your compact plunge router to the Jig Arm (1) with the included 10mm Pan-Head Machine Screws (8) and install the desired bit.
- Page 6 3. Insert a Dovetailed Key (3) into each channel in the Jig Base (2). Center one (hereafter referred to as “Dovetail Key A”) along the minor axis. 4. Loosen the two Locking Pivots on the Jig Arm (1) and position them so they mount on the pins in the Dovetailed Keys (3).
- Page 7 Note: Don’t try to cut to full depth in one pass. Make several passes, increasing the depth of cut with each. Check Rockler.com for updates. If you have further questions, please contact our Technical Support Department at 1-800-260-9663 or support@rockler.com Fig.
- Page 8 55819 Distributed by Rockler Companies, Inc. Rev 09/16 ©2016 Rockler Woodworking and Hardware...
Need help?
Do you have a question about the Ellipse/Circle Jig and is the answer not in the manual?
Questions and answers
The ellipse jig does not match the Bosch router and the process of having to field modify the jig is not a pleasant task. The material chips when drilling and interference with existing holes can occur in the process. The fact that the jig was not predrilled for use with the popular Bosch router is very disappointing.