Table of Contents
Advertisement
Quick Links
Digital Encoder
E-Series User Manual
(updated June 29, 2014)
Information in this document is subject to change without notice.
© Copyright 2006-2014, Exacq Technologies, Inc. All rights reserved.
Exacq Technologies is a trademark of Exacq Technologies, Inc. Other trademarks and trade names may be used in
this document to refer to either the entities claiming the marks and names or their products. Exacq Technologies,
Inc., disclaims any proprietary interest in trademarks and trade names other than its own.
Exacq Technologies makes no warranty of any kind with regard to this material, including, but not limited to, the
implied warranties of merchantability and fitness for a particular purpose. Exacq Technologies shall not be liable
for errors contained herein or for incidental or consequential damages in connection with the furnishing,
performance, or use of this manual.
Exacq Technologies, Inc.
11955 Exit Five Parkway, Bldg 3
Fishers, IN 46037 USA
Advertisement
Table of Contents

Summary of Contents for Exacq exacqVision E Series
- Page 1 Inc., disclaims any proprietary interest in trademarks and trade names other than its own. Exacq Technologies makes no warranty of any kind with regard to this material, including, but not limited to, the implied warranties of merchantability and fitness for a particular purpose. Exacq Technologies shall not be liable for errors contained herein or for incidental or consequential damages in connection with the furnishing, performance, or use of this manual.
- Page 2 +1.317.845.5710 USA (Corporate Headquarters) www.exacq.com +44.1438.310163 Europe/Middle East/Asia...
-
Page 3: Table Of Contents
Configuring SNMP Settings ..........................28 Configuring Port Settings ............................ 30 Configuring PPPoE Settings ..........................31 Configuring QoS Settings ............................ 32 Configuring SOCKS Settings ..........................33 Configuring NAT/UPnP Settings ........................34 Configuring HTTPS Settings ..........................36 +1.317.845.5710 USA (Corporate Headquarters) www.exacq.com +44.1438.310163 Europe/Middle East/Asia... - Page 4 14 Log Search and Maintenance ................64 Log Search ................................64 Viewing Device Information ..........................65 Maintenance ................................66 A Technical Support ....................68 B Regulatory Notice ....................69 C Warranty ........................70 +1.317.845.5710 USA (Corporate Headquarters) www.exacq.com +44.1438.310163 Europe/Middle East/Asia...
-
Page 5: Introduction
Relay input alarm can be responded to with PTZ linkage actions, such as presets, patrols, or patterns. +1.317.845.5710 USA (Corporate Headquarters) www.exacq.com +44.1438.310163 Europe/Middle East/Asia... - Page 6 Logs Can be classified into the operation logs, alarm logs, exception logs, and information logs; searchable and viewable by date or type; exportable in text format over network. +1.317.845.5710 USA (Corporate Headquarters) www.exacq.com +44.1438.310163 Europe/Middle East/Asia...
-
Page 7: Encoder Overview
3.5mm interface; connect to audio output device such as loudspeaker. microSD microSD interface for log storage. RESET Hold button for more than 15 seconds after power is turned on to restore factory-default settings. +1.317.845.5710 USA (Corporate Headquarters) www.exacq.com +44.1438.310163 Europe/Middle East/Asia... -
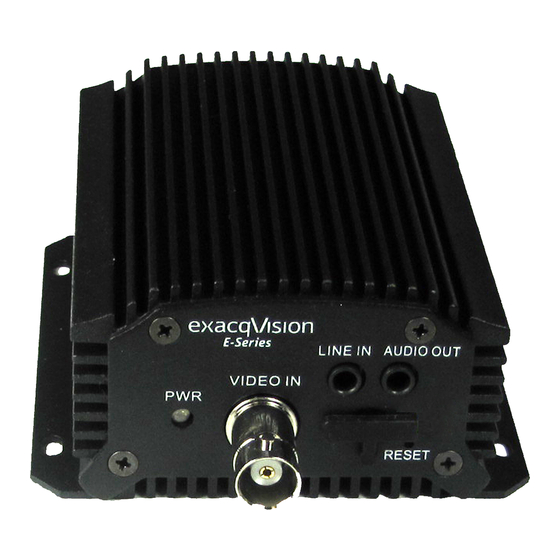
Page 8: E-Ade4C Front Panel
3.5mm two-way audio input interface; connect to active pick-up, microphone, etc. AUDIO OUT 3.5mm interface; connect to audio output device, such as loudspeaker. VIDEO IN BNC interface for video input. AUDIO IN Line input interface for audio input. +1.317.845.5710 USA (Corporate Headquarters) www.exacq.com +44.1438.310163 Europe/Middle East/Asia... -
Page 9: E-Ade1C Rear Panel
10M/100Mbps adaptive Ethernet interface (PoE). Right LED indicator lights in green when the network cable is connected; left LED indicator blinks in orange when data is transmitting/receiving. DC12V 12V DC power supply. Grounding. +1.317.845.5710 USA (Corporate Headquarters) www.exacq.com +44.1438.310163 Europe/Middle East/Asia... -
Page 10: E-Ade4C Rear Panel
10M/100Mbps adaptive Ethernet interface (PoE). Right LED indicator lights in green when the network cable is connected; left LED indicator blinks in orange when data is transmitting/receiving. DC12V 12V DC power supply. Grounding. +1.317.845.5710 USA (Corporate Headquarters) www.exacq.com +44.1438.310163 Europe/Middle East/Asia... -
Page 11: Alarm Input Connections
For DC load, JJ1can be safely used both in NC and NO modes, and it is recommended within the limit of 12V/1A. For external AC input, JJ1 must be open. The motherboard provides two jumpers, each corresponding to one alarm output. Both jumpers are connected by default. +1.317.845.5710 USA (Corporate Headquarters) www.exacq.com +44.1438.310163 Europe/Middle East/Asia... -
Page 12: Network Parameters
Any newly searched devices are added to the list. Devices can be searched and displayed in the list within 15 seconds of connection, and they are removed from the list within 45 seconds after going offline. +1.317.845.5710 USA (Corporate Headquarters) www.exacq.com +44.1438.310163 Europe/Middle East/Asia... -
Page 13: Modifying Network Parameters
It is recommended that you change the admin password. Default credentials for the encoder are as follows: Username: admin Password: admin256 If you need to restore the default password, contact technical support to obtain a security code. Enter the security code and click OK. +1.317.845.5710 USA (Corporate Headquarters) www.exacq.com +44.1438.310163 Europe/Middle East/Asia... -
Page 14: Connecting To An Exacqvision System
Connecting to an exacqVision System NOTE: The latest version of exacqVision Client can be downloaded from https://exacq.com/support/downloads.php. Initiating the Connection To add the encoder to the exacqVision system using exacqVision Client, complete the following steps: 1. Open exacqVision Client and select the Config (Setup) page. -
Page 15: Verifying The Connection
4. If audio is connected, drag an audio channel into the playback window to verify the audio connection and transmission. For complete information about exacqVision Client, click the Help button or download the user manual from https://exacq.com/support/specsheets.php?perma=exacqVision+User+Manuals. +1.317.845.5710 USA (Corporate Headquarters) www.exacq.com... -
Page 16: Encoder Configuration Page
1. In the web browser, open the IP address of the encoder (such as http://192.0.0.64) and then press Enter to display the login interface. NOTE: When the HTTPS feature is enabled, the system will use the HTTPS login mode (https://ipaddress) by default. You can alternatively enter http://ipaddress/index.asp to use HTTP instead. +1.317.845.5710 USA (Corporate Headquarters) www.exacq.com +44.1438.310163 Europe/Middle East/Asia... - Page 17 5. Click Run or Save on the pop-up warning message box. 6. Click Next on the pop-up Setup dialog box. 7. When the installation completes, click Finish to complete the installation of Web Components. +1.317.845.5710 USA (Corporate Headquarters) www.exacq.com +44.1438.310163 Europe/Middle East/Asia...
-
Page 18: Main Page
7. Preset Setting/Calling: Set and call the preset for the camera (supports PTZ functions). 8. Video Parameters menu: Configure the brightness, contrast, hue, and saturation of live video. (Click the Video Parameters button to display the options.) +1.317.845.5710 USA (Corporate Headquarters) www.exacq.com +44.1438.310163 Europe/Middle East/Asia... -
Page 19: Live View
Live View automatically. Starting Live View 1. In the Live View window, select a video window. 2. Double-click a camera from the device list to start the Live View. +1.317.845.5710 USA (Corporate Headquarters) www.exacq.com +44.1438.310163 Europe/Middle East/Asia... -
Page 20: Capturing A Picture
JPEG format. When the picture is captured, the following pop-up message box will appear at the lower right corner. The location where the picture is saved can be configured using the Local Configuration option on the Configuration page. +1.317.845.5710 USA (Corporate Headquarters) www.exacq.com +44.1438.310163 Europe/Middle East/Asia... -
Page 21: Operating Ptz Controls
2. The baud rate, PTZ control, and address are configured in the RS-485 Settings interface (on the Remote Configuration menu, select Serial Port Settings and then 485 Serial Port). The PTZ controls contain eight directional buttons (up, down, left, right, upper left, upper right, bottom left, bottom right). +1.317.845.5710 USA (Corporate Headquarters) www.exacq.com +44.1438.310163 Europe/Middle East/Asia... - Page 22 2. Use the PTZ control buttons to point the camera in the desired direction with the desired settings. You can use any of the following commands: 3. Click the icon to set the preset. Up to 256 presets are configurable, depending on the PTZ protocol applied. +1.317.845.5710 USA (Corporate Headquarters) www.exacq.com +44.1438.310163 Europe/Middle East/Asia...
- Page 23 To call a preset in Live View mode, select a predefined preset from the list and click the icon. The preset can also be used to link to the alarm input when an alarm occurs. +1.317.845.5710 USA (Corporate Headquarters) www.exacq.com +44.1438.310163 Europe/Middle East/Asia...
-
Page 24: Configuring Video Parameters
4. Move the slider to set the sharpness from 0 to 15 and the denoising level from 0 to 3. The default value is 3 for the sharpness and 1 for the denoising level. NOTE: Click the button to restore the default settings. +1.317.845.5710 USA (Corporate Headquarters) www.exacq.com +44.1438.310163 Europe/Middle East/Asia... -
Page 25: Device Configuration
9. Save Record Files To: Click Browse or manually enter the path for the manually recorded video files. 10. Save Snapshots in Live View To: Click Browse or manually enter the path for the manually captured pictures in Live View mode. +1.317.845.5710 USA (Corporate Headquarters) www.exacq.com +44.1438.310163 Europe/Middle East/Asia... -
Page 26: Configuring Time Settings
You can also select Sync. with Computer Time to synchronize the time with the local computer, and enable daylight saving time (DST) and its parameters if observed in the local area. 4. Click the Save button to save the settings. +1.317.845.5710 USA (Corporate Headquarters) www.exacq.com +44.1438.310163 Europe/Middle East/Asia... -
Page 27: Network Settings
4. If the DNS server settings are required for some applications, configure the Preferred DNS Server and Alternate DNS Sever here. 5. Click the Save button to save the above settings. +1.317.845.5710 USA (Corporate Headquarters) www.exacq.com +44.1438.310163 Europe/Middle East/Asia... -
Page 28: Configuring Snmp Settings
5. Configure the Write SNMP community (default: private) 6. Configure the Tap Address (default: [blank]) 7. Configure the Trap Port (default: 162). The rest of the SNMP configuration is discussed on the following page. +1.317.845.5710 USA (Corporate Headquarters) www.exacq.com +44.1438.310163 Europe/Middle East/Asia... - Page 29 Algorithm parameters. If the security level is set to “no auth, no priv”, you cannot configure the Authentication Algorithm and Private-key Algorithm parameters. 12. Set the SNMP port (default: 161). 13. Click Save to save the settings. +1.317.845.5710 USA (Corporate Headquarters) www.exacq.com +44.1438.310163 Europe/Middle East/Asia...
-
Page 30: Configuring Port Settings
Set the HTTP port (default: 80), RTSP port (554), and HTTPS port (443) of the camera. Click Save to save the settings. A system restart is required to activate changed settings. +1.317.845.5710 USA (Corporate Headquarters) www.exacq.com +44.1438.310163 Europe/Middle East/Asia... -
Page 31: Configuring Pppoe Settings
2. Select the Enable PPPoE checkbox. 3. Enter the User Name, Password, and Confirm Password for PPPoE access. These must be assigned by the ISP. 4. Click the Save button to save and exit. +1.317.845.5710 USA (Corporate Headquarters) www.exacq.com +44.1438.310163 Europe/Middle East/Asia... -
Page 32: Configuring Qos Settings
The valid value range of the DSCP is 0-63. The higher DSCP value indicates a higher priority level. Click Save to save the settings and then restart the encoder. +1.317.845.5710 USA (Corporate Headquarters) www.exacq.com +44.1438.310163 Europe/Middle East/Asia... -
Page 33: Configuring Socks Settings
Local networks: Define the local network segment that does not need to use SOCKS proxy server. You can enter multiple network addresses and use a semicolon (;) to separate them (“10.0.0.0/255.0.0.0; 172.16.0.0/255.240.0.0”). Click Save to save the settings. +1.317.845.5710 USA (Corporate Headquarters) www.exacq.com +44.1438.310163 Europe/Middle East/Asia... -
Page 34: Configuring Nat/Upnp
NOTES: You can use the default port No., or change it according to actual requirements. The Ports indicate the port NUMBER for mapping in the router. Click Save to save the settings. +1.317.845.5710 USA (Corporate Headquarters) www.exacq.com +44.1438.310163 Europe/Middle East/Asia... - Page 35 You can view the status of the port mapping in the Port Status area. +1.317.845.5710 USA (Corporate Headquarters) www.exacq.com +44.1438.310163 Europe/Middle East/Asia...
-
Page 36: Configuring Https Settings
Click Create to create the self-signed certificate or authorized certificate. This opens the following window. Enter the country, host name/IP, validity, and other information. Click OK to save the settings. +1.317.845.5710 USA (Corporate Headquarters) www.exacq.com +44.1438.310163 Europe/Middle East/Asia... - Page 37 After the HTTPS feature is enabled, the system will use the HTTPS login mode by default when you input the IP address (such as https://192.0.0.64). You can also input http://IP address/index.asp (such as http://192.0.0.64/index.asp) if you want to use HTTP mode to log in to the device. +1.317.845.5710 USA (Corporate Headquarters) www.exacq.com +44.1438.310163 Europe/Middle East/Asia...
-
Page 38: Configuring Bonjour Settings
Edit the name of device. The name is shown when the device is detected by the system. Only letters, numbers, and hyphens (“-”) can be contained in the name. Click Save to save the settings. +1.317.845.5710 USA (Corporate Headquarters) www.exacq.com +44.1438.310163 Europe/Middle East/Asia... -
Page 39: Configuring Ip Address Filter
3. Select the filter type of IP address (Allowed or Forbidden). 4. Click the Add button to add the IP address to the selected filter type list. 5. Click Save to save the settings. +1.317.845.5710 USA (Corporate Headquarters) www.exacq.com +44.1438.310163 Europe/Middle East/Asia... -
Page 40: Configuring Ieee 802.1X Settings
2. Select the Enable IEEE 802.1X checkbox. 3. The Protocol is automatically selected. Select EAPOL Version 1 or 2. 4. Enter the login credentials. 5. Click Save to save the settings. +1.317.845.5710 USA (Corporate Headquarters) www.exacq.com +44.1438.310163 Europe/Middle East/Asia... -
Page 41: Configuring Advanced Settings
1. From the Remote Configuration menu, select Network Settings and then Advanced to enter the Advanced interface. 2. Enter the IP address and port of the alarm host. 3. Select Enable Telnet if required. 4. Click Save to save the settings. +1.317.845.5710 USA (Corporate Headquarters) www.exacq.com +44.1438.310163 Europe/Middle East/Asia... -
Page 42: Camera Settings
4. Select the display of camera name, date, or week by selecting the checkboxes (if required). 5. Set the Time Format, Date Format, and Display Mode by selecting them from the drop-down lists. +1.317.845.5710 USA (Corporate Headquarters) www.exacq.com +44.1438.310163 Europe/Middle East/Asia... - Page 43 7. To copy the display settings of the current camera to other cameras, expand the Copy to Camera panel and select the cameras, or click Select All to select all cameras. 8. Click Save to activate the settings. +1.317.845.5710 USA (Corporate Headquarters) www.exacq.com +44.1438.310163 Europe/Middle East/Asia...
-
Page 44: Configuring Video Settings
14. To copy the display settings of the current camera to other cameras, expand the Copy to Camera panel and select the cameras, or click Select All to select all cameras. 15. Click Save to activate the settings. +1.317.845.5710 USA (Corporate Headquarters) www.exacq.com +44.1438.310163 Europe/Middle East/Asia... -
Page 45: Configuring Motion Detection
1. From the Remote Configuration menu, select Camera Settings and then Motion Detection to open the Motion Detection settings interface. 2. Select the Channel from the drop-down list. 3. Select the Enable Motion Detection checkbox. 4. Click the Draw Area button. +1.317.845.5710 USA (Corporate Headquarters) www.exacq.com +44.1438.310163 Europe/Middle East/Asia... - Page 46 7. Click the Clear All button if you want to clear all areas. 8. Move the Sensitivity slider bar to set the sensitivity of the camera. 9. Click the Save button to save the settings. +1.317.845.5710 USA (Corporate Headquarters) www.exacq.com +44.1438.310163 Europe/Middle East/Asia...
- Page 47 4. Click the clock buttons to set the time period for the arming schedule. 5. Copy the schedule to other days, if desired. 6. Click the OK button to save the settings. +1.317.845.5710 USA (Corporate Headquarters) www.exacq.com +44.1438.310163 Europe/Middle East/Asia...
- Page 48 1. To specify the alarm type when an event is triggered, select the Linkage Method tab. 2. Select the alarming linkage methods: Full Screen Monitoring Audible Warning Notify Surveillance Center 3. Select the Alarm Output to trigger. 4. Select the Trigger Channel. +1.317.845.5710 USA (Corporate Headquarters) www.exacq.com +44.1438.310163 Europe/Middle East/Asia...
-
Page 49: Configuring A Video Loss Alarm
4. Click Edit to edit the arming schedule for video loss detection. The arming schedule configuration is the same as setting of the Arming Schedule for Motion Detection. 5. Click the Linkage Method tab to set the actions taken for the video loss alarm. +1.317.845.5710 USA (Corporate Headquarters) www.exacq.com +44.1438.310163 Europe/Middle East/Asia... -
Page 50: Configuring A Privacy Mask
6. Click the Stop Drawing button to finish drawing. 7. You can click the Clear All button to clear all of the areas without saving it. 8. Click Save to save the settings. +1.317.845.5710 USA (Corporate Headquarters) www.exacq.com +44.1438.310163 Europe/Middle East/Asia... -
Page 51: Configuring Video Tampering
Arming Schedule for Motion Detection. 6. Select the Linkage Method tab to set the actions taken for the tampering alarm. 7. Click Save to save the settings. +1.317.845.5710 USA (Corporate Headquarters) www.exacq.com +44.1438.310163 Europe/Middle East/Asia... -
Page 52: Configuring Text Overlay
6. To copy the text overlay settings of the current camera to other cameras, expand the Copy to Camera panel and select the cameras, or click Select All to select all cameras. 7. Click Save to activate the settings. +1.317.845.5710 USA (Corporate Headquarters) www.exacq.com +44.1438.310163 Europe/Middle East/Asia... -
Page 53: Configuring Holiday Settings
9. Repeat the same steps to configure up to 32 holiday settings. NOTE: The Holiday option is available in the Schedule drop-down list when you have enabled holiday schedule in Holiday settings. +1.317.845.5710 USA (Corporate Headquarters) www.exacq.com +44.1438.310163 Europe/Middle East/Asia... -
Page 54: Rs-232 And Rs-485 Settings
2. Select the Baud Rate. 3. Select the Data Bit. 4. Select the Stop Bit. 5. Select the Parity. 6. Select the Flow Ctrl. 7. Select the Usage. 8. Click Save to save the settings. +1.317.845.5710 USA (Corporate Headquarters) www.exacq.com +44.1438.310163 Europe/Middle East/Asia... -
Page 55: Configuring Rs-485 Settings
Parity and Flow Ctrl as None. The Baud Rate, PTZ Protocol, and PTZ Address parameters should be exactly the same as the parameters of the connected PTZ camera. 3. Click Save to activate the settings. +1.317.845.5710 USA (Corporate Headquarters) www.exacq.com +44.1438.310163 Europe/Middle East/Asia... -
Page 56: Alarm Input/Output
1. From the Remote Configuration menu, select Alarm Settings and then Alarm Input to open the Alarm Settings interface. 2. Choose the Alarm Input No. and the Alarm Type: NO (Normally Open) or NC (Normally Closed). 3. Set the Arming Schedule for the alarm input. +1.317.845.5710 USA (Corporate Headquarters) www.exacq.com +44.1438.310163 Europe/Middle East/Asia... - Page 57 PTZ Linking channel, and then select the Enable checkbox next to Preset Calling, Patrol Calling, or Pattern Calling. 6. You can copy your settings to other alarm inputs. 7. Click Save to activate the settings. +1.317.845.5710 USA (Corporate Headquarters) www.exacq.com +44.1438.310163 Europe/Middle East/Asia...
-
Page 58: Configuring The External Alarm Output
4. Click Edit to enter the Edit Schedule Time interface. The time schedule configuration is the same as the Setting of the Arming Schedule for Motion Detection. 5. Return to the Alarm Output Settings interface and click Save to save the settings. +1.317.845.5710 USA (Corporate Headquarters) www.exacq.com +44.1438.310163 Europe/Middle East/Asia... -
Page 59: Exceptions
1. From the Remote Configuration menu, select Exceptions to open the Exception settings interface. 2. Select the checkbox to set the action or actions (Audible Warning or Notify Surveillance Center) to be taken for the Exception alarm. 3. Click Save to activate the settings. +1.317.845.5710 USA (Corporate Headquarters) www.exacq.com +44.1438.310163 Europe/Middle East/Asia... -
Page 60: User Management
User Management The admin user can create up to 31 users. From the Remote Configuration menu, select User Management to open the User Information interface: +1.317.845.5710 USA (Corporate Headquarters) www.exacq.com +44.1438.310163 Europe/Middle East/Asia... -
Page 61: Adding A User
On the Camera Configuration tab, select channels for which the user has permission to use each feature. Use the arrows to display or hide the channel numbers. Click OK to finish the user addition. +1.317.845.5710 USA (Corporate Headquarters) www.exacq.com +44.1438.310163 Europe/Middle East/Asia... -
Page 62: Modifying A User
1. Select the user account from the list on the User Information interface: 2. Click Modify to enter the setting interface. 3. Modify the information as needed. 4. Click OK to finish the user modification. +1.317.845.5710 USA (Corporate Headquarters) www.exacq.com +44.1438.310163 Europe/Middle East/Asia... -
Page 63: Deleting A User
To delete a user account, complete the following steps: 1. Select the user account from the list in the User Information interface. 2. Click Delete to display a confirmation message. 3. Click OK to delete the selected user account. +1.317.845.5710 USA (Corporate Headquarters) www.exacq.com +44.1438.310163 Europe/Middle East/Asia... -
Page 64: Log Search And Maintenance
3. Click the Search button to start searching log files. 4. Up to 100 matched log files are displayed in the list. 5. You can click the Save Log button to save the searched log files to a local directory. +1.317.845.5710 USA (Corporate Headquarters) www.exacq.com +44.1438.310163 Europe/Middle East/Asia... -
Page 65: Viewing Device Information
You can edit the Device Name and Device No., and view the device information, including Model, Serial No., Firmware Version, Encoding Version, Number of Channels, Number of HDDs, Number of Alarm Input, and Number of Alarm Output. +1.317.845.5710 USA (Corporate Headquarters) www.exacq.com +44.1438.310163 Europe/Middle East/Asia... -
Page 66: Maintenance
Maintenance From the Remote Configuration menu, select Maintenance to open the Maintenance interface: Restarting the Device On the Maintenance page, select Reboot. Confirm the message to reboot the encoder. +1.317.845.5710 USA (Corporate Headquarters) www.exacq.com +44.1438.310163 Europe/Middle East/Asia... - Page 67 On the Maintenance page, click the Export button to export configuration files to the selected local backup device. Upgrading the System On the Maintenance page, click Browse to select the local update file and then click Upgrade to start remote upgrade. +1.317.845.5710 USA (Corporate Headquarters) www.exacq.com +44.1438.310163 Europe/Middle East/Asia...
-
Page 68: A Technical Support
Technical Support Exacq Technologies is committed to providing exceptional technical and engineering support. When you need help with your exacqVision product, please be ready with a complete description of the problem, including any error messages or instructions on re-creating the error. -
Page 69: B Regulatory Notice
Reorient the television or radio receiving antenna, and/or relocate the Exacq product and the radio or TV with respect to each other. If necessary, users should consult the manufacturer or an experienced radio/television technician for additional suggestions. -
Page 70: C Warranty
If the foregoing limitation of liability is not enforceable because an Exacq product sold or licensed to Customer is determined by a court of competent jurisdiction in a final non appeal able judgment to be defective and to have directly caused bodily injury death or property damage in no event shall Exacq’s liability for property...
Need help?
Do you have a question about the exacqVision E Series and is the answer not in the manual?
Questions and answers