Table of Contents
Advertisement
Quick Links
Advertisement
Table of Contents

Summary of Contents for poolstar 57001A
- Page 1 Filtration group...
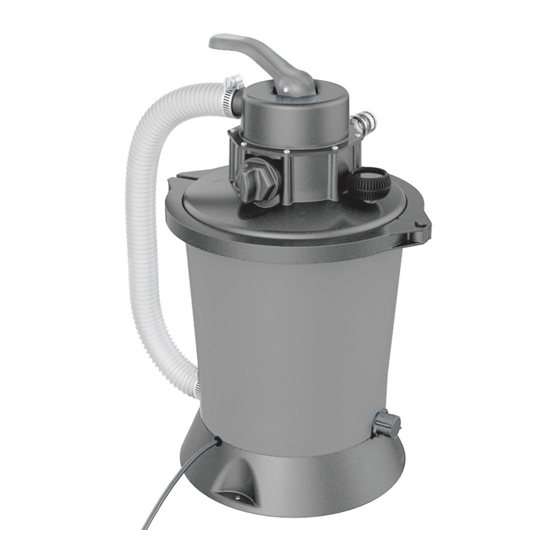
- Page 2 Product Specifications Model 57001A Current 220-240V Power Maximum operating pressure <0.2bar (3psi) Efficient filtration surface 0.058m²(0.62ft²) Maximum water flow 3,03m /h (800 gallons/h) Maximum water temperature 35°C Type of filtering media Sand, zeolite, recycled glass filter, foam filter (special swimming pool)
-
Page 3: Safety Notice
Safety notice Please follow the safety instructions concerning the installation and use of this electrical equipment: This equipment must not be manipulated by children less than 8 years old and persons with reduced sensory or mental abilities, or lacking experience and knowledge, if they are not properly supervised and if instructions related to the safe use of the equipment have not been provided and if risks incurred were not ascertained. - Page 4 Warning: do not use this product when the swimming pool is in use. Warning: installing and dissassembly must be done by adults only. Warning: this product must not be used for above-ground swimming pools. It cannot, in any way, be used for sheltered pools. Warning: to avoid any type of damage, only use the 6-way valve when the product is disconnected from electricity.
- Page 5 What you will find in your package Clamp ring Cover with 6-way valve Filtration shell Corrugated pipes Cover joint Strainer Central tube plug Central tube Filtration return hose Hose clamp 25/42 Hose clamp 32/50 Connectors 32/38 Suction and discharge prefilters...
- Page 7 Parts reference table N° Name Quantity N° Name Quantity Cover with 6-way Prefilter sealing joint valve Sealing joint Prefilter plug Sealing plug 32/38 connectors Pressure gauge 38 sealing joint Pressure gauge seal- 32 sealing joint ling joint M8 screw 32-50 hose clamp Washer Φ38 corrugated pipe Central tube protec-...
-
Page 8: Installation Instructions
Installation instructions: Carefully prepare the area where your filtration group will be installed. Important advice: This product must be installed on a stable, rigid, levelled surface with enoug space provided above it for its handling and maintenance. Please ensure to follow all current regulations in your region relative to the installation of a filtration group. - Page 9 Filling up with filter media: Caution: use filtration sand specific for swimming pools. Sand granulometry must be between 0.45 and 0.85mm. (or between 0.018-0.033 inch), general grain homoge- neous coefficient is lower than 1.75. It is also possible to use foam type media such as «Pureflow» instead of filter sand. Step 1 Assembly of the elements of the filtration unit.
- Page 10 Installing the control cover Warning : The presence of sand or any other foreign body in the groove or on the seal can cause a leak or even an explosion of the filtration unit. Step 1 Clean the top groove of any sand that may be inside before installing the gasket.
- Page 11 Step 4 Pass the 2 32/50 hose clamps around the corrugated pipe, then install it so that it faces the connection between the filter body and the cover, as shown in the following figure. Then tighten the hose clamps with a screw- driver.
- Page 12 Connecting your filtration group to your swimming pool. Start by installing the pre-filters in your swimming pool. They prevent large foreign bodies from damaging the pump or its motor. Then install the connection pipes to the swimming pool and to the 32/38 fittings of the filtration unit and tighten them with the clamps provided.
-
Page 13: First Start-Up
First start-up For the first start-up, it is important to clean the sand present in the filter. This should be repeated from time to time when you feel that the water in your pool is no longer sufficiently clean or depending on the pressure on the gauge. Step 1 Make sure the 6-way valve is in the closed position (5). -
Page 14: Regular Care And Maintenance
Checking the operating values Once the filtration unit has been started, check the value indicated on the pressure gauge. The needle should be in the green area, if this is the case the filtration unit is working properly. If the gauge needle is in the Yellow zone, immediately clean the sand bed or change the sand. - Page 15 ● Warranty service outside of the country of purchase is limited to the terms and condi- tions of the country where the product is used. When the cost of repair or replacement is not covered by this warranty, Poolstar will notify the owners and the cost will be borne by the owner.
-
Page 16: Different Operating Modes
Different operating modes 1 Filtration Filtration (1): Discharge waste This function is used to filter the pool water. The water is pumped from the pool and then passes through the sand filter to be returned to the pool. Suction 2 Rincage Rinse Mode (2): Discharge waste... - Page 17 4 Contre-lavage Backwash Mode (4): This function is used to clean the sand layer. The water is sucked through the Discharge waste central tube and then passes through the sand to then be returned through the waste outlet (D). Suction 5 Fermé...
- Page 18 Diagnosis and breakdowns Troubleshooting Check Resolve Motor does not start - The plug is not properly - Make sure that the normally connected electrical outlet is properly connected - The differential circuit - Reset the circuit breaker, breaker is disarmed if the problem persists, contact an electrician - The motor has...
- Page 19 Water is flowing from the - The cover seal is da- - Remove the upper cover 6-way valve or the cover maged or missing of the control valve and reposition a new gasket. - The cover seal is too - Clean the seal with clean dirty water and close the cover - Tighten the clamping...
-
Page 20: After Sales Service
After-Sales Service Telephone: +33 (0)4 91 51 03 03 http://support@poolstar.fr...
Need help?
Do you have a question about the 57001A and is the answer not in the manual?
Questions and answers