Table of Contents

Summary of Contents for Attainment Company StepPad
- Page 1 Attainment Company’s Step Pad User’s Guide Weight: 5.3 oz. (150 g) Size: 6½” x 3” x 1” (16.5 x 7.6 x 2.5 cm) Two AAA batteries included. Item# ST-P05 Organizes recorded messages for auditory prompts or expressive communication...
-
Page 3: Table Of Contents
Locking the StepPad into One Activity . . . . . . . . . . . . . . . . . . -
Page 4: Introduction
. Directions that you record are played back in sequence, one step at a time to prompt the user on what to do next . The StepPad functions as a short-term teaching tool and a long-term adaptive aid . - Page 5 Here’s how the StepPad works . Press any of the four Activity buttons to activate a step-by-step sequence . You can label these buttons with a slide-in overlay plus a auditory cue . Users hear the steps one at a time by pressing the Next button . Press Play to repeat a step . Review previous steps with the Back button .
-
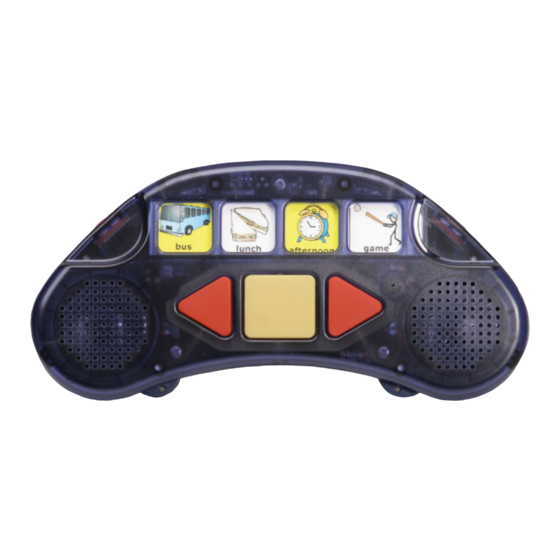
Page 6: Front Display
Front Display Activity buttons Core message Core message Slot for overlay Volume Volume Down Play Next Back Lanyard holes Speaker Speaker... -
Page 7: Back Display
Back Display On/Off Record Level Slot for Battery Rubber strap compartment feet Head (Two AAA batteries phone jack included) -
Page 8: Recording Overview
. We recommend you script an outline of the complete sequence before you begin to record . When recording, talk at normal volume about eight inches from the StepPad . Stop the recording promptly when you’re done talking to avoid “dead space . ”... - Page 9 . The landyard lets the user wear the StepPad around the neck . A slot for a wide strap is machined into the back of the device below the label . A small strap with Velcro® can be used to attach the StepPad to a belt or belt loop .
-
Page 10: Recording An Auditory Cue For An Activity Button
Recording an Auditory Cue for an Activity Button 1 . Turn on the StepPad . Press and release the Activity button you wish to label with an auditory cue . green light will appear . 2 . Press and release the REC button located on the back of the device twice . A solid... - Page 11 3 . Press and release the Play button and the LED will flash, indicating record mode . Begin recording by speaking clearly, about eight inches from the StepPad . 4 . Press and release the Play button when you’re done recording your first step . The LED will return to solid red .
-
Page 12: Playing A Step-By-Step Sequence
Playing a Step-by-Step Sequence 1 . Press the appropriate Activity button and a green LED will briefly light above it . This indicates the step-by-step sequence is now linked to the selected activity . 2 . Press the Next button to play the first step . Press Play to repeat playback of any step . 3 . -
Page 13: Recording A Message On A Core Button
8 inches from the StepPad . 3 . Press the Core button to stop recording . 4 . Press the REC button on the back of StepPad TWICE to exit the record mode . Core button... -
Page 14: Adding A New Step Within A Sequence
4 . Press and release the Play button and the LED will flash . Begin recording by speaking clearly, about eight inches from the StepPad . 5 . Press and release the Play button when you’re done recording the new step . The LED will return to solid red . -
Page 15: Erasing A Step Within A Sequence
Erasing a Step Within a Sequence You can easily erase any step within a sequence without affecting the other recordings . 1 . Press and release the REC button located on the back of the device . A solid LED will appear on the front of the device . -
Page 16: Erasing An Activity Sequence
Erasing an Activity Sequence You can easily erase all the steps within an activity sequence at once . 1 . Press and release the REC button to enter the record mode . A solid LED will appear on the front of the device . -
Page 17: Locking The Record Function
Activity Lock can be enabled and disabled by pressing and holding an Activity button while turning on the StepPad . Make sure the activity you want the user to have access to is current before you turn off the StepPad . A BOOP-BEEP sound will play when the Activity button has been locked . A BEEP-BOOP sound will play when the Activity button has been unlocked . -
Page 18: Changing Levels
Level One . Changing Batteries The StepPad comes with two AAA batteries . They should last a month or more with even with consistent use . Turn off the StepPad when not in use to conserve the batteries . To change batteries: 1 .
Need help?
Do you have a question about the StepPad and is the answer not in the manual?
Questions and answers