Table of Contents
Advertisement
Quick Links
Advertisement
Table of Contents

Subscribe to Our Youtube Channel
Summary of Contents for Finlux FC-9210
-
Page 3: Table Of Contents
Contents Features ..............2 Accessories ............2 Safety Precautions ..........3 Overview of the Remote Control ......4 Connections............5 Remote Control ............6 Connection to the TV ..........6 Power Connection ..........7 Power On-Off ............7 Antenna Connection ..........7 USB Connection ............. -
Page 4: Features
Features Accessories • • Channel capacity: 1000 • DVB 7 days event information (7 days EPG) • TV scart (with RGB and CVBS support) • Last watched channel saving • Automatic search for all channels • Timer function programmable via EPG Batteries •... -
Page 5: Safety Precautions
• Please avoid the contact of the set with water Safety Precautions or humidity. Do not put into operation near bath, Power Source swimming pools. • Always use the provided AC adaptor. • Take care to provide a good air circulation. •... -
Page 6: Overview Of The Remote Control
Overview of the Remote Control StandBy Favourite List TV/Radio Mode Previous Programme Left/Right Sound Coloured buttons Numeric buttons Aspect Ratio Info Channel Up / Down Volume Up / Down Mute No function Display Teletext Electronic Programme Guide Navigation Back Menu No function Timers Language... -
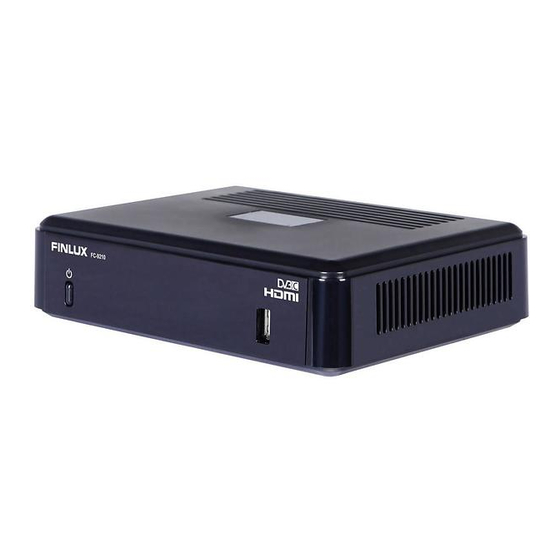
Page 7: Connections
Connections Front Panel 1. POWER/STAND-BY 2. USB-PORT: To connect USB-stick/-device for media playback Rear Panel DC IN: To connect the power adaptor(12V). Antenna In: To connect Aerial/Cable plug Antenna Out: To watch analogue channels on the TV HDMI: To connect the box to your TV’s HDMI input (if available) by using HDMI connection cable. -
Page 8: Remote Control
Remote Control First open the battery cover on the underside of the remote control. Put in both batteries 1.5Volt (RO3/AAA) referring to the imprinted symbols (+/-) in the battery case and put on the battery cover again. While using the remote control, direct it towards the front side of the receiver. If the remote control does not work or the chosen function does not work, the batteries are most probably exhausted and they should be replaced as soon as possible. -
Page 9: Power Connection
Power Connection IMPORTANT: The set-top box is designed to operate on 12 V DC. For this, an adaptor is used which gives 12 V voltage. Connect this adaptor to a system that supplies 220-240V AC, 50Hz. After unpacking, allow the set-top box to reach the ambient room temperature before you connect the set to the mains. -
Page 10: Usb Connection
USB Connection • You can connect a USB hard disc drive or USB memory stick to your box by using the USB input . This feature allows you to play files stored in a USB drive. • 2.5” and 3.5” inch (hdd with external power supply) external hard disk drives are supported. IMPORTANT ! •... -
Page 11: Main Menu System
Main Menu System When the box is opened from stand-by mode and there is no channel stored in the database, 1.) Channel List First Time Installation Menu window is displayed 2.) Settings on the screen. In the first window, menu Media Browser language is asked. - Page 12 relative position of the currently visible channels with to lock a channel you should know the parental respect to the whole list. Lock password (set to 0000 in the factory and can only be changed from the Configuration When you press İ(info) button on the remote, Menu), then highlight the channel to be locked following item is displayed.
- Page 13 Yellow button(Zoom):Narrows the info boxes. So you can see the whole programmes of the selected channel that day. PR/CH- button: Displays the programmes of the previous day. PR/CH+ button: Displays the programmes of the next day Event Options In EPG menu, press the OK button to enter the “Event Options”...
-
Page 14: Settings
For each value, Signal quality and Signal Settings level are shown on the screen. Press OK to The adjustments in this menu are given as the start the search. following: Any existing channel in the database is not re-stored to avoid duplicates of that channel. Network Search Select Network Search by using “... - Page 15 Output Settings 1. Press Menu button and using“ ”/“ ”buttons, highlight Setting and Configuration and press Highlight this item with ”/ “ ” buttons and the OK button, press OK button. A submenu will be displayed on the screen: 2. Use the “ ”/“ ” buttons to highlight Receiver upgrade and press OK button.
-
Page 16: Language Settings
default PIN is 0000, if you change the PIN, consumption is less then 0,5 W (in standby). make sure you write it down and keep it. The front display will show no time information (in standby). If low power mode is deactivated, all functions will be reactivated. -
Page 17: Media Browser
Viewing JPEG Files Media Browser You can play the MP3, JPEG or AVI files from a USB device like memory stick, multiple card reader etc. When you connect a USB device, the receiver recognizes it automatically and displays “USB Device connected” message on the screen. -
Page 18: Timers
Playing Mp3 Files Timers OK button(Play This) : Plays the selected file Activate this from the Timers in the main menu. INFO button(Loop/Shuffle): Plays the selected To add a timer, press the Yellow button on file repeatedly. the remote control. Then Add Timer window appears. -
Page 19: Osd Message
You can save the adjustments by pressing the GREEN key or cancel the process by pressing the RED button. You can edit the list via OK key and delete with the BLUE button. Editing a Timer Select a timer in the Timers menu by pressing Channel Navigation “”/“”... -
Page 20: Displaying Text
Specifications GENERAL Power supply for set-top box: 12V DC Input Frequency :174MHz - 862 MHz Power consumption : 10,8 W (max) When Vol +/- buttons are pressed, a banner is displayed. This shows the present volume Operating temperature : 5ºC to +40ºC level graphically. -
Page 21: Tv Scart
-Simultaneously supports HE-AAC decoding and transcoding to AC-3 -AC-3 stream output through SPDIF -Stereo audio description decoding -RA8-LBR decoding Media Player Supported files: mp3, jpeg, avi, mkv Trick modes: Available Supported Play modes: Repeat, Shuffle Rotate for pictures: Available MP3 ID3 Tag support: Available Mpeg4 file and MKV Playback: Available TV Scart Video output : Composite video signal;... -
Page 22: Trouble Shooting
Trouble Shooting Problem Possible Reasons What To Do Check if the AC Adaptor The LED indicator does not Power Adaptor is not is plugged into the power glow. connected. socket. Check the aerial and video No picture or sound. No signal or weak signal. connections (scart/HDMI).
Need help?
Do you have a question about the FC-9210 and is the answer not in the manual?
Questions and answers