Advertisement
Quick Links
Advertisement

Summary of Contents for Labomed eVO 500
- Page 1 500/500D Digital Slit Lamp...
-
Page 2: Table Of Contents
Contents Introduction Safety Instruction 9-11 Installation 12-13 Operating Procedure 14-15 Lamp and Fuse Replacement 16-18 Care & maintenance Technical Specification ... - Page 3 eVO500D ...
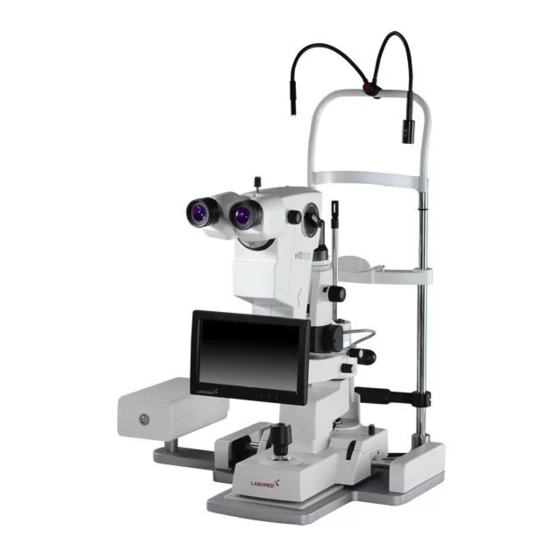
- Page 4 Parts Description 1. On/Off Button. 2. Slide Plate 3. Joystick 4. Light Intensity Regulator 5. Guide Rail Cover 6. Instrument Base Locking Knob 7. Microscope arm Locking Knob 8. Illumination arm locking arm 9. Lamp access door 10. Filter Dial 11.
- Page 5 eVO500 ...
- Page 6 Parts Description 1. On/Off Button. 2. Slide Plate 3. Joystick 4. Light Intensity Regulator 5. Guide Rail Cover 6. Instrument Base Locking Knob 7. Microscope arm Locking Knob 8. Illumination arm locking arm 9. Lamp access door 10. Filter Dial 11.
-
Page 7: Introduction
Please retain this manual for future reference and to share with other users. Additional copies can be obtained from your authorized LABOMED dealer or from the LABOMED service department. Contact information is provided at the end of this manual. - Page 8 Its slit angle of incidence makes it easier to view the inner side by rotating the illumination arm (0° - 90°), giving it a 3 dimensional rigid view of the eye interrelated with slit housing. It makes and rotate the slit at its 0° - 180° position with fine click stop smooth movement option for the corneal view, vertically/horizontally reducing or increasing the size of slit from 0-14mm.With the continuous slit measurement of 1.5 to 11mm and variable fixed measurement at 0.5, 5, 8, 12mm it has enhanced red free, cobalt blue and heat absorbing filters.
-
Page 9: Safety Instruction
• It is recommended to use the instrument only with the accessories supplied. In case you wish to use other accessory make sure that LABOMED has certified that its use will not harm the safety of the instrument. NOTE : Its requested to retain in the Serial Number of the instrument for identification by the service personnel. -
Page 10: Installation
3 Installation D Slit Lamp is shipped in a multi-layer foam container and it is divided eVO500 eVO500 into major components: Microscope body, Binocular straight head, Base Platform, HD Panel and Chin Rest Assembly, Illumination Column. 1. Take out the various parts after removing the wrapping and save the packing. - Page 11 6. Tighten microscope base locking screw. Place the guide-rail covers over the guide-rails (Refer Fig. 4). Base Locking Knob Rail Cover Fig. 4 7. Mount the microscope head on the microscope carrying arm by sliding it into position, making sure it is up against the stop.
- Page 12 10. Mount the touch screen panel on the microscope arm along with the knob in the mount. Screw the mount to the knob to hold it tight incase of eVO500D(See Fig 7). 11. Connect the USB output at the back of the panel and the power cord incase of eVO500D Fig.
-
Page 13: Operating Procedure
4 Operating Procedure 1. Turn the power using the ON/OFF switch located on the front of the power supply. Brightness can be adjusted by rotating the illumination level knob situated on the microscope base. NOTE: The maximum position is for intermittent use only. Continuous use will shorten lamp life. - Page 14 9. Magnification is altered by rotating the dial on the microscope head. The magnification of each click stop position is engraved on the dial. 10. Three filters are provided for cool and comfortable view. This can be achieved by rotating the filter dial. An eVO500 is a basic and eVO500D is the high end model.
-
Page 15: Lamp And Fuse Replacement
5 Lamp & Fuse Replacement 1. Open the lamp house by loosen the screw (1). See figure 8. Fig. 8 2. Take out the bulb holder (1) by pulling the metal pins on the holder(see fig 9) Fig. 9 3. Loosen the screw and pull the bulb out of the house assembly (Refer Fig. - Page 16 4. Remove the bulb from the housing. Replace the blown lamp with new one. Insert the bulb in the housing and secure the same in the housing. 5. Insert the holder in the bulb slowly and tighten the lamp cover after putting it in its place.
-
Page 17: Care & Maintenance
CONTINUOUS POWER SUPPLY The LABOMED eVO500/eVO500D Slit Lamp can be operated from 100 to 240V AC. This is achieved by universal power supply. So, there is no need of adjusting the settings according to the supply line voltage of the destination country. - Page 18 Do not use ethanol and spirit. Do not clean products with optical components in a cleaning/disinfecting device or ultrasonic bath. LABOMED MaxLite coatings are very resistant. If you clean as described above, the coatings will not be damaged. ...
- Page 19 Also use spirits to clean optical components. Dry optical components using a microfiber cloth, dry the rest of the product using a paper towel. • Service: Service as and when required should be informed to LABOMED after – sales service department. ...
-
Page 20: Technical Specification
7 Technical Specification Item Specification eVO 500 eVO 500D • Microscope Galilean Galilean • Magnification 5 step rotation: 6.5x, 10x, 5 step rotation: 6.5x, 10x, 16x, 16x, 25x, 40x 25x, 40x • Eyepieces Wide field 12.5x, focusable, Wide field 12.5x, focusable,... - Page 21 ...