Table of Contents
Advertisement
Quick Links
Section
HPP-SB
Instruction Manual
the HPP-SB
High Pressure
Single-Acting Positioner
Table of Contents
Page
2
2
2
3
3
3
3
4
4
5
6
6
7
8
for
Section
Appendix - Parts & Mounting detail
Close on increasing (parts) 22
Page
9
10
14
17
18
18
18
19
21
23,24
25,26
September 1999
Advertisement
Table of Contents

Related Manuals for Becker HPP-SB

Summary of Contents for Becker HPP-SB
-
Page 1: Table Of Contents
Instruction Manual the HPP-SB High Pressure Single-Acting Positioner Table of Contents Section Page Section Page Introduction Changing Positioner Action Scope of Manual Description Conversion to Split Range Technical Information Assembly Procedures Specifications Materials of Construction Inspection Procedures Accessories Parts Ordering... -
Page 2: Introduction
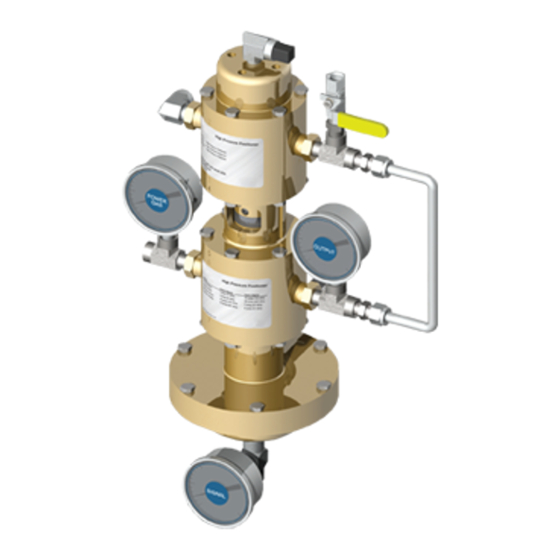
Website: www.bpe950.com mental impact of atmospheric hydrocarbons and diminishing natural resources. Description The Becker HPP-SB positioner is used to pro- vide extremely accurate pressure control in con- trol valve assemblies utilizing a controller or I/P transducer and single-acting actuator. The HPP-SB is designed for use with ball valves 16”* in diameter or smaller (when used with... -
Page 3: Technical Information
T = 460 + Operative Temperature (°F) a positioner adjusted with a minimum deadband for reduction of Cv = Flow Factor (1.5 for HPP-SB) bleed gas. If the deadband is eliminated, bleed gas will increase slightly and resolution and repeatability will improve. -
Page 4: Principals Of Operation
HPP-SB Positioner “How-It-Works” Principles of Operation Close on Increasing Signal – Actuator Fails Open The positioner is a force-balanced instru- An increase in the input signal pressure re- ment that provides a control valve position pro- sults in the opening of the lower balanced portional to a pneumatic input signal. -
Page 5: Open On Increasing
HPP-SB Positioner “How-It-Works” Open on Increasing Signal – Actuator Fails Closed The control valve will close on loss of input This increases the cylinder pressure, further opening the valve and compressing the actua- signal. The energy to operate the control valve tor spring. -
Page 6: Adjustment Procedure
18 psig for a 6-30 psig range). time the positioner is disassembled Stroke the actuator to an intermediate po- sition. Adjustment Procedure The Becker HPP-SB Positioner has three (3) adjustment devices: • The adjustment drum adjusts the dead- band. -
Page 7: Bias Adjustment
HPP-SB Positioner Adjustment If there is no gauge response, the deadband For Standard (Non-split range) Systems: must be decreased by turning the adjustment 1. To increase the bias setting, increase ten- drum slightly (increasing numbers). Re-check sion on the range spring. This is accom- the deadband. -
Page 8: Range Adjustment
If the desired range is not achieved after ment signal to the HPP-SB creates full (equal making the above adjustments, readjust the bias (per the previous instructions) to to the power gas pressure) or zero (depending allow proper range adjustment. -
Page 9: Changing Positioner Action
(see piping sche- matic provided by Becker Precision Equip- To change open on increasing to close on in- ment) then reattached to the positioner. creasing: Part #25-1444 plus an Extension... -
Page 10: Conversion To Split Range
HPP-SB Positioner Split Range Stroke With Without Slide the thread spacer (brass bushing) Transmitter Transmitter over the adjusting screw and tighten the washer and jam nut against the thread 25-8265 25-8001 spacer. 25-8136 25-1093 If a range spring was sent with the kit, re-... - Page 11 HPP-SB Positioner HPP-SB Positioner Assembly Assembly ASSEMBLY NOTE: Moisten all O-rings, threads, thrust bearing, and the recess in the spring seat with a light weight silicone grease. 1. Using a 7/16" socket, press seat assembly (E) with rubber seat facing downward into bottom body (F).
- Page 12 HPP-SB Positioner Assembly 3. With the balanced valve assemblies now installed, perform a leak test of the top and bottom bodies by doing the following: 3b. Apply approximately 100 PSIG air to the supply ports of the bottom and top bodies, marked 'P1' &...
- Page 13 HPP-SB Positioner HPP-SB Positioner Assembly Assembly 4. Install -012 O-rings (J) onto the groove on each piston and -010 O-ring (N) onto the stem of the top body's inside piston (L). DO NOT lubricate the -010 O-ring. 4a. Attach posts (H) to outside pistons (K) with 8-32 x 1/2" SHCS (I).
- Page 14 HPP-SB Positioner HPP-SB Positioner Assembly Assembly 5. Slide one grooved washer (O) onto each piston with the grooves facing away from the valve body. 5a.Install convoluted diaphragms (R) onto the washers (O) as shown. 5b. Install another washer (O) onto each piston with grooves facing the dia- phragms.
- Page 15 HPP-SB Positioner HPP-SB Positioner Assembly Assembly 7. Center the posts in bodies (F&G) by: a. Rotating the diaphragm assemblies (from Step 5) counterclockwise until they stop (Ž) . b. Marking the diaphragms and bodies (F&G) with a single line. c. Rotating the diaphragm assemblies clockwise until they stop (ŽŽŽ).
- Page 16 HPP-SB Positioner HPP-SB Positioner Assembly Assembly 9. Install spring (Y) and spring cartridge (X) onto top body (G) with 1/4-20 x 3/4 HHCS (W). Torque to 95-100 in. lbs. 10. Attach beam spacer (Z) to bottom body (F), so the opening in it faces the opposite direction of the opening in the sensitivity spacer.
-
Page 17: Assembly Procedures
5. __________ Confirm zero steady-state bleed gas of Model HPP-SB. Refer to Procedure 1 through 9, Pages 7-8, Adjustment Procedure 6. __________ Check sensitivity of HPP-SB positioner. Movement of output gauge should occur within ±0.1 psig change of instrument signal. -
Page 18: Parts Ordering
Parts Parts Ordering The following is provided to allow the ordering of replacement parts. Please specify the Becker valve regulator serial number when ordering parts (this can be found on the Stainless Steel attached to the positioner by on of the 7/16 hex head cap screws. -
Page 19: Feedback Detail
HPP-SB Positioner Instruction Manual HPP-SB September 1999... - Page 20 HPP-SB Positioner Appendix HPP-SB September 1999...
-
Page 21: Open On Increasing (Parts)
HPP-SB Positioner HPP-SB September 1999... - Page 22 HPP-SB Positioner HPP-SB September 1999...
-
Page 23: Open On Incr., L, R
HPP-SB Positioner Appendix HPP-SB September 1999... - Page 24 HPP-SB Positioner Appendix HPP-SB September 1999...
-
Page 25: Close On Incr., L, R
HPP-SB Positioner Appendix HPP-SB September 1999... - Page 26 HPP-SB Positioner Appendix HPP-SB September 1999...
Need help?
Do you have a question about the HPP-SB and is the answer not in the manual?
Questions and answers