Table of Contents

Related Manuals for AVL DITEST ADS 340

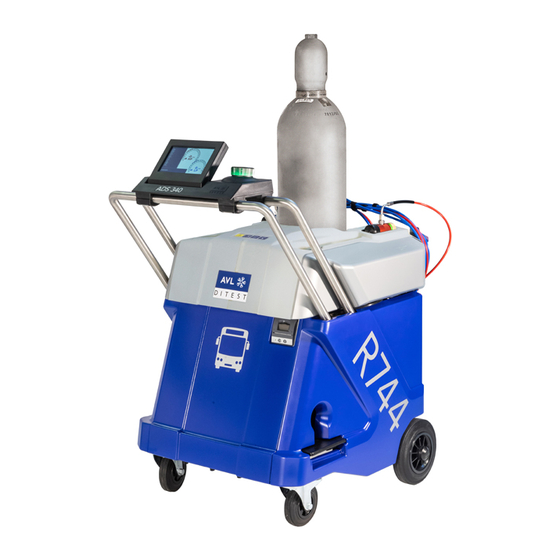
Summary of Contents for AVL DITEST ADS 340
- Page 1 USER MANUAL AVL DITEST ADS 340 AIRCONDITION DIAGNOSTIC SYSTEM ID number: AT8009E Revision: Edition: 11/2021 Firmware version: Data subject to change and errors excepted. All data valid at the time of print. PASSION INNOVATES FUTURE...
- Page 2 The content of this publication may not be reproduced in any way or forwarded to third parties, either in part or in full, without the prior written consent of AVL DiTEST. This publication was created with due care such that AVL DiTEST is not liable for any remaining...
- Page 3 Warning and safety notices This user manual provides an overview of first start-up and the operation of the AVL DiTEST ADS 340. Despite partially giving detailed process descriptions, it does not claim to be comprehensive. The product is intended only for the highly specific use described in the user manual.
- Page 4 Warning and safety notices AVL DiTEST ADS 340 User Manual...
-
Page 5: Prohibition Signs
AVL DiTEST ADS 340 SAFETY INSTRUCTIONS SAFETY INSTRUCTIONS Sign and symbols Symbols with the following meanings are used in the safety instructions of the operating instructions, unpacking instructions or other supplied instructions as well as on the display of the tester during operation and on the products themselves: DANGER Indicates an extreme danger that can lead to death if not avoided. -
Page 6: Mandatory Signs
SAFETY INSTRUCTIONS AVL DiTEST ADS 340 Mandatory signs Wear Wear gloves Refrigerating Wear Wear Wear protective agent cylinder protective respiratory protective goggles shoes protection clothing Secure CO (R744) Other symbols Observe Fuse First aid Gas cylinder operating instructions Notices: NOTICE This text points to situations or mal operations that can lead to damage or data loss. -
Page 7: Safety Instructions For Carbon Dioxide Co (R744)
AVL DiTEST ADS 340 SAFETY INSTRUCTIONS FOR CARBON DIOXIDE CO2 (R744) SAFETY INSTRUCTIONS FOR CARBON DIOXIDE CO (R744) Always observe the manufacturer's safety data sheet WARNING Contact with the product can cause cold burns or frostbite. Gases/vapours are heavier than air. High concentration due to accumulation in closed rooms, work pits, cellars, etc. - Page 8 SAFETY INSTRUCTIONS FOR CARBON DIOXIDE CO2 (R744) AVL DiTEST ADS 340 Behaviour in the event of danger After a gas leak: Keep unprotected persons away. Ventilate rooms well. Wear protective gear and self-contained breathing apparatus. Close valves / stop gas leak. Avoid entry into cellars, pits and similar enclosures (danger of suffocation).
-
Page 9: Safety Instructions For Nitrogen N
AVL DiTEST ADS 340 SAFETY INSTRUCTIONS FOR NITROGEN N2 SAFETY INSTRUCTIONS FOR NITROGEN N Always observe the manufacturer's safety data sheet WARNING High concentrations of the gas can cause suffocation. Loss of motor ability and consciousness. Rapid release of large quantities creates cold and fog. - Page 10 SAFETY INSTRUCTIONS FOR NITROGEN N2 AVL DiTEST ADS 340 Behaviour in the event of danger WARNING Exposure to heat and fire may cause cylinders to burst/explode. All extinguishing agents can be used. If gas is escaping, close valve is possible.
-
Page 11: Safety Instructions For Working On Air Conditioning System
WARNING The device must not be used if the heating band or cable is damaged. Contact the respective AVL DiTEST branch / AVL DiTEST partner in your country. NOTICE The oil level of the vacuum pump must be checked regularly. Top up if necessary. After 60 operating hours a regeneration of the pump oil is necessary (user notification). - Page 12 NOTICE Open the manual valve of the connected refrigerating agent cylinder before switching If the ADS 340 is not being used, shut of the gas supply by closing the manual valve. NOTICE The ADS 340 performs a self-test when it is switched on. This is indicated by the brief sounding of the siren.
-
Page 13: General Obligations Of The Personnel
GENERAL OBLIGATIONS OF THE PERSONNEL WORKING ON/IN ELECTRICAL COMPONENTS Opening and working on the electrical components of the ADS 340 may only be carried out by appropriately trained electricians (skilled personnel). Failure to do so may result in danger to life due to dangerous electrical voltage. -
Page 14: General Safety Instructions
DANGER Danger of life due to electrical voltage The cylinder heater is operated via the mains voltage. Only connect/disconnect the ADS 340 when it is switched off. WARNING Danger from hot parts The cylinder heater and the refrigerant cylinder become hot during operation. - Page 15 AVL DiTEST ADS 340 GENERAL SAFETY INSTRUCTIONS User Manual XIII...
-
Page 16: Table Of Contents
Contents AVL DiTEST ADS 340 Contents Warning and safety notices ................. I SAFETY INSTRUCTIONS ................III Prohibition signs ..........................III Warning signs ............................ III Mandatory signs ..........................IV Other symbols ........................... IV SAFETY INSTRUCTIONS FOR CARBON DIOXIDE CO (R744) ....V SAFETY INSTRUCTIONS FOR NITROGEN N .......... - Page 17 New Devices ........................11-1 11.2 Replacement or Loaned Devices ..................11-1 11.3 Damage Claims ....................... 11-1 11.4 AVL DiTEST service address ..................11-1 Shipping Package ................ 12-1 12.1 System Delivery ....................... 12-1 12.2 Consumables and operating material ................12-2 12.3 Spare parts ........................
-
Page 19: General
Read and observe this user manual, particularly the safety instructions contained therein. Prior to its commissioning, the AVL DiTEST ADS 340 was inspected carefully, and it needs to undergo regular inspections (in compliance with relevant laws and regulations applicable in the country where it is used) during its operation period. -
Page 20: Frontal View
General AVL DiTEST ADS 340 1.2 Frontal view Fig. 1-2 Display Multifunctional dial Grab rail Printer Locking wheel User Manual... -
Page 21: Right Side View
AVL DiTEST ADS 340 General Right side view Fig. 1-3 Extensible collection tank for drained vacuum pump oil Allen screw to drain vacuum pump oil Inspection glass for vacuum pump oil User Manual... -
Page 22: Rear View
General AVL DiTEST ADS 340 Rear View Fig. 1-4 Harness to secure the refrigerant bottle carbon dioxide CO (R744) 250ml fresh oil tank Wheel Connection for drain hose 250ml used oil tank High-pressure hose connection HP/HP, red USB socket Power switch with fuse link... -
Page 23: Quick Couplings
AVL DiTEST ADS 340 General Quick Couplings Your AVL DiTEST ADS 340 is equipped with a quick coupling system. These quick couplings provide the following safety functions: ▪ It is mechanically impossible to uncouple the quick couplings under pressure. ▪... -
Page 24: Refrigerant Bottle Co2 (R744)
3.0 (purity of 99.9%). WARNING Frostbite on parts of the body due to refrigerant Only trained personnel is permitted to change bottles. Follow the instructions on the AVL DiTEST ADS 340 step by step. Mind safety instructions on the refrigerant bottles. CAUTION Injuries to parts of the body. - Page 25 AVL DiTEST ADS 340 General NOTE Use the AVL DiTEST ADS 340 only when the filling hoses are connected correctly. Filling with replaced hoses can lead to a defect in the air conditioning system of the vehicle. NOTE AVL DiTEST ADS 340 comes without the refrigerant bottle CO (R744).
-
Page 26: Operating Controls
General AVL DiTEST ADS 340 Operating controls Fig. 1-9 Power switch (rear panel) Display adjustable Multifunctional dial The multifunctional dial features a display. Meaning of the display: Meaning Condition of the display System start Blue light Status in order / finished... -
Page 27: User Interface - Operation
AVL DiTEST ADS 340 General User interface - operation The user interface is operated via a multifunctional dial. Turning the dial, one selects the individual functions (buttons) and starts them by pressing. Fig. 1-10 HP High Pressure High pressure gauge HD of the refrigerant cycle... -
Page 28: User Prompts
General AVL DiTEST ADS 340 User prompts Selects the previous function. Down Selects the next function. Back Goes one step back. Start Starts functions. Cancel Cancels the ongoing process. RESET RESET Set values. Starts function, confirms questions with "yes" or "ok". -
Page 29: Operating Mode Overview
AVL DiTEST ADS 340 General 1.11 Operating mode overview Operating mode Function Description Automated cycle Automated process: See chap. 3 1. Prepare equipment 2. Draining 3. Vacuumizing 4. Filling Manual cycle Hose clearing See chap. 4.1 Release See chap. 4.3 Evacuation See chap. - Page 30 General AVL DiTEST ADS 340 1-12 User Manual...
-
Page 31: Commissioning
Size-25 spanner Cut the packing tape and remove the carton. Carefully remove the protective foil from the ADS 340 Use the scissors/side cutter to cut the four zip ties used to additionally secure the ADS 340 to the pallet. WARNING Crushing hazard AVL DiTEST ADS 340 may tilt and fall off the pallet. -
Page 32: Checking Vacuum Pump Oil
Commissioning AVL DiTEST ADS 340 Fix the fixing wheels. Fig. 2-1 Checking vacuum pump oil Check the oil level by means of the inspection glass. If necessary, complete the vacuum pump oil, see chap. 6.2.1 . Fig. 2-2 User Manual... -
Page 33: Connection To The Power Supply-Switch On
AVL DiTEST ADS 340 Commissioning Connection to the power supply-Switch on Use the supplied power cable to connect the AVL DiTEST ADS 340. Connect the power cable to the power supply. Switch on the ADS 340. Fig. 2-3 User Manual... -
Page 34: Startup Wizard
Commissioning AVL DiTEST ADS 340 Startup Wizard After switching on for the first time, an automatic sequence starts which guides you through the steps "Setting the language", "Setting the date/time", "Zeroing the balance", "Zeroing the pressure" and "Bottle exchange". Follow the instructions on the screen exactly. - Page 35 Follow the instructions on the screen. Pay particular attention to the safety instructions. NOTICE When replacing the refrigerant bottle, the AVL DiTEST ADS 340 must not be connected to the vehicle. NOTICE Observe the specifications of the refrigerant bottle CO2 (R744), see chapter 1.6.
-
Page 36: Filling Hoses Lp (Blue) And Hp (Red)
WARNING Make sure that the filling hoses LP (blue) and HP (red) get no contact with hot parts. Only use filling hoses approved by AVL DiTEST hoses. Damaged filling hoses (buckled, worn, etc.) must not be used. Regularly perform a visual check. -
Page 37: First Filling/Refilling And Emptying The Oil Tank
AVL DiTEST ADS 340 Commissioning First filling/refilling and emptying the oil tank WARNING Mind the safety data sheets for the oil. Tank for Fresh oil 250ml Tank for Used oil 250ml Fig. 2-10 Remove the oil tank by the releasing sleeve of the quick coupling:... -
Page 38: Switching On
Commissioning AVL DiTEST ADS 340 Switching On Turn on the AVL DiTEST ADS 340 by using the power switch. After switching on, the device performs a safety selftest. Fig. 2-12 Symbolic image Symbol description: Pressure at high pressure side Pressure at low pressure side... - Page 39 AVL DiTEST ADS 340 Commissioning Once the self-check has been successfully completed, select to get to the main screen: Fig. 2-13 User Manual...
- Page 40 Commissioning AVL DiTEST ADS 340 2-10 User Manual...
-
Page 41: Automated Cycle "Air Conditioning Service
AVL DiTEST ADS 340 Automated cycle Automated cycle "air conditioning service" There are max. 3 preset configurations are available. They differ in the default values. The default values can be accepted and changed. Changed values are automatically saved in the selected configuration. - Page 42 Automated cycle "air conditioning service" AVL DiTEST ADS 340 Oil-filling mode: No oil is introduced into the air conditioning system of the vehicle. The set oil quantity is ignored ABS: The set oil quantity is entered into the air conditioning system of the vehicle brought in.
-
Page 43: Manual Cycle
AVL DiTEST ADS 340 Manual cycle Manual cycle NOTE Do not connect the quick couplings to the air-conditioning system until the AVL DiTEST ADS 340 prompts you to do so. Fig. 4-1 In the manual cycle execute the following functions separately: ▪... -
Page 44: Emptying Clearing
Manual cycle AVL DiTEST ADS 340 Emptying clearing Manual mode│Hose clearing. In the main menu, select The “hose emptying” function allows you to entirely empty the filling hoses. Hoses should not be emptied when the vehicle is connected. Data In all manually selectable procedures (except for bag emptying), customer data can be entered for logging purposes. -
Page 45: Release
AVL DiTEST ADS 340 Manual cycle Release Manual mode│Release. In the main menu, select This function is used to drain the refrigerant CO (R744) from the vehicle. Fig. 4-3 Input values: Button Parameters Unit Selection Customer data Refrigerant quantity Results:... -
Page 46: Evacuation
Manual cycle AVL DiTEST ADS 340 Evacuation Manual mode│Evacuation. In the main menu, select A vacuum is created in the air conditioning system. Possible leaks in the vehicle's air conditioning system are detected. Fig. 4-4 Input values: Button Parameters Unit Selection 5 …360... -
Page 47: Injection
AVL DiTEST ADS 340 Manual cycle Injection Manual mode│Injection. In the main menu, select In the first step, the adjusted oil quantity is injected into the air conditioning system of the vehicle. It is then filled with the pre-set refrigerant CO (R744). -
Page 48: Hp/Lp Pressure Test
The minimum bottle pressure must not be less than 50 bar. You will then be asked to turn on the air conditioning system of the vehicle. Confirm this on ADS 340. The procedure must be terminated by the user. Fig. 4-6... -
Page 49: Setup
AVL DiTEST ADS 340 Manual cycle Setup The Setup menu item allows you to change various parameters and perform various settings and approvals. Fig. 6-1 Select the desired function. Follow the instructions on the display. Units This function is used to select the unit of measure for the pressure (bar / psi), temperature (°... -
Page 50: Firmware Update
Printing text size Allows you to select the text size on the printout. Information AVL DiTEST reserves the right to add new parameters to make the AVL DiTEST ADS 340 even more versatile and adjust it to market requirements. User Manual... -
Page 51: Maintenance
Chapter WARNING Danger to life from electric current Prior to opening the AVL DiTEST ADS 340, make sure it has been disconnected from the power supply. WARNING Do not alter the AVL DiTEST ADS 340 in any way not described in this chapter. -
Page 52: Regular Maintenance
6.2.1 Changing the vacuum pump oil Once the vacuum pump has reached 500 operating hours, or at least once a year, the vacuum pump oil needs to be changed. The AVL DiTEST ADS 340 points out the required vacuum pump oil change to you. - Page 53 AVL DiTEST ADS 340 Maintenance 8. Remove the blue housing part (d). Solve this the 2 screws (c), pull the housing part (d) only slightly outwards and then push it forward. Fig. 6-2 9. Unscrew the cap (e) and fill in the oil, amount: 250 ml. Only use the vacuum pump oil stated in chapter 11.3 “consumables”.
- Page 54 Maintenance AVL DiTEST ADS 340 11. Bring the blue housing part again (d), see Section 7. Make sure that before the tightening of the housing part snap the 3 white knobs in the black plastic parts. Fig. 6-5 Maintenance│ Vacuum Pump Oil│Set off 12.
-
Page 55: Check Oil Level (Vacuum Pump Oil)
AVL DiTEST ADS 340 Maintenance 6.2.2 Check oil level (vacuum pump oil) Check the oil level in the inspection glass weekly. If necessary, complete or change the vacuum pump oil, see chap. 6.2.1 . Fig. 6-6 6.2.3 Refrigerant CO (R744) Check the refrigerant bottle for corrosion, leaks and damage weekly. -
Page 56: Bottle Adapter
Maintenance AVL DiTEST ADS 340 6.2.4 Bottle adapter Check the bottle adapter for corrosion, leaks and damage weekly. Fig. 6-8 (sample photo): 6.2.5 ND and HD filling hoses Check the filling hoses ND (blue) and HD (red) for leaks, defects or damages weekly. -
Page 57: Quick Couplings Nd And Hd
AVL DiTEST ADS 340 Maintenance 6.2.6 Quick couplings ND and HD Check the quick couplings ND (blue) and HD (red) for leaks, defects or damages weekly. Fig. 6-10 (Symbol photo) User Manual... -
Page 58: Bottle Heating (Heating Tape)
Check bottle heating (heating tape) only when the mains plug is disconnected. If the heating tape or cable is damaged, the device must not be put into operation. Contact the AVL DiTEST branch office / AVL DiTEST partner in your country. WARNING Danger from hot parts The cylinder heater and the refrigerant cylinder become hot during operation. -
Page 59: Irregular Maintenance, If Required
Maintenance Irregular maintenance, if required 6.3.1 Replacement refrigerant bottle CO2 (R744) Proceed as following: 1. Switch on the AVL DiTEST ADS 340. 2. The following message appears after a successful self-test. Fig. 6-12 3. Continue with 4. You are in the main menu. Tap Maintenance. - Page 60 Maintenance AVL DiTEST ADS 340 5. Select Replace refrigerating agent cylinder in the maintenance menu. Fig. 6-14 6. Now select Cylinder content. Fig. 6-15 6-10 User Manual...
- Page 61 AVL DiTEST ADS 340 Maintenance 7. Enter the weight of the cylinder content. (= nominal quantity of the content / nominal capacity of the cylinder, not the actual cylinder capacity). Incorrect entries inevitably result in incorrect calculations of the available/usable cylinder capacity.
- Page 62 Maintenance AVL DiTEST ADS 340 9. Refrigerating agent cylinder with protective cap: In order to read the tare weight, the protective cap must be removed from the refrigerating agent cylinder Fig. 6-18 Note down the tare weight. The tare weight represents the net weight of the used cylinder (empty).
- Page 63 AVL DiTEST ADS 340 Maintenance Mark the location of the outlet valve on the refrigerating agent cylinder. Fig. 6-20 Re-attach the protective cap. Fig. 6-21 User Manual 6-13...
- Page 64 Maintenance AVL DiTEST ADS 340 10. Enter the tare weight. Fig. 6-22 11. Depending on the refrigerant bottle used, select with/without riser pipe. Press to continue replacing the cylinder. Fig. 6-23 6-14 User Manual...
- Page 65 AVL DiTEST ADS 340 Maintenance 12. Skip the plausibility check and accept the settings by tapping on Fig. 6-24 13. Follow the instruction and release the screw fitting at the connectors. Fig. 6-25 14. Continue with . The hose is automatically emptied.
- Page 66 Maintenance AVL DiTEST ADS 340 17. Close the manual valve on the refrigerating agent cylinder. Continue with Fig. 6-27 18. Follow the instruction. Fig. 6-28 WARNING Danger from hot parts The cylinder heater and the refrigerant cylinder become hot during operation.
- Page 67 AVL DiTEST ADS 340 Maintenance Disconnect the hose from the cylinder adapter. Spanner width: 14 mm Fig. 6-29 Unscrew the cylinder adapter Fig. 6-30 Unscrew the protective cap Fig. 6-31 User Manual 6-17...
- Page 68 Maintenance AVL DiTEST ADS 340 Release the safety belts and remove the refrigerating agent cylinder from the refrigerating agent scales. Fig. 6-32 Remove the cylinder heater (heating band). Fig. 6-33 19. Continue with 6-18 User Manual...
- Page 69 AVL DiTEST ADS 340 Maintenance 21. The scales are reset to zero. Follow the instructions. Make sure the scales are unloaden. Fig. 6-34 22. Continue with 23. Follow the instruction. Fig. 6-35 User Manual 6-19...
- Page 70 Maintenance AVL DiTEST ADS 340 a) Attach the cylinder heater (heating band) around the lower third of the cylinder. Important: The closure of the cylinder heater must be located on the opposite side of the outlet valve. Outlet valve Fig. 6-36 b) Make sure that the cylinder heater (heating band) is connected.
- Page 71 AVL DiTEST ADS 340 Maintenance Fig. 6-38 24. Continue with 25. Refrigerating agent cylinder with protective cap: Remove the protective cap. Make sure that the connection of the refrigerating agent cylinder is facing the device and not away. Fig. 6-39 26.
- Page 72 Maintenance AVL DiTEST ADS 340 Fig. 6-40 28. Remove the hose from the plastic cap if necessary. Fig. 6-41 29. Remove the plastic cap on the outlet valve if necessary. Fig. 6-42 30. Attach the supplied cylinder adapter. Torque: 30 … 32 Nm, max. 35 Nm.
- Page 73 AVL DiTEST ADS 340 Maintenance Fig. 6-43 32. Connect the hose to the cylinder adapter. Spanner width: 14 mm. Torque: 16 … 18 Nm, max. 20 Nm. Fig. 6-44 33. Continue with 34. Make sure that the hose/hose connection is facing the device.
- Page 74 Maintenance AVL DiTEST ADS 340 ✓ Fig. 6-45 36. Make sure that the hose/hose connection does not point centrally to the front, but approx. 20 ... 25 degrees to the left. 20 … 25 ° Fig. 6-46 37. Follow the instructions and open the manual valve of the refrigerating agent cylinder.
-
Page 75: Pressure Zero
38. End the replacement of the refrigerating agent cylinder with The system is flushed with CO2, i.e. the filling hoses are first flooded with CO2, then the CO2 is discharged. The ADS 340 must not be connected to the vehicle at this time. 39. Exit the menu with 40. -
Page 76: Oil Weight Zero
Maintenance AVL DiTEST ADS 340 Select Reset to zero. Fig. 6-50 Pressure zeroing Start pressure zeroing with Pressure zeroing – Start Fig. 6-51 Pressure zeroing takes about 60 seconds. The counter is displayed. Wait until the process is complete. "Pressure zeroing" is complete. -
Page 77: Save Logs
Log files are being recorded in the background which can be stored on a USB flash drive in the event of a malfunction and sent to the AVL DiTEST service department for error analysis. The log file is started / stopped with... - Page 78 Maintenance AVL DiTEST ADS 340 Remark: After the log function is started, it is not deactivated by switching off the device. 6-28 User Manual...
-
Page 79: Change Printer Paper
AVL DiTEST ADS 340 Maintenance 6.3.5 Change printer paper Press the black flap outwards and open the cover. Fig. 6-55 Remove the empty paper reel and insert a new one. Note the turning direction. Fig. 6-56 Pull out the paper until it flash drives out of the printer. -
Page 80: Changing The Fuses
6.3.6 Changing the fuses NOTICE Use only the original AVL DiTEST fuses with the ID number EV0051 or fuses with the same specification: glass fuse 5×20 mm, 6.3 A, 250 V, anti-surge. Pull out the fuse and replace the fuse. -
Page 81: Additional Maintenance Information
AVL DiTEST ADS 340 Maintenance Additional maintenance information If you experience problems, you can execute various maintenance tasks using the maintenance menu. Select the desired function. Follow the instructions on the screen 6.4.1 System information The menu "System information" shows ▪... -
Page 82: Replace The Quick Coupling Seal
Maintenance AVL DiTEST ADS 340 6.4.3 Replace the quick coupling seal Tools required ▪ 2 slot screwdrivers (2 mm wide) ▪ Tweezers Important: The screwdrivers and tweezers must have been carefully deburred and rounded. Overview The seal consists of two parts: ▪... - Page 83 AVL DiTEST ADS 340 Maintenance Removing the rings Remove O-ring and supporting ring with screwdrivers. Apply caution to avoid damaging the service connection. Fig. 6-61 Installing the O-ring and supporting ring 1. Bend the supporting ring slightly in the middle. Do not bend it together completely as otherwise it will be damaged.
- Page 84 Maintenance AVL DiTEST ADS 340 2. Insert the supporting ring into the connector with your fingers. Fig. 6-63 3. Push the supporting ring further into the connector and then position it in the O-ring groove. The supporting ring must fit perfectly in the groove without exhibiting any unevenness or damage.
- Page 85 AVL DiTEST ADS 340 Maintenance 5. Position the O-ring as shown in the following figures. The correct position is behind the supporting ring. The correct position is essential to the proper functioning of the connector and must be adhered to.
- Page 86 7. Push the O-ring further into the groove until the O-ring is seated evenly in the groove as shown in the figures. Supporting ring O-ring Seated evenly all round Fig. 6-68 If you experience problems or have any questions, please contact your AVL DiTEST service partner. 6-36 User Manual...
- Page 87 AVL DiTEST ADS 340 Maintenance User Manual 6-37...
-
Page 89: Service
AVL DiTEST ADS 340 Service Service The operating mode "Service" is password-protected and reserved for the authorized AVL DiTEST service department. User Manual... - Page 90 Service AVL DiTEST ADS 340 User Manual...
-
Page 91: Overview
AVL DiTEST ADS 340 Overview Overview The overview shows all current system values. Fig. 8-1 Symbol description: Pressure on high pressure side Pressure on low pressure side Pressure at refrigerant connection concentration in % Measures bottle fill level Measured usable bottle fill level... - Page 92 Overview AVL DiTEST ADS 340 User Manual...
-
Page 93: Shutdown And Restart / Storage
Storage Disconnect the AVL DiTEST ADS 340 from the power supply and place it at a secure location protected from high temperatures, air humidity and any risk of colliding with another object that could damage it. Please also refer to the technical data. The device must also be covered with the enclosed cover. -
Page 94: Cleaning
The cloth may be moistened with water or an alkaline detergent. It may be damp but not wet. CAUION Before cleaning remove the mains plug. The device must not be pressurized. Be sure that no liquid is flowing into the housing of the ADS 340. User Manual... -
Page 95: List Of Possible Faults / Troubleshooting
Please try to determine the fault and locate it as precisely as possible. Follow the recommended solutions on the screen and perform all actions offered where possible. If a fault cannot be corrected, please contact the responsible AVL DiTEST branch/AVL DiTEST partner in your country. - Page 96 List of possible faults / troubleshooting AVL DiTEST ADS 340 Error messages: Error message Possible cause(s), Solution Error An error indicates that the current operation should be discontinued because of a problem. Charging indicator: flashing red. Pressure at CO2 outlet The measured pressure at the CO outlet is faulty.
- Page 97 AVL DiTEST ADS 340 List of possible faults / troubleshooting Device check incomplete. The device scan can not be completed due to insufficient amount Replace refrigerant bottle. of refrigerant. The refrigerant cylinder must be replaced. Measurement data invalid, If during calibration incorrect measured data calibration is calibration failed.
- Page 98 List of possible faults / troubleshooting AVL DiTEST ADS 340 10-4 User Manual...
- Page 99 AVL DiTEST ADS 340 List of possible faults / troubleshooting User Manual 10-5...
-
Page 101: Warranty
The date on the delivery slip to the end customer applies for handling claims. 11.3 Damage Claims In the event of a damage please contact the AVL DiTEST branch / AVL DiTEST partner in your country. 11.4 AVL DiTEST service address AVL DiTEST GmbH Schwadermühlstraße 4... - Page 102 Warranty AVL DiTEST ADS 340 11-2 User Manual...
-
Page 103: Shipping Package
AVL DiTEST ADS 340 Shipping Package Shipping Package 12.1 System Delivery Description Order no. AVL DiTEST ADS 340 incl. first filling and power cable BO7994 AVL DiTEST ADS 310/340 quick start guide, printed AT7862 AVL DiTEST ADS 310/340 inspection log book, printed AT7864E... -
Page 104: Consumables And Operating Material
Bottle adapter incl. seal: 0.825 "×14NGO DN7473 Bottle adapter incl. seal: W27×2mm DN7474 Drain hose 3 m BO8016 Sealing-set R744 BO8101 NOTE Use original accessories by AVL DITEST only. Contact the AVL DiTEST branch/AVL DiTEST partner in your country. 12-2 User Manual... -
Page 105: Technical Data
-25 ...+50 °C Air humidity 10 ... 90 %, non-condensing Disposal This product by AVL DiTEST is a high-quality electrical and electronic device that must not be disposed of with household waste. For disposal, it is essential to comply with local legal obligations. - Page 106 Technical Data AVL DiTEST ADS 340 Certificates This product complies with all relevant guidelines, standards, etc. The full text of the EU Declaration of Conformity can be found on the Internet at: https://www.avlditest.com/index.php/en/downloads-en.html 13-2 User Manual...
-
Page 107: List Of Abbreviations
AVL DiTEST ADS 340 List of Abbreviations List of Abbreviations Abbreviation Description AirCondition Diagnostic System Communauté Européenne (European Community) Carbon dioxide European Community High pressure High Pressure Internet Protocol Motor vehicle Low pressure High Voltage Universal Serial Bus Ultra violet... - Page 108 List of Abbreviations AVL DiTEST ADS 340 14-2 User Manual...
-
Page 109: Index
AVL DiTEST ADS 340 Index Index Automated cycle"air conditioning service" 3-1 Language 5-2 List of Abbreviations 14-1 List of possible faults / troubleshooting 10-1 Balance sheet 5-2 Bottle adapter 6-6 Maintenance 6-1 Maintenance Plan 6-1 Manual cycle 4-1 Change printer paper 6-28... - Page 110 Index AVL DiTEST ADS 340 SAFETY INSTRUCTIONS III Units 5-1 Save Logs 6-27 Unpacking 2-1 Service 7-1 User interface - operation 1-9 Setup 5-1 User prompts 10 Shipping Package 12-1 Shutdown 9-1 Shutdown and restart / storage 9-1 Warning and safety notices I...
Need help?
Do you have a question about the ADS 340 and is the answer not in the manual?
Questions and answers
Where can I get GE7427 vacuum pump oil for the vacuum pump