
Summary of Contents for Hafco Metalmaster BS-76
- Page 1 OPERATION MANUAL Models BS-76 & BS-152 Order Code L119, Order Code L120 Edition No : BS-76, 152-1 Date of Issue : 07/2021...
- Page 2 Owing to the continuous improvement of the HAFCO METALMASTER machine, changes may be made at any time without obligation or notice. Please ensure the local voltage is the same as listed on the specification plate before operating any electric machine.
-
Page 3: Table Of Contents
OPERATION MANUAL C O N T E N T S: 1. GENERAL MACHINE INFORMATION 1.1 Specifications.............. 4 1.2 Accessories Included..........4 1.3 Identification............... 5 2. SAFETY 2.1 General Metalworking Machine Safety....6 2.2 Specific Safety Linisher Sander......9 3. POWER SUPPLY 3.1 Electrical Requirements........... -
Page 4: Specifications
OPERATION MANUAL 1.1 SPECIFICATION Order Code L119 L120 MODEL BS-76 BS-152 Type Linisher Sander Linisher Sander Mounting Type - Bench / Pedestal Pedestal Pedestal Includes Stand Belt Speed (fpm / mpm) 2850, 5700 / 870, 1740 2850, 5700 / 870, 1740... -
Page 5: Identification
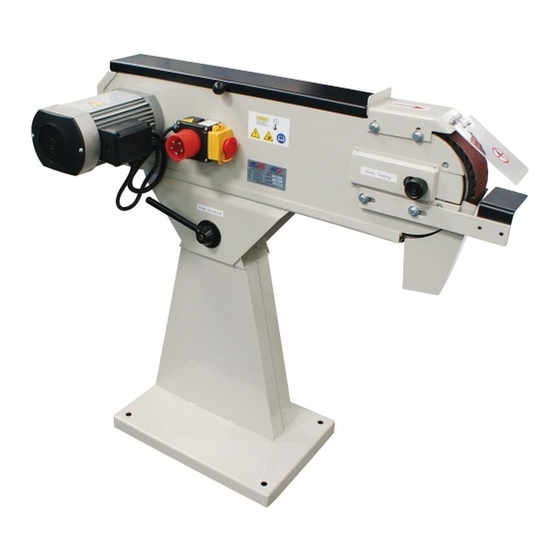
OPERATION MANUAL 1.3 IDENTIFICATION Motor Emergency Stop Button Belt Guard Tilting Lever Work / Tool Rests ON/OFF Button Eye Shield Two Speed Motor Switch Spark Arrester. Belt Release Lever Belt Tracking Knob Contact Wheel... -
Page 6: General Metalworking Machine Safety
OPERATION MANUAL 2.1 GENERAL METALWORKING MACHINE SAFETY DO NOT use this machine unless you have read this manual or have been instructed in the use of this machine in its safe use and operation WARNING This manual provides safety instructions on the proper setup, operation, maintenance, and service of this machine. - Page 7 OPERATION MANUAL 2.1 GENERAL METALWORKING MACHINE SAFETY Cont. Ensure that keys and adjusting wrenches have been removed from the machine before turning on the power. Appropriate storage for tooling should be provided. Ensure that all cutting tools and blades are clean and sharp. They should be able to cut freely without being forced.
- Page 8 OPERATION MANUAL 2.1 GENERAL METALWORKING MACHINE SAFETY Cont. HAZARDS ASSOCIATED WITH MACHINES include, but are not limited to: • Being struck by ejected parts of the machinery • Being struck by material ejected from the machinery • Contact or entanglement with the machinery •...
-
Page 9: Specific Safety Linisher Sander
OPERATION MANUAL 2.2 SPECIFIC SAFETY FOR LINISHER SANDER DO NOT use this machine unless you have been instructed in its safe use and operation and have read and understood this manual Safety glasses must be worn at Long and loose hair must be con- all times in work areas tained or restrained Close fitting/protective clothing must... -
Page 10: Power Supply
OPERATION MANUAL 3. POWER SUPPLY 3.1 ELECTRICAL REQUIREMENTS Place the machine near an existing power source. Make sure all power cords are protected from traffic, material handling, moisture, chemicals, or other hazards. Make sure there is access to a means of disconnecting the power source. The electrical circuit must meet the requirements for 415V. -
Page 11: Setup
OPERATION MANUAL 4 SETUP 4.1 UNPACKING This machine was carefully packaged for safe transport. When unpacking, separate all enclosed items from packaging materials and inspect them for shipping damage. If items are damaged, please contact your distributor. NOTE: Save all the packaging materials until you are completely satisfied with the machine and have resolved any issues with the distributor, or the shipping agent. -
Page 12: Anchoring To The Floor
OPERATION MANUAL 4.5 ANCHORING TO THE FLOOR The machine is best mounted on a concrete slab. Masonry anchors with bolts are the best way to anchor ma- chinery, because the anchors sit flush with the floor surface, making it easy to unbolt and move the machine later, if needed. -
Page 13: Assembly
OPERATION MANUAL 4.7 ASSEMBLY The machine must be fully assembled before it can be operated. First clean any parts that are coated in rust preventative to ensure the assembly process can proceed smoothly. Mounting The Linisher Sander This mounting of the Linisher will require suitable lifting equipment to complete this step. While holding the sander in place, then the bolt and sleeve can be installed. -
Page 14: Test Run
OPERATION MANUAL 4.8 TEST RUN Once assembly is complete, test run the machine to ensure it is properly connected to the power and safety components are functioning correctly. Check that the direction of the motor is correct, and make sure that the belt travels in the correct direction. If the direction is incorrect, isolate the machine and have the electrician make changes to the wiring. -
Page 15: Operation
OPERATION MANUAL 5. OPERATION This machine may perform many types of operations that are beyond the scope of this manual. Many of these operations may be dangerous or deadly if performed incorrectly. The instructions in this section are written with the understanding that the operator has the necessary knowledge and skills to operate this machine. -
Page 16: Changing The Belt
OPERATION MANUAL 5.3 CHANGING THE BELT Belts with different grit sizes will need to be changed. Changing the belts on these machines is very easy. 1. DISCONNECT THE LINISHER FROM THE POWER SUPPLY! 2. Ensure that the belt has come to a complete standstill. ension 2. -
Page 17: Maintenance
The outside cover of the belt, and the grinding remnants and dust in the outlet ports should be frequently cleaned and kept clean to resist build up. 6.2 OPTIONAL ACCESSORIES Replacement Belts for BS-76 Replacement Belts for BS-152 40G Zirconia Linishing Belt Pack... -
Page 18: Troubleshooting
OPERATION MANUAL TROUBLESHOOTING Review the troubleshooting and procedures in this section if a problem develops with your machine. If you need replacement parts then follow the procedure in beginning of the spare parts section or if additional help with a procedure is required, then contact you distributor. Note: Make sure you have the model of the machine, serial number,and manufacture date be- fore calling. -
Page 19: Spare Parts
3. Go to www.machineryhouse.com.au/contactus and fill out the inquiry form attaching a copy of scanned parts list. CONTENTS Wiring Diagram............20 BS-76 Spare Parts Diagram........21 BS-76 Spare Parts List..........22 BS-152 Spare Parts Diagram......... 23 BS-152 Spare Parts List........... 24... - Page 20 OPERATION MANUAL WIRING DIAGAM FOR BS-76 & BS-152...
- Page 21 OPERATION MANUAL BS-76 PARTS DIAGRAM...
- Page 22 OPERATION MANUAL BS-152 PARTS LIST ITEM DESCRIPTION QTY. ITEM DESCRIPTION QTY. CUP HEAD SCREW M4X6 SELF-LOCKINGNUTM6 LEFT COVER NUT M4 WORK TABLE MOTOR FIXATION BOARD OF WORK TABLE BOLT M8X25 FLAT ASHER Φ8 HAND BALL HEX COUNTERSUNK SCREW M8X10 SAFETY COVER HEX COUNTERSUNK SCREW M8X16 TOP TABLE U-SUPPORT...
- Page 23 OPERATION MANUAL BS-152 PARTS DIAGRAM...
- Page 24 OPERATION MANUAL BS-152 PARTS LIST ITEM DESCRIPTION QTY. ITEM DESCRIPTION QTY. CUP HEAD SCREW M4X6 SELF-LOCKINGNUTM6 LEFT COVER NUT M4 WORK TABLE MOTOR FIXATION BOARD OF WORK TABLE BOLT M8X25 FLAT ASHER Φ8 HAND BALL HEX COUNTERSUNK SCREW M8X10 SAFETY COVER HEX COUNTERSUNK SCREW M8X16 TOP TABLE U-SUPPORT...
-
Page 25: Risk Assessment Sheets
General Machinery Safety Instructions Machinery House requires you to read this entire Manual before using this machine. 1. Read the entire Manual before starting 14. Use correct amperage extension cords. machinery. Machinery may cause serious injury if Undersized extension cords overheat and lose not correctly used. - Page 26 Linisher/Disc Sander Safety Instructions Machinery House requires you to read this entire Manual before using this machine. 1. Maintenance. 11. Workpiece Handling. Make sure the sander is turned Never hold small workpieces off and disconnect from the main power supply with your fingers during a cut.
Need help?
Do you have a question about the BS-76 and is the answer not in the manual?
Questions and answers