Table of Contents
Advertisement
Quick Links
M18 SIM
Original instructions
Originalbetriebsanleitung
Notice originale
Istruzioni originali
Manual original
Oorspronkelijke gebruiksaanwijzing
Original brugsanvisning
Original bruksanvisning
Bruksanvisning i original
Alkuperäiset ohjeet
Πρωτότυπο οδηγιών χρήσης
Orijinal işletme talimatı
Původním návodem k používání
Pôvodný návod na použitie
470 424 - M18SIM - GB Print.indd 1
470 424 - M18SIM - GB Print.indd 1
Instrukcją oryginalną
Eredeti használati utasítás
Izvirna navodila
Originalne pogonske upute
Instrukcijām oriģinālvalodā
Originali instrukcija
Algupärane kasutusjuhend
Оригинальное руководство по эксплуатации
Оригинално ръководство за експлоатация
Instrucţiuni de folosire originale
Оригинален прирачник за работа
Оригінал інструкції з експлуатації
اﻟﺗﻌﻠﯾﻣﺎت اﻷﺻﻠﯾﺔ
01.07.2020 06:40:42
01.07.2020 06:40:42
Advertisement
Table of Contents

Subscribe to Our Youtube Channel
Related Manuals for Milwaukee M18 SIM

Summary of Contents for Milwaukee M18 SIM
- Page 1 M18 SIM Original instructions Instrukcją oryginalną Originalbetriebsanleitung Eredeti használati utasítás Notice originale Izvirna navodila Istruzioni originali Originalne pogonske upute Manual original Instrukcijām oriģinālvalodā Oorspronkelijke gebruiksaanwijzing Originali instrukcija Original brugsanvisning Algupärane kasutusjuhend Original bruksanvisning Оригинальное руководство по эксплуатации Bruksanvisning i original Оригинално...
-
Page 2: Table Of Contents
CONTENTS General informations ............................3 1.1 Additional Safety and Working Instructions .................... 3 1.2 Technical data ............................3 1.3 Specifi ed conditions of use ........................3 1.4 Radio Frequency Interface Requirements - Related to European installation ........4 1.5 EC-declaration of conformity ........................4 1.6 One-key™... -
Page 3: General Informations
Do not try to replace the battery pack if the surface of the instrument is wet. Do not dispose of used battery packs in the household refuse or by burning them. Milwaukee Distributors off er to retrieve old batteries to protect our environment. -
Page 4: Radio Frequency Interface Requirements - Related To European Installation
1.4 Radio Frequency Interface Requirements - Related to European installation Note: This equipment has been tested and found to comply with the limits for a EN 300 440 v2.1.1 receiver Category 3. These limits are designed to provide reasonable protection against harmful interference in a residential installation. -
Page 5: Maintenance
Check with forwarding company for further advice 1.9 Maintenance Use only Milwaukee accessories and spare parts. Should components need to be replaced which have not been described, please contact one of our Milwaukee service agents (see our list of guarantee/service addresses). -
Page 6: Overview
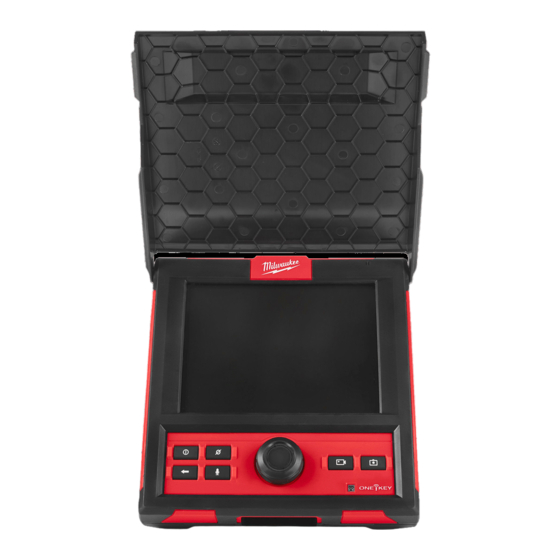
2 OVERVIEW 1. Sunshield 2. Internal microphone 3. LCD 4. Distance reset button 5. Power button 6. Back button 7. Microphone button 8. Navigation dial 9. Record video button 10. ONEKEY LED 11. Picture capture button 12. USB-C port 13. USB-A port 14. -
Page 7: Installing And Removing Battery Pack
3 INSTALLING AND REMOVING BATTERY PACK click 78-100 % 55-77 % 33-54 % 10-32 % < 10 % ENGLISH 470 424 - M18SIM - GB Print.indd 7 470 424 - M18SIM - GB Print.indd 7 01.07.2020 06:40:43 01.07.2020 06:40:43... -
Page 8: Change Onekey Battery
4 CHANGE ONEKEY BATTERY ENGLISH 470 424 - M18SIM - GB Print.indd 8 470 424 - M18SIM - GB Print.indd 8 01.07.2020 06:40:45 01.07.2020 06:40:45... -
Page 9: Setup
These initial WIRELESS MONITOR settings will set the UNITS of distance measurement, DATE & TIME formats, SONDE frequencies, VIDEO quality, IMAGE quality, CONNECTION SETTINGS and LANGUAGE. These settings can also be performed through a tablet running the MILWAUKEE® PIPELINE INSPECTION APP. 5.3 Navigating through the settings menu Navigation dial - Turn the navigation dial clockwise or counter-clockwise to move through the menus. -
Page 10: Setting The Date & Time
The DATE & TIME are now set, and you will be returned to the SETTINGS menu. If using a tablet running the MILWAUKEE® PIPELINE INSPECTION APP, the DATE & TIME are taken from the tablet. 5.6 Setting the UNITS of Measure 1. -
Page 11: Setting The Sonde Frequency
SETTINGS MILWAUKEE A B C D E F G H I J K L M N O P Q R S T U V W X Y Z 1 2 3 4 5 6 7 8 9 0 . , - ? ! -
Page 12: Video And Image Settings
1. Go to SETTINGS VIDEO SETTINGS. SETTINGS MANAGE JOBS SONDE FREQUENCY 640Hz LABEL SETTINGS MANAGE JOBS 2019/05/10 6 FILES COMPANY NAME MILWAUKEE VIDEO SETTINGS 1080P 30FPS IMAGE SETTINGS 1920x1080 FORMAT DISK CONNECTION SETTINGS MTCAM_02938B284 CAMERA SETTINGS 2. Choose 1080p, 720p or 480p. - Page 13 1. Go to SETTINGS IMAGE SETTINGS. SETTINGS MANAGE JOBS SONDE FREQUENCY 640Hz LABEL SETTINGS MANAGE JOBS 2019/05/10 6 FILES COMPANY NAME MILWAUKEE VIDEO SETTINGS 1080P 30FPS IMAGE SETTINGS 1920x1080 FORMAT DISK CONNECTION SETTINGS MTCAM_02938B284 CAMERA SETTINGS 2. Choose 1920x1080, 1280x720 or 640x480.
-
Page 14: Connection Settings
• If there is more than one CONTROL HUB in range, the Control Hub List will appear on the WIRELESS MONITOR or MILWAUKEE® PIPELINE INSPECTION APP so the user can choose the desired CONTROL HUB. SETTINGS Control Hub List... - Page 15 CONNECTION SETTINGS. SETTINGS MANAGE JOBS SONDE FREQUENCY 640Hz LABEL SETTINGS MANAGE JOBS 2019/05/10 6 FILES COMPANY NAME MILWAUKEE VIDEO SETTINGS 1080P 30FPS IMAGE SETTINGS 1920x1080 FORMAT DISK CONNECTION SETTINGS MTCAM_02938B284 CAMERA SETTINGS USB-C Cable Connection The WIRELESS MONITOR can also be powered by the CONTROL HUB battery via the supplied USB-C cable.
-
Page 16: M18™ Battery
5.11 M18™ BATTERY Both the WIRELESS MONITOR and CONTROL HUB are powered by an M18™ BATTERY. The battery condition of both is always shown in the status bar on the WIRELESS MONITOR screen. Recharge only with the charger specifi ed for the battery. For specifi c charging instructions, read the operator's manual supplied with your charger and battery. -
Page 17: Using The Wireless Monitor
6 USING THE WIRELESS MONITOR Many of these instructions also apply to the Milwaukee® Pipeline Inspection App. The Milwaukee® Pipeline Inspection App is available for download from the Apple App Store or at Google Play. CAMERA LIGHT 2020/04/17 11:30:45 AM 3.2M... -
Page 18: Using Jobs
6.1 Using JOBS Before creating a video or image fi le, you can tell the system where to store the fi les. This is known as creating a NEW JOB or CONTINUE EXISTING JOB. Creating a NEW JOB will setup a container (folder) for both video and image fi... -
Page 19: Creating A Video Recording And Image Capturing
6.2 Creating a Video Recording and Image Capturing By default, all videos and images recorded are saved to the CONTROL HUB INTERNAL DRIVE. If a thumb drive is plugged into the CONTROL HUB, all videos and pictures can be saved to both the CONTROL HUB INTERNAL DRIVE and CONTROL HUB THUMB DRIVE. -
Page 20: Export Job
6.3 EXPORT JOB The EXPORT JOB allows for the copying of fi les from the CONTROL HUB INTERNAL DRIVE to the CONTROL HUB THUMB DRIVE. From within the GALLERY individual fi les can be exported one at a time. From the MANAGE JOBS option, under SETTINGS entire folders of JOBS can be EXPORTED in one session. -
Page 21: Adjusting The Camera Light And Image Enhance
6.4 Adjusting the CAMERA LIGHT and IMAGE ENHANCE 1. Go to CAMERA LIGHT and set the desired light level. CAMERA LIGHT 2020/04/17 11:30:45 AM 3.2M LIGHT LEVEL IMAGE ENHANCE 2. Pressing the navigation dial again will select the IMAGE ENHANCE option. The IMAGE ENHANCE feature allows the LCD display to show more detail and depth from the camera head in diff... -
Page 22: Screen Rotate
Pan location reference ZOOM & PAN ZOOM & PAN 2020/04/17 11:30:45 AM 3.2M 2019/10/23 01:47:57 AM 9.3FT 2019_10_23_SCREEN 2019_10_23_SCREEN HORIZ VERT Down Left Right Example of PANNING HORIZ, to the left Example of PANNING VERT, up 4. Press the BACK button to exit and return to the main viewing area. -
Page 23: Sonde
The LINE TRACE is now active, and the LINE TRACE icon with selected frequency will appear in the status bar. 33kHZ LINE TRACE 2019/10/23 01:47:57 AM 9.3FT 2019_10_23_SCREEN 3. Deactivate the LINE TRACE mode by going to LINE TRACE and select OFF. 6.8 SONDE SONDE - activates the SONDE transmitter attached at the end of the PIPELINE INSPECTION REEL termination spring to locate the approximate position of the SONDE in the pipe. -
Page 24: Playback Highlights
The Saved Locations labels GALLERY show if the fi les are located on the CONTROL HUB INTERNAL DRIVE or CONTROL HUB THUMB DRIVE. GALLERY 2019_10_23 201910230518c 201910230518b 201910230518a 201910230516b_h 00:18 00:20 2019/10/23 2019/10/23 2019/10/23 2019/10/23 201910230516a 201910230515a 01:20 2019/10/23 2019/10/23 When entering the job folder, the individual fi... -
Page 25: Rewind And Fast Forward
6.12 Rewind and Fast Forward Use the rewind and fast forward feature to move through a playing video. 1. Go to GALLERY , select the job folder and then the desired video. 2. Select the RW/FF (rewind/fast forward) menu option and press the navigation dial. 2019_10_23_SCREEN PLAYBACK 00:14 / 00:40... -
Page 26: Recording Audio
6. Use the on-screen keyboard to enter the new fi le name, when fi nished navigate to ENTER and press the navigation dial. 201905100515a0101 A B C D E F G H I J K L M N O P Q R S T U V W X Y Z 1 2 3 4 5 6 7 8 9 0 . -
Page 27: Delete Files
6.16 Delete Files From within the GALLERY individual fi les can be deleted one at a time. From the SETTINGS menu, select MANAGE JOBS and entire folders of jobs can be deleted in one session. Deleting fi les from the Gallery 1. -
Page 28: Using Labels
6.17 Using LABELS LABELS are predefi ned observations that are splashed on the screen and appear in recorded videos and captured pictures. When a LABEL is selected, it will appear on the screen for 15-seconds and then disappear. LABELS LABEL 2020/04/17 11:30:45 AM 3.2M ADD CUSTOM... - Page 29 Editing labels Previously created LABELS can be edited or deleted with this option. 1. Go to SETTINGS LABEL SETTINGS EDIT LABELS. SETTINGS RESET FREQUENTLY USED LABELS LIST EDIT LABELS 2. Select the label for editing or deletion. Select EDIT or DELETE and press the navigation dial. Editing –...
-
Page 30: Factory Reset & Firmware Updates
7 FACTORY RESET & FIRMWARE UPDATES 7.1 Factory Reset Performing a factory reset will reset the WIRELESS MONITOR to the factory defaults. On the WIRELESS MONITOR, the functionality that will reset to the factory default will be: • Backlight settings back to default •... - Page 31 5. A confi rmation message will appear when the update is complete, and the system will reboot. The Wireless Monitor will now restart in order to complete the firmware update. 6. Go to SETTINGS ABOUT to confi rm that the fi rmware revision numbers have updated. ENGLISH 470 424 - M18SIM - GB Print.indd 31 470 424 - M18SIM - GB Print.indd 31...
- Page 32 Copyright 2020 Techtronic Industries GmbH Max-Eyth-Straße 10 71364 Winnenden Germany +49 (0) 7195-12-0 (07.20) www.milwaukeetool.eu 4931 4704 24 470 424 - M18SIM - GB Print.indd 32 470 424 - M18SIM - GB Print.indd 32 01.07.2020 06:42:02 01.07.2020 06:42:02...
Need help?
Do you have a question about the M18 SIM and is the answer not in the manual?
Questions and answers