Table of Contents
Advertisement
Available languages
Available languages
Quick Links
Advertisement
Table of Contents

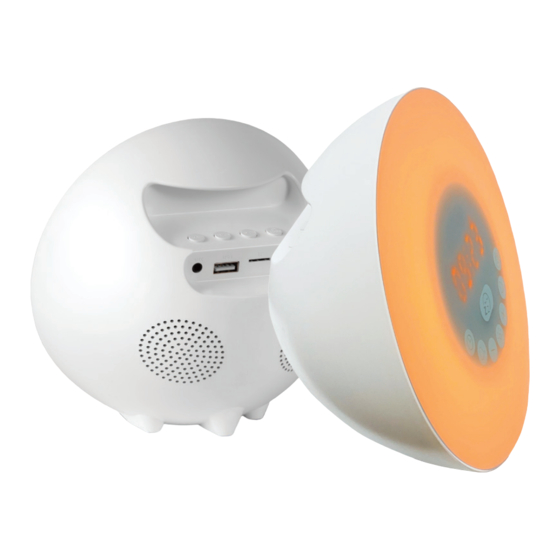
Summary of Contents for Dutch originals DIGITAL SUNRISE
-
Page 3: Package Content
2) SAFETY INSTRUCTIONS The following precautions must always be taken into consideration before using the “Digital sunrise alarm LED clock”, hereinafter referred to as the ‘device’. General information • Read the instructions for use carefully and keep them safe. If you give this device to other people, please also pass on this manual. - Page 4 • Do not charge the device if the charging cable shows signs of damage. • Make sure the charging cable cannot be trodden on or pinched. • Do not allow the charging cable to hang over sharp edges and keep it away from hot objects and naked flames.
- Page 5 • Prior to use, check the device for visible external damage. Never operate the device if it is damaged. • Do not use the device in the vicinity of flammable materials. • Do not place the device under any mechanical stress. •...
- Page 6 AUX in Stereo speakers Power ON/OFF / mode button Next track / volume up button Play-pause / call pick up OR call end button Previous track / volume down button Clock button Alarm 1 button - Setting button Light button + Setting button Alarm 2 button Sunset button...
- Page 7 Powering the device ON/OFF: • To power ON the device, press the ‘power’ button for ± 3 seconds. Once powered ON, you will hear a ‘tone’, the display will light up and the time is shown (initial setting 00:00). • Power OFF the device: press the ‘power’ button for ±...
- Page 8 display, To set up a wireless BT connection, go to “Making a BT connection (BT pairing)”. FM radio When the device is powered ON, press the ‘mode’ button three times to switch to the FM radio mode. On the display the ‘FM’...
- Page 9 Setting the alarm with natural sound For waking up with one of the 7 natural sounds, press the ‘alarm 1’ button for ± 2 seconds to activate the alarm. The ‘alarm 1’ icon will light up and the hours & minutes digits will flash on the display indicating the set alarm time.
- Page 10 Use the ‘-‘ or ‘+‘ buttons to select one of the desired FM presets. ‘CH xx’ will be shown on the display (xx stands for the number of the selected FM preset). Confirm the set FM preset by pressing the ‘alarm 2’ button When the alarm is enabled, the device will start 30 minutes before the set alarm by gradually lighting up to a maximum brightness at the set alarm.
- Page 11 Note! When playing music in one of the selected modes, the music will be switched OFF when the set time has elapsed. Making a BT connection (BT pairing): • When the device is ON, press the ‘power’ button 2x. You will hear a ‘tone’ and on the display, the ‘BT’...
-
Page 12: Features And Specifications
Reject a call If you would like to reject an incoming call, press the call pickup/end’ button for a longer period of time. 4) FEATURES AND SPECIFICATIONS: • Driver diameter: Ø 45 mm • Speaker resistance: 32 Ω • Available frequency: 20 Hz ~ 20 kHz •... -
Page 13: Inhoud Van De Verpakking
GEBRUIKERSHANDLEIDING: DUTCH ORIGINALS – Nederlands DIGITALE LEDWEKKER MET GESIMULEERDE ZONSOPKOMST Model no.: DO-CE-WL01-W INHOUDSOPGAVE: 1) Inhoud verpakking 2) Veiligheidsinstructies 3) Gebruik van het apparaat 4) Functies en specificaties 1) INHOUD VAN DE VERPAKKING 1. Digitale ledwekker met gesimuleerde zonsopkomst 2. USB-oplaadkabel 3. - Page 14 voordat u het apparaat voor de eerste keer gebruikt. • Zorg ervoor dat uw handen droog zijn voordat u het apparaat, het stroomsnoer of de stekker aanraakt. • Wanneer u de stekker van het stroomsnoer in de voedingsbron steekt, moet u ervoor zorgen dat anderen het snoer niet per ongeluk kunnen lostrekken of erover kunnen struikelen.
- Page 15 water en zeep. Als deze vloeistof in uw ogen terecht komt, moet u uw ogen minimaal 10 minuten spoelen met schoon water en een dokter raadplegen. • WAARSCHUWING! Gooi het apparaat nooit in een vuur omdat het kan ontploffen! • Gooi het apparaat niet weg met het huisvuil. Breng het apparaat naar een plaatselijk recycling-adres.
- Page 16 Reiniging: • Haal altijd de voeding van het apparaat voordat u het schoonmaakt. • Gebruik geen schurende schoonmaakmiddelen om het apparaat te reinigen. • Reinig de buitenkant van het apparaat met een vochtige doek. 3) INSTALLATIE EN GEBRUIK VAN HET APPARAAT Open de verpakking voorzichtig en haal het apparaat eruit.
- Page 17 Het apparaat opladen: • Steek de micro-USB-aansluiting voorzichtig in de micro-USB-oplaadpoort het apparaat. • Steek de USB-aansluiting van de oplaadkabel in een USB-poort op uw computer of USB-oplader. • Het LED-indicatielampje knippert rood wanneer het apparaat aan het opladen is. •...
- Page 18 Let op! Als een USB-stick of micro-SD-kaart is aangesloten, kunt u deze selecteren, maar gaat het icoontje ‘TF’ branden op het display Natuurgeluiden: Druk terwijl het apparaat AAN staat op de knop ‘modus’ om naar natuurgeluiden te luisteren. Het icoontje ‘NS’ gaat branden op het display .
- Page 19 track wordt ongeveer twee seconden weergegeven op het display Let op! De volgende bestandsformaten worden ondersteund: MP3, WAV. De maximale ondersteunde capaciteit = 32 GB. AUX-IN Als u de 3,5-mm stereo-audiokabel gebruikt om een externe geluidsbron aan te sluiten op de AUX-IN-poort , hoort u een ‘toon’...
- Page 20 Let op! Als de ingestelde wektijd over minder dan 30 min. is, wordt de lamp niet geactiveerd. Als u de wekker UIT wilt zetten, houdt u de knop ‘wekker 1’ ongeveer 2 seconden ingedrukt. De lamp en het natuurgeluid gaan uit. FM-radio instellen als wekker Als u wakker wilt worden met FM-radio, houdt u de knop ‘wekker 2’...
- Page 21 De lamp gaat opnieuw geleidelijk feller branden tot de maximale helderheid is bereikt en de wekker weer afgaat. Als het apparaat in de snoozemodus staat, knippert het icoontje van de ingestelde wekker (wekker 1 of 2) op het display Let op! De snoozemodus wordt automatisch geactiveerd als de wekker 3 minuten lang is afgegaan en er niet op een knop is gedrukt.
- Page 22 meer op het display • Wanneer een gekoppeld BT-apparaat binnen bereik is, maakt het apparaat daar automatisch verbinding mee als het apparaat in BT-modus staat. LET OP! Wanneer u het apparaat wilt verbinden met een ander BT-apparaat, moet u eerst de verbinding van het apparaat met het actieve gekoppelde BT-apparaat verbreken.
- Page 23 • Bedieningsafstand: tot 10 m • Frequentie: 2,4 GHz - 2,48 GHz • BT-profielen: A2DP, HSP, HFP, AVRCP • Voeding: 5 V , 1 A max. • Ingebouwde oplaadbare batterij: 2.000 mAh Li-ion • Geïntegreerde microfoon met richtingsgevoeligheid • Afmetingen microfoon: Ø 4,0 x 1,5 mm •...
-
Page 24: Contenu Du Paquet
MANUEL D’UTILISATION : DUTCH ORIGINALS – RÉVEIL Français NUMÉRIQUE LED LEVER DU SOLEIL Model no.: DO-CE-WL01-W SOMMAIRE : 1) Contenu du paquet 2) Instructions de sécurité 3) Utilisation de l’appareil 4) Caractéristiques et spécifications 1) CONTENU DU PAQUET 1. Réveil numérique LED lever du soleil 2. - Page 25 • Lorsque le câble d'alimentation est branché, faire attention à ce que personne ne puisse tirer accidentellement ou trébucher sur le cordon. • Ne jamais laisser l’appareil en cours de charge sans surveillance. • Contrôler régulièrement si le câble chargeur n’est pas endommagé. •...
- Page 26 recyclage locale. Contactez les autorités locales pour plus de détails. • Après le chargement complet, toujours retirer la fiche de la prise de courant. • L’appareil ne contient aucune partie qui puisse être réparée par l’utilisateur. • AVERTISSEMENT ! Ne jamais recouvrir le câble d'alimentation ou l'appareil de tissus, rideaux ou autres matières, pour éviter la surchauffe et les éventuels risques d’incendie.
- Page 27 3) INSTALLATION ET UTILISATION DE L’APPAREIL Ouvrir l’emballage avec précaution avant d’en sortir l’appareil. S’assurer que l’appareil soit complet et en bon état. S’il y a des composants qui manquent ou qui sont endommagés, contacter le fournisseur et ne pas utiliser le produit. Conserver l’emballage ou le recycler conformément aux réglementations locales.
-
Page 28: Allumer/Éteindre L'appareil
Charger l’appareil : • Insérer avec précaution le connecteur micro USB dans le port de recharge USB de l’appareil. • Brancher le connecteur USB du câble de recharge à un port USB de votre ordinateur ou chargeur USB. • L'indicateur LED clignote en rouge lorsque l’appareil est en cours de chargement. - Page 29 Si une clé USB, une carte Micro SD et AUX-in sont connectés, vous pouvez sélectionner le mode souhaité : Allumer l’appareil : => mode heure => bruits naturels => BT => FM => AUX-in => Clé USB => Carte Micro SD => Remarque ! Lorsqu'une clé...
- Page 30 Fente pour carte TF / carte Micro SD Lorsque vous insérez une carte Micro SD dans le lecteur de fente pour carte TF (les connexions tournées vers le haut) , poussez-la dans la fente jusqu'à ce que vous entendiez un « clic ». Si la carte est correctement insérée, vous entendrez une «...
- Page 31 Utilisez les boutons « - » ou « + » pour sélectionner le bruit naturel souhaité : oiseaux qui chantent 1 => jungle 2 => vallée 3 => vent 4 => eau du ruisseau 5 => pluie 6 => bip 7. «...
-
Page 32: Mode Silencieux
Une fois l'alarme activée, l'appareil s'allumera 30 minutes avant l'alarme programmée en s'éclairant graduellement pour atteindre le taux de luminosité maximum lorsque l'alarme programmée se déclenchera. En d'autres termes, lorsque l'alarme programmée se déclenche, la lumière a atteint sa luminosité maximale et la station FM préprogrammée est diffusée. Pour éteindre l'alarme, appuyez sur le bouton «... - Page 33 Remarque ! Si vous jouez de la musique dans l'un des modes sélectionnés, elle s'éteindra lorsque la durée programmée se sera écoulée. Établir une connexion BT (Couplage BT) : • Lorsque l'appareil est allumé, appuyez deux fois sur le bouton « allumer/éteindre » .
-
Page 34: Caractéristiques Et Spécifications
Veuillez noter : Si vous écoutiez de la musique avant de téléphoner, la musique recommencera automatiquement lorsque vous raccrochez. Refuser un appel Pour refuser un appel entrant, appuyez sur le bouton « décrocher/raccrocher » pendant plus longtemps. 4) CARACTÉRISTIQUES ET SPÉCIFICATIONS : •... - Page 35 BEDIENUNGSANLEITUNG: DUTCH ORIGINALS – Deutsch DIGITALER SONNENAUFGANGSWECKER MIT LED Model no.: DO-CE-WL01-W INHALT: 1) Verpackungsinhalt 2) Sicherheitshinweise 3) Benutzung des Geräts 4) Funktionen und technische Angaben 1) VERPACKUNGSINHALT 1. Digitaler Sonnenaufgangswecker mit LED 2. USB-Ladekabel 3. 3,5 mm Stereo-Audiokabel 4. Bedienungsanleitung 2) SICHERHEITSANWEISUNGEN Vor Gebrauch des „Digitaler Sonnenaufgangswecker mit LED“, nachfolgend als...
- Page 36 Stromkabel oder Stecker berühren. • Achten Sie beim Einstecken des Netzkabels darauf, dass es nicht versehentlich herausgezogen werden kann oder Personen darüber stolpern. • Lassen Sie das Gerät nie unbeaufsichtigt, wenn es geladen wird. • Überprüfen Sie das Ladekabel regelmäßig auf Schäden. •...
- Page 37 • Entsorgen Sie das Gerät nicht im Hausmüll. Bringen Sie es zu einem Recyclingzentrum vor Ort. Erkundigen Sie sich bei Ihrer Kommunalverwaltung nach den Einzelheiten. • Ziehen Sie am Ende des Ladevorgangs immer den Netzstecker aus der Steckdose. • Das Gerät enthält keine Teile, die vom Benutzer gewartet werden können. •...
- Page 38 3) AUFSTELLUNG UND VERWENDUNG DES GERÄTS Öffnen Sie die Verpackung vorsichtig, bevor Sie das Gerät herausnehmen. Stellen Sie sicher, dass das Gerät vollständig und unbeschädigt ist. Sollten Teile fehlen oder beschädigt sein, kontaktieren Sie den Lieferanten und verwenden Sie das Produkt nicht.
- Page 39 Aufladen des Geräts: • Stecken Sie den Micro-USB-Stecker in den Micro-USB-Anschluss des Geräts. • Stecken Sie den USB-Stecker des Ladekabels in einen USB-Anschluss an Ihrem Computer oder USB-Ladegerät. • Die LED-Anzeige blinkt rot auf, während das Gerät aufgeladen wird. • Sobald der Ladevorgang beendet ist, wird die LED-Anzeige rot aufleuchten und das Gerät wird den Ladevorgang automatisch beenden.
-
Page 40: Usb-Anschluss
Hinweis! Wenn ein USB-Flash-Laufwerk und eine Micro SD-Karte angeschlossen sind, können diese ausgewählt werden, werden aber mit dem „TF“-Symbol auf dem Display angezeigt. Natürliche Töne: Wenn das Gerät eingeschaltet ist, drücken Sie die Taste „Modus“ , um die natürlichen Töne zu hören. Auf dem Display wird das „NS“-Symbol aufleuchten. - Page 41 nach oben) einlegen, schieben Sie sie in den Schlitz, bis Sie ein „Klicken“ hören. Wenn die Karte korrekt eingeführt ist, hören Sie einen „Ton“ und auf dem Display leuchtet das Symbol „TF“ auf. Die auf der Micro-SD-Karte gespeicherte Musik wird automatisch abgespielt. Drücken Sie auf „Weiter“ oder „Vorherige“...
- Page 42 natürlichen Tons). Bestätigen Sie die Eingabe des gewünschten natürlichen Tons durch Drücken der „Alarm 1“-Taste Wenn die Weckfunktion aktiviert ist, beginnt das Gerät 30 Minuten vor der eingestellten Weckzeit mit dem allmählichen Aufleuchten und steigert sich bis zur maximalen Helligkeit der eingestellten Weckzeit. Anders ausgedrückt, zum Zeitpunkt des eingestellten Weckalarms ist das Licht maximal hell und es ertönt der natürliche Ton.
- Page 43 gedrückt halten. Das Licht und das Radio werden ausgeschaltet. Schlummern Wenn der Weckton ertönt, drücken Sie die Schlummertaste , um den Schlummermodus zu aktivieren. Der Weckton wird nach 9 Minuten automatisch wiederholt. Licht und Ton des Geräts schalten sich aus. Nach und nach wird das Licht bis zur maximalen Helligkeit aufleuchten, bis der Weckton wieder ertönt.
-
Page 44: Musik Hören
fähigen Gerät entfernt. • Lassen Sie Ihr Mobiltelefon, Tablet oder anderes BT-fähiges Gerät nach kompatiblen BT-Geräten suchen. (Achten Sie darauf, dass die BT-Funktion eingeschaltet ist.) • Wenn Ihr BT-fähiges Gerät das Gerät findet, wählen Sie aus der Liste der gefundenen Geräte „DO-CE-WL01-W“ aus. •... - Page 45 4) FUNKTIONEN UND TECHNISCHE ANGABEN: • Durchmesser des Treibers: Ø 45 mm • Lautsprecherwiderstand: 32 Ω • Verfügbare Frequenz: 20 Hz ~ 20 kHz • Lautsprecher-Empfindlichkeit: 100 dB ±3 dB • BT V5.0 • Sendeleistung: Klasse II • Reichweite: bis 10 m •...
-
Page 46: Ec Declaration Of Conformity
Declare under our sole responsibility that the product: • Product Brand: Dutch Originals • Product Model No: DO-CE-WL01-W • Product Description: Digital sunrise alarm LED clock • Product Rating: Input: 5 V , 1 A Battery: 2.000 mAh Li-Ion (7.4 Wh) Following the provisions of the Directives: •... - Page 48 Version 2020.11.16...
Need help?
Do you have a question about the DIGITAL SUNRISE and is the answer not in the manual?
Questions and answers