Table of Contents
Advertisement
Quick Links
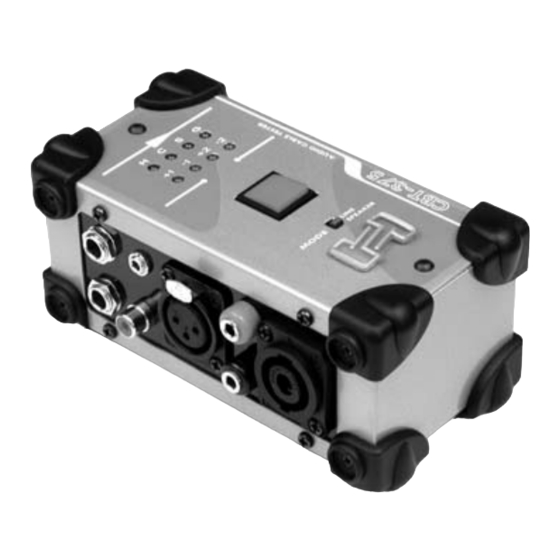
Hosa CBT-375 Cable Tester
Applications Guide
NOTE: THIS UNIT INCLUDES A NEW 9-VOLT BATTERY. OPEN THE BATTERY
COMPARTMENT ON THE BOTTOM OF THE CASE, USING A SMALL PHILLIPS
SCREWDRIVER. UNWRAP THE BATTERY, CONNECT IT TO THE BATTERY
RECEPTACLE, AND REPLACE THE BATTERY & COMPARTMENT COVER. DIM
LEDs USUALLY INDICATE THAT IT'S TIME TO REPLACE THE BATTERY.
REMOVE THE BATTERY WHEN STORING UNIT FOR LONG PERIODS.
OVERVIEW: To test a cable, plug one end of the cable
into the right side of the tester, and the other end of the
cable into the left side of the tester, and then push the
square red button
in the center of the top panel. Lights on the top panel
will blink in sequence as the tester does its work. When
it is finished testing the cable, various combinations of
green and red lights will be illuminated for several sec-
onds to indicate the way the cable is wired.
In general, when the MODE Switch is in the LINE posi-
tion, a green light indicates a proper "through connec-
tion", no green light indicates "no connection", and a red
light indicates a "bridged connection". NOTE: A red light
does not necessarily indicate incorrect wiring. An XLR
to unbalanced 1/4" Phone cable, for example) requires
that the Cold and Shield be bridged at the XLR.
When the MODE Switch is in the SPEAKER position,
(for the testing of Speakon-to-Speakon, Speakon-to-
1/4", Speakon-to-Banana, and 1/4" to Banana), green
lights indicate good through connections. Proper polari-
ty must be observed when testing banana-plug cables
to get a good test. (Make sure the "ground tab" of the
banana plug is in the lower position.) Improperly wired
banana cables (or banana cables plugged into the
tester upside-down) will light Red LEDs.
If you're testing speaker cables that use Speakon
and/or dual banana connectors, and/or 1/4" phone,
make sure to first switch the MODE SWITCH
to "SPEAKER" before testing. Also, use the "SPEAK-
ER" MODE to check for chassis grounding* in an XLR
cable. Otherwise, leave the MODE switch in the "LINE"
position.
*The shell or "chassis" of an XLR connector is the part you hold when plugging it in. Some cable manufacturers connect Pin 1
(Shield) to the chassis. Most do not. (Hosa does not.) While neither way is right or wrong, it's important to know if your cable has
chassis ground when you're troubleshooting hums and buzzes in audio systems, since chassis ground can actually help propagate
noise due to ground "loops". An illuminated red or green G LED indicates that one or both XLRs are grounded to chassis. THIS
TEST MUST BE RUN WITH THE MODE SWITCH IN THE "SPEAKER" POSITION, to activate the "G" LED lights.
Hot
Cold
Shield
Chassis
Ground *
Advertisement
Table of Contents

Summary of Contents for Hosa Technology CBT-375
- Page 1 Hosa CBT-375 Cable Tester Applications Guide NOTE: THIS UNIT INCLUDES A NEW 9-VOLT BATTERY. OPEN THE BATTERY COMPARTMENT ON THE BOTTOM OF THE CASE, USING A SMALL PHILLIPS SCREWDRIVER. UNWRAP THE BATTERY, CONNECT IT TO THE BATTERY RECEPTACLE, AND REPLACE THE BATTERY & COMPARTMENT COVER. DIM LEDs USUALLY INDICATE THAT IT’S TIME TO REPLACE THE BATTERY.
- Page 2 RIGHT-SIDE. The exception would be a cable with a Male XLR plug, since the only Female XLR jack on the CBT-375 is on the Left Side. Diagrams that follow show which LEDs light- up when the cable is wired correctly, for the various cable configurations that the CBT-375 can test.
- Page 3 WHY DOES THE RED S LIGHT UP?: Notice that for this test, we connect the unbalanced 1/4” plug to the TOP 1/4” Jack. (This odd configuration is made necessary by the internal bussing of the CBT-375, which keeps the unbalanced 1/4”...
- Page 4 XLR (M) to TS 1/4” (UNBALANCED) Exception: Use the top 1/4” Jack for this test. GOOD TEST for PIN 2 HOT top jack In a properly wired unbalanced cable such as this one, Pin 1 and Pin 3 of the XLR (representing Shield and Cold, GOOD TEST for PIN 3 HOT respectively) are bridged.
- Page 5 RCA (UNBALANCED) to XLR (F) GOOD TEST for PIN 2 HOT For this cable, the LEDs (being referenced to the jacks on the right) are referenced to the XLR female end. In a properly-wired Pin 2 Hot cable such as this, Pins 1 and 3 of the XLR (representing Shield and Cold respectively) are bridged.
- Page 6 3.5mm (STEREO) GOOD TEST LEFT SIDE RIGHT SIDE 3.5mm (STEREO) to 1/4” (STEREO) GOOD TEST top jack Speaker Cables For Testing Speakon cables, be sure to first switch the MODE Switch to the SPEAKER position. Speakon™ to Speakon™ GOOD TEST, 4 Conductor Cable GOOD TEST, 2 Conductor Cable...
- Page 7 Observe proper polarity when con- Banana to Speakon™ necting Banana plugs. The Banana GOOD TEST: plug should be oriented with the “Ground Tab” in the lower position. Otherwise your test will show two Red LEDs! For Speakon to one Banana, the test is ground tab straightforward and yields results shown GOOD TEST:...
- Page 8 Speakon™ is a trademark of Neutrik, and refers to their 4 and 8-pole connectors used on many brands of speak- ers and audio amplifiers and the cables that connect them. The CBT-375 Cable Tester can test cables with Speakon-to-Speakon, Speakon to 1/4”, and Speakon-to-Banana connections, but only for the 4-pole version of the Speakon connector.
Need help?
Do you have a question about the CBT-375 and is the answer not in the manual?
Questions and answers