Table of Contents
Advertisement
Available languages
Available languages
Quick Links
Advertisement
Table of Contents

Summary of Contents for Motion CM-34-120
- Page 1 M ANUAL CM -3 4 -1 2 0 Smart switch wired motor...
- Page 2 App Control Connectivity Video Alternating Powered by 230V Two-way Operate with a Operate with the Compatible with How to install, program and operate current motor mains electricity communication for remote controls MOTION app home and building rtube.nl/red1441 real-time response automation...
-
Page 3: Service And Support
Safety Warranty Service WARNING: Important safety instructions. Follow all instructions, First follow the advice in this manual. If the product appears to be since incorrect installation can lead to severe injury. damaged or does not function properly, go to your local dealer for Do not let children play with the blind and/or remote control. - Page 4 EU Declaration Hereby, Coulisse declares that the radio equipment type CM34 is in compliance whith directive 2014/53/EU. The full text of the EU dec- laration of conformity is available at the following internet address: www.my.coulisse.com...
- Page 5 FCC Manual I FCC ID: ZY4CM34 2 FCC Electronic Emission Notices This device complies with part 15 of the FCC Rules. Operation is subject to the following two conditions: Regulatory Information 1. This device may not cause harmful interference 2. This device must accept any interference received, including interference that may cause undesired operation.
- Page 6 used in accordance with the instructions, may cause harmful To satisfy FCC RF exposure requirements, a separation interference to radio communications. distance of 20 cm or more should be maintained between Operation of this equipment in a residential area may cause the antenna of this device and persons during device harmful interference, in which case the user will be required to operation.To ensure compliance, operations at closer...
- Page 8 CAUTION! Danger of electrocution. The mounting/installation of the smart switch should be done by a qualified person (electrician). CAUTION! Danger of electrocution. Even when the smart switch is turned off, it is possible there is voltage across its clamps. Every change in the connection of the clamps has to be done after ensuring all local power is powered off/disconnected.
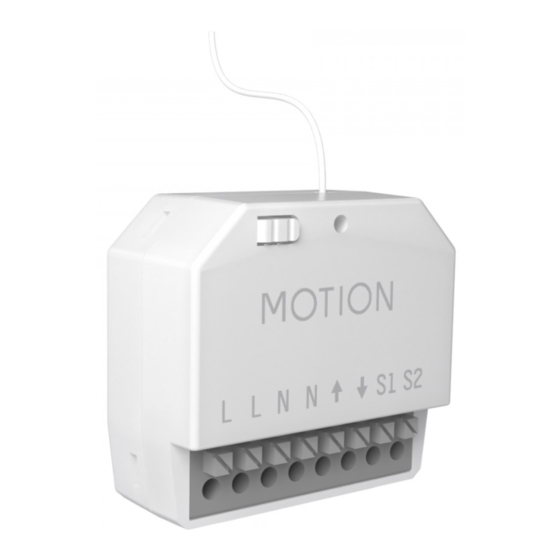
- Page 9 24mm 24mm Program button Motor neutral line Motor up line Input neutral line Motor down line Live line for external switch Up line of external switch Input live line Down line of external switch L L N N S1 S2 L L N N S1 S2 49mm...
- Page 10 Before installing the smart switch ensure that the grid is turned off (turned Install the smart switch down breakers). Connect the smart switch with the power grid according the schedule below. (The cables can be inserted without pressing the buttons.) L = Input live line Mains Cable 230V...
- Page 11 For the following steps the power grid shoud be turned on. It is recommended to Pair a remote first program the end limits of your wired motor before programming the smart g the switch. Please see the manual of your motor how to program the end limits. ns.) (Max.
-
Page 12: Check Direction Of Rotation
The direction of rotation can be changed in two ways: by Check direction of rotation remote or by changing the wiring (option 2). Option 1 Shortly press the program button on the smart switch. The blind will start stepping and the LED on the smart switch will start blinking, indicating that program mode has been activated.(The blind remains stepping until the program mode is de-activated.) Shortly press the down button to check if the blind unrolls the right way. - Page 13 Please make sure the grid is turned off when changing the Check direction of rotation cables (down breakers need to be turned off). Option 2 Remove the motor up line and the motor down line by press and holding the button above the electronic terminal and gently pull the motor cable out of the terminal.
- Page 14 Before programming a favorite position, the blind needs to be moved Set favourite position from its top position to its bottom position twice. This is necessary to (optional) save the favorite position. Do not stop the blind during this process. Move the blind to a desired favourite position.
- Page 15 When pressing the up or down button on the remote control the blind directly moves to De-activate its end positions (direct control). To operate the blind with smaller steps using the up and direct control down button, direct control can be de-activated. Now, the blind only directly moves to its end positons when the up or down button is held longer than two seconds.
- Page 16 Operate the blind Option 1 Center Remote control: Choose the channel to which the blind has been paired using the channel Down button. Press the up or down button to operate the blind. Press the center button to stop Channel Selection the blind.
- Page 17 Operate the blind Option 2 Down Switch control: Turn the external switch to the up or down position to operate the blind.
- Page 18 It is possible to only delete end limits or to do a factory reset.Factory reset will delete Reset the blind the end limits and remove the connection to any paired remote. Shortly press the program button on the smart switch. The blind will start stepping and the LED on the smart switch will start blinking, indicating that program mode has been activated.(The blind remains stepping until the program mode is de-activated.) Delete end limits: To delete the end limits of the blind hold the program button until the blind stops...
-
Page 19: Frequently Asked Questions
Frequently Asked Questions Problem Cause Solution Power supply is not connected. Connect the wiring according to step 1. n the Remote battery is empty. Replace the battery in the remote. Remote battery is inserted incorrectly. Replace the battery in the remote. Make sure that the antenna of the switch is out Switch is not responding Radio interference / shielding. - Page 20 Frequently Asked Questions Motor moves in small Direct control is de-activated. Activate direct control. See step 6. steps. Favorite position can not No end limits are programmed. First let the smart switch calculate the end limits. be programmed. See step 5. The blind keeps moving The blind is in program mode.
- Page 23 HA NDB UC H CM -3 4 -1 2 0 Verdrahteter Motor mit intelligentem Schalter...
- Page 24 Sie bitte rtube.nl/cm-34 Motoreigenschaften Steuerungsoptionen Support AC-motor 230V Bi-directional Fernbedienung App-Steuerung Konnektivität Video Wisselstroommotor Angetrieben durch Zwei-Wege- Betrieb mit Betrieb mit der Kompatibel mit Installation, Program- mierung und Betrieb 230V-Strom Kommunikation für Fernbedienung MOTION-App Heim- und Gebäude- rtube.nl/red1441 Echtzeit-Reaktion automatisierung...
-
Page 25: Garantie & Service
Sicherheit Service & Support WARNUNG: Wichtige Sicherheitshinweise Befolgen Sie sämtliche Führen Sie Reparaturen nie selbst durch. Versuchen Sie nicht, das Hinweise, da eine fehlerhafte Installation zu ernsten Verletzungen Gerät zu öffnen oder auseinanderzunehmen. Sie riskieren einen führen kann. Elektroschock und setzen gegebenenfalls die Garantie außer Kraft. .2#247 Lassen Sie Kinder nicht mit dem Rollo und/oder der Fernbedi- Es befinden sich keine durch den Benutzer zu wartenden Teile im... -
Page 26: Eu-Konformitätserklärung
Recycle EU-Konformitätserklärung Diese Kennzeichnung weist darauf hin, dass dieses Produkt in Hiermit erklärt Coulisse, dass der Funkgerätetyp CM-34 die Richtlinie der gesamten EU nicht mit anderen Haushaltsabfällen entsorgt 2014/53/EU erfüllt. Der vollständige Text der EU-Konformität- werden sollte. Um eine mögliche Schädigung der Umwelt oder der serklärung ist im Internet unter folgender Adresse verfügbar: www. - Page 27 FCC Handbuch I FCC ID: ZY4CM34 2 FCC Hinweis zu elektronischen Emissionen Dieses Gerät entspricht Abschnitt 15 der FCC-Richtlinien. Bei Betrieb müssen die folgenden zwei Bedingungen erfüllt sein: Regulatorische Informationen 1. Dieses Gerät darf keine schädigenden Interferenzen verursachen. 2. Dieses Gerät muss jede empfangene Interferenz akzeptieren, einschließlich Interferenz, die unerwünschten Betrieb zur Folge 1 FCC Information für Benutzer haben könnte.
- Page 28 Umgebung betrieben wird. Dieses Gerät erzeugt und nutzt Vergrößern Sie den Abstand zwischen dem Gerät und dem Hochfrequenzenergie und kann dieselbe ausstrahlen. Wenn es Empfänger nicht gemäß den Hinweisen installiert und verwendet wird, kann Verbinden Sie das Gerät mit einer Steckdose eines anderen es schädigende Interferenzen für Funkgeräte verursachen.
- Page 30 VORSICHT! Gefahr eines Stromschlags. Die Montage/Installation des intelligenten Schalters sollte von einer qualifizierten Person (Elektriker) durchgeführt werden. VORSICHT! Gefahr eines Stromschlags! Auch wenn der Smart-Schalter ausgeschaltet ist, kann Spannung über seine Klammern entstehen. Jede Jede Veraenderung in der Verbindung der Klammern kann erst gemacht werden, nachdem sichergestellt ist, dass der lokale Strom abgestellt oder die Verbindung unterbrochen ist.
- Page 31 24mm 24mm Programmknopf Neutralleiter Motor Motor rauf Motor runter Neutralleiter Phase für externen Schalter Aufwärts externen Schalter Phase Abwärts externen Schalter L L N N S1 S2 L L N N S1 S2 49mm 49mm...
- Page 32 Vergewissern Sie sich vor der Installation des Smart Switches, dass das Den intelligenten Netz ausgeschaltet ist (heruntergefahrene Unterbrecher). Verbinden Sie den Schalter installieren Smart Switch mit dem Stromnetz gemäß dem unten stehenden Zeitplan. (Die Kabel können ohne Drücken der Knöpfe eingeführt werden). L = Phase Netzkabel 120V...
- Page 33 Für die folgenden Schritte sollte das Stromnetz eingeschaltet werden. Es wird empfohlen, Mit einer zuerst die Endgrenzen Ihres verdrahteten Motors zu programmieren, bevor Sie den Smart Switch programmieren. Wie Sie die Endgrenzen programmieren, entnehmen Sie Fernbedienung koppeln bitte dem Handbuch Ihres Motors. (Es können maximal 10 Fernbedienungen mit dem Schalter gekoppelt werden).
- Page 34 Die Drehrichtung kann auf zwei Arten geändert Rotationsrichtung überprüfen werden: durch Fernbedienung oder durch Änderung Option 1 der Verdrahtung (Option 2). Drücken Sie kurz die Programmtaste auf dem Smart Switch. Die Jalousie beginnt zu laufen und die LED am Smart-Schalter beginnt zu blinken, was anzeigt, dass der Programmiermodus aktiviert wurde (die Fensterbekleidung läuft so lange, bis der Programmiermodus deaktiviert wird).
- Page 35 Bitte stellen Sie sicher, dass das Stromnetz beim Rotationsrichtung überprüfen Wechseln der Kabel ausgeschaltet ist (Down-Breaker Option 2 müssen ausgeschaltet werden). Entfernen Sie die Aufwärts- und Abwärts- leitung des Motors durch Drücken und Halten der Taste über dem elektronischen Terminal und ziehen Sie das Motorkabel vorsichtig aus dem Terminal heraus.
- Page 36 Bevor eine Lieblingsposition programmiert wird, muss die Fensterbekleidung Lieblingsposition einstellen zweimal von ihrer oberen Position in ihre untere Position bewegt werden. Dies ist notwendig, um die Favoritenstellung zu speichern. Während dieses (optional) Vorgangs darf die Fensterbekleidung nicht angehalten werden. Bringen Sie das Rollo in Ihre gewünschte Lieblingsposition. Halten Sie den mittleren Knopf gedrückt, um diese Lieblingsposition zu speichern.
- Page 37 dung Wenn Sie den Rauf- oder Runter-Knopf auf der Fernbedienung drücken, bewegt sich das Rollo direkt Direktsteuerung in seine Endpositionen (Direktsteuerung). Um das Rollo mit dem Rauf- und Runter-Knopf in kleineren deaktivieren Schritten zu steuern, können Sie die Direktsteuerung deaktivieren. Nun bewegt sich das Rollo nur dann direkt in seine Endpositionen, wenn der Rauf- oder Runter-Knopf länger als zwei Sekunden gedrückt wird.
- Page 38 Das Rollo benutzen Option 1 Hoch Mitte Fernbedienung: Wählen Sie mithilfe des Kanal-Knopfs den Kanal aus, mit dem das Rollo Runter gekoppelt wurde. Drücken Sie den Rauf- oder Runter-Knopf, um das Rollo zu steuern. Kanal- auswahl Drücken Sie den mittleren Knopf, um das Rollo anzuhalten. Drücken Sie den mittleren Knopf, um das Rollo in Ihre Lieblingsposition zu bringen.
- Page 39 Das Rollo benutzen Option 2 Runter Hoch Schalter-Steuerung: Drehen Sie den externen Schalter in die obere oder untere Position, um die Fensterbekleidung zu betätigen. nopf,...
- Page 40 Sie können entweder nur die Endpositionen neu einstellen oder das Gerät auf die Fensterbekleidung Werkseinstellungen zurücksetzen.Wenn Sie das Gerät auf die Werkseinstellungen neu einrichten zurücksetzen, werden die Endpositionen sowie die Verbindung zu sämtlichen gekoppelten Fernbedienungen gelöscht. Drücken Sie kurz die Programmtaste auf dem Smart Switch. Die Fensterbekleidung beginnt sich zu bewegen und die LED am intelligenten Schalter beginnt zu blinken, was anzeigt, dass der Programm-Modus aktiviert wurde.
-
Page 41: Häufig Gestellte Fragen
Häufig gestellte fragen Problem Grund Lösung Power supply is not connected. Connect the wiring according to step 1. wegen Die Fernbedienungsbatterie ist leer. (LEDs der Ersetzen Sie die Batterie in der Fernbedienung. viert Fernbedienung blinken schnell.) Siehe Handbuch der Fernbedienung. Ersetzen Sie die Batterie in der Fernbedienung. - Page 42 Häufig gestellte fragen Rollo bewegt sich in Direktsteuerung ist deaktiviert. Direktsteuerung aktivieren. Siehe Schritt 6. kleinen Schritten. Lieblingsposition kann nicht Lassen Sie zunächst den intelligenten Schalter die Keine Endpositionen sind programmiert. programmiert werden. Endgrenzen berechnen. Siehe Schritt 5. Das Rollo bewegt sich Drücken Sie den Programmknopf auf dem Smart Das Rollo befindet sich im Programmiermodus.
- Page 45 MANU EL C M-3 4 -1 2 0 Interrupteur intelligent à moteur filaire...
- Page 46 Alimenté par l'électricité Communication Fonctionne avec une Compatible avec programmer et faire alternatif du réseau 230V bidirectionnelle pour une télécommande Fonctionne avec l'appli- l' a utomatisation domes- fonctionner, rtube.nl/red1441 réponse en temps réel cation MOTION tique et d' i mmeuble...
-
Page 47: Service And Assistance
Sécurité Service & Assistance ATTENTION:instructions de sécurité importantes. Suivez toutes Ne faites pas de réparations vous-même. N’essayez pas d’ouvrir les instructions, car une installation incorrecte peut entraîner des l’appareil ou de le démonter. Vous risquez de vous électrocuter et blessures graves. d’annuler la garantie limitée. - Page 48 Recycle Déclaration de l’UE Ce marquage indique que ce produit ne doit pas être jeté avec les Par la présente, Coulisse déclare que l’équipement radio de type autres déchets ménagers au sein de l’UE. Pour empêcher tout CM-34 est conforme à la directive 2014/53/UE. Le texte intégral dommage éventuel à...
- Page 49 Manuel FCC I FCC ID : ZY4CM34 Son utilisation est soumise aux deux conditions suivantes : 1. Cet appareil ne doit causer aucune interférence nuisible 2. Cet appareil doit accepter toute interférence reçue, y compris des interférences qui peuvent provoquer un fonctionnement Informations relatives à...
- Page 50 fréquence radio et, s’il n’est pas installé et utilisé conformément circuit différent de celui où le récepteur est branché aux instructions, il peut causer des interférences nuisibles aux Consulter le revendeur ou un technicien radio/télévision communications radio. expérimenté pour obtenir de l’aide Le fonctionnement de cet équipement dans une zone résidentielle peut générer des interférences préjudiciables, auquel cas il appartiendra à...
- Page 52 ATTENTION! Danger d' é lectrocution. Le montage/installation de l'interrupteur intelligent doit être effectué par une personne qualifiée (électricien). ATTENTION! Risque d' é lectrocution. Même lorsque l' i nterrupteur intelligent est éteint, il est possible qu'il y ait une tension à travers ses pinces.
- Page 53 24mm 24mm Bouton de programme Ligne neutre du moteur (1) Ligne de motorisation (3) Ligne neutre d' e ntrée Moteur en aval (2) Ligne sous tension pour le Ligne supérieure du commutateur externe commutateur externe Entrée en ligne en direct Ligne descendante du commutateur externe L L N N...
- Page 54 Avant d' i nstaller l'interrupteur intelligent, assurez-vous que le réseau Installer l'interrupteur est éteint (disjoncteurs fermés). Connectez le smart switch au réseau électrique selon le calendrier ci-dessous. (Les câbles peuvent être insérés intelligent sans appuyer sur les boutons). L = Entrée en ligne en direct Câble d’alimentation 230V L = Ligne sous tension pour le commutateur externe...
- Page 55 Pour les étapes suivantes, le réseau électrique doit être mis en marche. Il est recommandé de programmer d' a bord les limites de fin de course de votre moteur câblé Associez une avant de programmer l' i nterrupteur intelligent. Veuillez consulter le manuel de votre télécommande moteur pour savoir comment programmer les limites de fin de course.
- Page 56 Le sens de rotation peut être modifié de deux façons : Vérifiez le sens de rotation à distance ou en changeant le câblage (option 2). Option 1 Appuyez brièvement sur le bouton de programme de l' i nterrupteur intelligent. Le store se mettra à marcher et la LED sur l' i nterrupteur intelligent se mettra à...
- Page 57 Veuillez vous assurer que le réseau est éteint lorsque vous Vérifiez le sens de rotation changez les câbles (les disjoncteurs de descente doivent Option 2 être éteints). Retirez le moteur en amont et le moteur en aval en appuyant et en maintenant le bouton au-dessus de la borne électronique et en tirant doucement le câble du moteur hors de la borne.
- Page 58 Avant de programmer une position favorite, le store doit être déplacé deux Définir la position favorite fois de sa position haute à sa position basse. Ceci est nécessaire pour sauvegarder la position favorite. N' a rrêtez pas le store pendant ce processus. (facultatif) Déplacez le store vers une position favorite souhaitée.
- Page 59 Lorsque vous appuyez sur le bouton haut ou bas de la télécommande, le store se déplace directement vers Désactiver le ses positions finales (contrôle direct). Pour faire fonctionner le store avec des pas plus petits en utilisant les ssus. boutons haut et bas, le contrôle direct peut être désactivé. Maintenant, le store ne se déplace directement contrôle direct que vers ses positions finales lorsque le bouton haut ou bas est maintenu plus de deux secondes.
- Page 60 Faire fonctionner le store Option 1 Croissant Centre Télécommande :choisissez la chaîne auquel le store a été associé en utilisant le bouton canal. Sélection de la chaîne Appuyez surla touche croissant ou bas pour actionner le store. Appuyez sur le bouton centre pour arrêter le store.
- Page 61 Faire fonctionner le store Option 2 Croissant Contrôle des interrupteurs: Tournez l'interrupteur externe en position haute ou basse pour actionner le store.
- Page 62 Il est possible de supprimer uniquement les limites finales ou de réinitialiser les Réinitialiser le store paramètres d' u sine. La réinitialisation d'usine effacera les limites et supprimera la connexion à toute télécommande couplée. Appuyez brièvement sur le bouton de programme de l' i nterrupteur intelligent. Le store se mettra à marcher et la LED sur l' i nterrupteur intelligent se mettra à...
-
Page 63: Foires Aux Questions
Foires aux Questions Problème Cause Solution L’alimentation n’est pas connectée. Raccordez le câblage conformément à l'étape 1. cher La batterie à distance est vide. (Les LED de la Remplacez la batterie de la télécommande. été télécommande clignotent rapidement.) Voir le manuel de la télécommande. Remplacez la batterie de la télécommande. - Page 64 Foires aux Questions Le store se déplace à Le contrôle direct est désactivé. Activer le contrôle direct. Voir l'étape 6. petits pas. La position préférée Laissez d'abord l'interrupteur intelligent calculer les ne peut pas être Aucune limite finale n’est programmée. limites de fin de course.
- Page 68 motion-blinds.com...
Need help?
Do you have a question about the CM-34-120 and is the answer not in the manual?
Questions and answers