Table of Contents
Advertisement
Quick Links
Advertisement
Table of Contents

Subscribe to Our Youtube Channel
Related Manuals for Idis TR-4308


Summary of Contents for Idis TR-4308
- Page 1 Digital Video Recorder Installation Manual TR-4308 TR-4316 TR-4308R TR-4316R...
- Page 2 Before reading this manual This manual contains basic instructions on installing and using Digital Video Recorder, an IDIS product. Users who are using this product for the first time, as well as users with experience using comparable products, must read this manual carefully before use and heed to the warnings and precautions contained herein while using the product.
- Page 3 Before reading this manual Important Safeguards 1. Read Instructions 14. Damage requiring Service All the safety and operating instructions should be read before the appliance Unplug this equipment from the wall outlet and refer servicing to qualified is operated. service personnel under the following conditions: 2.
- Page 4 Before reading this manual In-Text Symbol Type Description Caution Important information concerning a specific function. Note Useful information concerning a specific function. User’s Caution Statement Caution: Any changes or modifications to the equipment not expressly approved by the party responsible for compliance could void your authority to operate the equipment.
- Page 5 IDIS Co., Ltd. reserves all rights concerning this manual. Use or duplication of this manual in part or whole without the prior consent of IDIS Co., Ltd. is strictly prohibited. Contents of this manual are subject to change without prior notice.
-
Page 6: Table Of Contents
Table of Contents Part 1 – Introduction ......... 7 Product Features . -
Page 7: Part 1 - Introduction
Part 1 – Introduction Product Features This is a video recorder that supports surveillance, recording, and playback of video from analog cameras. This DVR (Digital Video Recorder) unit offers the following features: ● Real-time channels surveillance ● Compatible with Color (NTSC or PAL) and B&W (CCIR and EIA-170) Video Sources ●... - Page 8 Part 1 – Introduction This document covers the 8- and 16-channel digital video recorders. The DVRs are identical except for the number of cameras and alarms that can be connected and the number of cameras that can be displayed. For simplicity, the illustrations and descriptions in this document refer to the 16-channel model.
-
Page 9: Accessories
Part 1 – Introduction Accessories Upon unpackaging the product, check the contents inside to ensure that all the following accessories are included. Digital Video Recorder Power Cable Quick Guide Assembly Screws for Adding Hard Optical USB Mouse IR Remote Control Disk Drives SATA2 cables Rack-mount Kit... -
Page 10: Overview
Part 1 – Introduction Overview Dimension Front Side 412.8... -
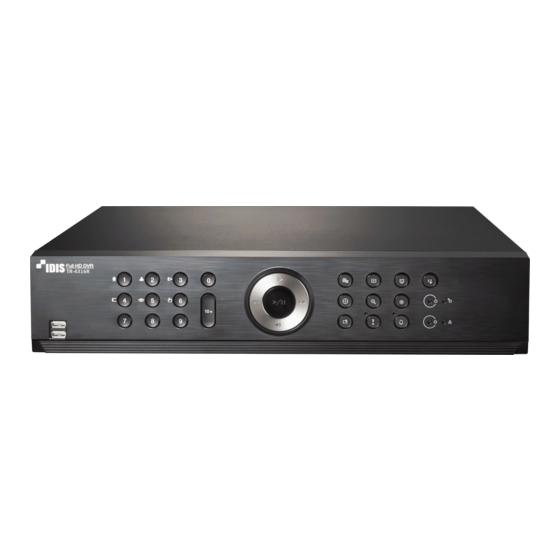
Page 11: Front Panel
Part 1 – Introduction Front Panel Arrow and Playback Control Camera Buttons Menu Button PTZ Button Buttons Bookmark Layout Button Zoom Button Panic Recording Button Button Monitor Button Freeze Button Alarm Button Search Mode Button LEDs USB Ports • Some buttons have more than one function. •... - Page 12 Part 1 – Introduction 1 Camera Buttons 4 PTZ Button Pressing the Camera buttons while in Live or Pressing the PTZ button initiates PTZ mode, Playback mode displays images from the selected allowing you to control PTZ cameras. camera in full screen. To select a camera whose In PTZ mode, use the arrow buttons to move the channel is made up of two digits, enter the button.
- Page 13 Part 1 – Introduction @ Search Mode Button Pressing the Search Mode button initiates Search mode, which will allow you to search for and play back video recordings. Pressing the Search Mode button while in Search mode returns the screen to Live mode. Pressing and holding the Search Mode button for 3 seconds displays the clip copy window.
-
Page 14: Rear Panel
Part 1 – Introduction Connections on the Front Panel Flash Memory Mouse USB HDD IR Remote Control Rear Panel Video Input Alarm Connection Ports RS-485 Port RS-232 Port eSATA Port Factory Reset Button SPOT / HDMI / VGA Out Port Network Port Audio In / Out Power In Port... -
Page 15: Rear Panel Connections
Part 1 – Introduction Rear Panel Connections ● NC/NO (Relay Alarm Outputs) This DVR is capable of activating/deactivating buzzers, lights, and other external devices. Connect the device to the C and NO (Normally Open) connectors. NC/NO is Video Connection a relay output which sinks 2A@125VAC and 1A@30VDC. For more information on alarm out setup, refer to the Video Input Alarm-Out in the operation manual. - Page 16 Part 1 – Introduction ● ● Connector Pin Outs eSATA Connection Connect external hard drives to these ports. Master Unit Slave Unit + → To → TX+/RX+ - → To → TX-/RX- Do not connect or disconnect an eSATA device while the DVR is powered on.
- Page 17 Part 1 – Introduction Monitor Connection Power Cable Connection Connect to the SPOT, VGA OUT, or HDMI port. Connect the power cable to this port. This DVR does not feature a separate power on/off button and will turn on the moment power is supplied. Network Connection •...
- Page 18 Part 1 – Introduction Connections on the Rear Panel Alarm Analog Camera Sensor Microphone Speaker Power VGA Monitor Network HDMI Monitor eSATA Storage SPOT Monitor Device IDIS Center Remote Monitoring Keyboard...
-
Page 19: Remote Control
Part 1 – Introduction Remote Control ID Button SPOT Button DISPLAY Button SEQUENCE Button FREEZE Button 4 5 6 ALARM Button Camera Buttons TRIPLEX Button AUDIO Button 9 0 ! BOOKMARK Button CLIP COPY Button FOCUS NEAR/FAR Button PRESET SET/VIEW Button ZOOM IN/OUT Button &... - Page 20 Part 1 – Introduction 1 ID Button @ FOCUS NEAR/FAR Button Used to assign remote control ID values. Used in PTZ mode to shift focus between a nearby point and a far away point. No additional remote control assignment is necessary if the system's ID is 0.
- Page 21 Part 1 – Introduction a Playback Buttons Stops the video and restores Live mode. Pressing the button during monitoring appears the window that selects between triplex and all channels modes. Pressing the qbutton during playback pauses the video and displays # on the screen. Plays the video in normal speed and displays r on the screen.
-
Page 22: Part 2 - Appendix
Part 2 - Appendix System Log Types Boot Up Panic Off System Shutdown Clear All Data Restart Clear Disk Upgrade Success Format Disk Upgrade Error Disk Full Power Failure Disk Config Change Time Changed Disk 'No.' : 'serial number' Time Zone Change Disk 'No.' : Removed Time Sync. -
Page 23: Error Code Types
Part 2 - Appendix Error Code Types Upgrade Error Codes Type Type Unknown Error Remote Network Error Incorrect File Version No Remote Upgrade Permission Incorrect OS Version Remote Upgrade File Save Failure Incorrect Software Version Remote Upgrade Cancelled by User Incorrect Kernel Version USB Storage Device Mount Failure Storage Device Mount Failure... -
Page 24: Troubleshooting
Part 2 - Appendix Troubleshooting Problem Solution ● Check the power cable connection status. The main unit won't turn on. ● Check the power outlet. ● Check the camera's video cable connection status. ● Check the monitor's video cable connection status. ●... -
Page 25: Specifications
Part 2 - Appendix Specifications These product specifications may change without prior notice. General Exterior Dimensions 430mm x 88mm x 413mm (W x H x D) Weight (Main Unit) 5.9kg(with 2HDDS) Working Temperature 0°C – 40°C Operating Humidity 0% – 90% Power 100 to 240 V~, ≤... - Page 26 Part 2 - Appendix Connectors Video In Composite 8 or 16 inputs: BNC 1 Vp-p, auto-terminating, 75 Ohms HDMI: 1 HDMI Monitor Out VGA: 1 SPOT: 1 BNC, 1 Vp-p, 75 Ohms Audio In 4 RCA connectors Audio Out 1 RCA connector Alarm Terminal blocks Ethernet Port...
- Page 27 IDIS Co., Ltd. For more information, please visit at www.idisglobal.com...
Need help?
Do you have a question about the TR-4308 and is the answer not in the manual?
Questions and answers