Table of Contents
Advertisement
Available languages
Available languages
Quick Links
D
E
C
B
N
(ClearSun
A
mode)
P
(Sanitizing
mode)
Diagram 2
Thrive LED Sanitizing Lamp with USB Charging
SCEY700S
INS200594
CAUTION!
Battery Safety: This product contains a
button battery. If swallowed, it could cause
severe injury or death in just 2 hours. Seek
medical attention immediately.
SEE ADDITIONAL SAFETY WARNING.
UP
DOWN
M
J
+
K
Diagram 3
L
G
H
F
(Alarm mode)
R
Diagram 1
ENGLISH
CONGRATULATIONS!
You've purchased the finest in natural lighting technology with your new OttLite
WARNING: To prevent electric shock, make sure the lamp is not plugged in until all
steps are complete.
PRODUCT REGISTRATION FORM
Please complete the enclosed Product Registration Form and return it today by mail or
register online by going to: OttLite.com/warranty.
NOTE: THIS UNIT IS FULLY ASSEMBLED
SETTING
MODE
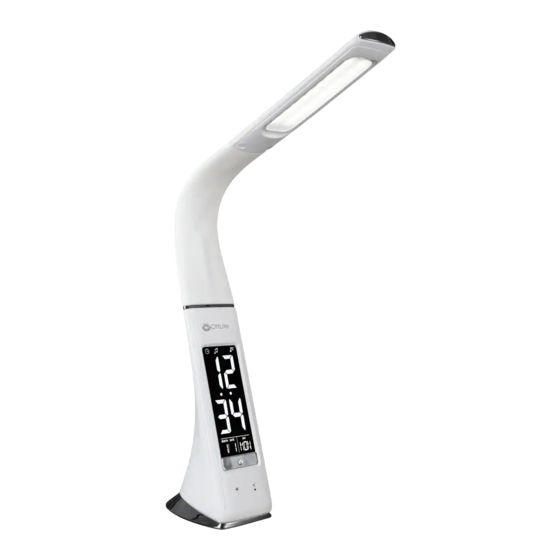
1. Remove lamp from packing, placing lamp body base (A) flat on a steady surface.
2. Connect power adapter input (F) into connector (G) in the rear-bottom of the lamp.
3. Plug the power adapter (H) into a standard household 120V AC outlet. Note: Only
use with the supplied power adapter to avoid damage or fire.
4. Power switch (B) is a "touch" switch that controls ON/OFF power, the LED
brightness settings and the mode function of the lamp.
5. To turn the lamp ON, touch (B) once. To adjust brightness touch (B) again. The lamp
has 3 brightness settings and then the fourth touch will turn the light OFF.
6. Touch and hold (B) to change light modes. The three modes are; ClearSun LED,
Sanitizing, and ClearSun + Sanitizing. ClearSun + Sanitizing mode utilizes both the
ClearSun LEDs and Sanitizing LEDs simultaneously to provide continuous cleaning
while using the lamp. NOTE: The active mode will be indicated by the light next
to the icons. If indicator light (N) is illuminated, ClearSun mode is on. If indicator
light (P) is illuminated, Sanitizing mode is on. If both indicator lights (N and P) are
illuminated, ClearSun + Sanitize mode is on.
7. To reposition the light, hold the lamp base (A) steady and grasp either flex-neck (C)
or shade (D) depending on needed adjustment.
8. Refer to diagram 1 for lamp maximum adjustment range. NOTE: DO NOT FORCE the
shade outside allowable adjustable range as excessive adjustment may cause damage.
REFER TO THE FOLLOWING ICON LEGEND FOR CONTROL PANEL (J), AS IT
PERTAINS TO THE INSTRUCTIONS FOR VARIOUS SETTING FUNCTIONS BELOW.
"SETTING BUTTON" – to set time and calendar; in alarm mode, push
to turn off alarm.
M
"MODE BUTTON" – push to set alarm and snooze
ˆ
"UP BUTTON" – In setting mode, push to increase.
ˇ
"DOWN BUTTON" – In setting mode, push to decrease.
CALENDAR AND CLOCK SETTING:
NOTE: Control Panel (J) to set Calendar and Clock is located on the bottom of
lamp body base (A). NOTE: For clock operation layout and features, see diagram 2.
• Under normal mode, press "SETTING BUTTON" to enter setting mode, press
"SETTING BUTTON" again for next setting. The sequence of setting is:
HOUR – MINUTE – YEAR – MONTH – DAY.
• In setting mode, press "MODE BUTTON" to quit setting, or it will automatically quit to
normal mode if idle for 60 seconds.
• Under normal mode, press "UP BUTTON" to switch between "12h" and "24h" display
ALARM & SNOOZE FUNCTION SETTING:
• Under normal mode, press "MODE BUTTON" to enter alarm mode, indicated on
screen by icon (R).
• Under alarm mode, press "SETTING BUTTON" to enter alarm setting, press
"SETTING BUTTON" again for next setting, the sequence of setting is:
HOUR – MINUTE – SNOOZE – MUSIC and then exit.
NOTE: There are 8-music tones to select.
• Press and "UP BUTTON" and "DOWN BUTTON" to adjust alarm time sequence.
• Under alarm mode, press "UP BUTTON" and "DOWN BUTTON" to turn ON/OFF
alarm and snooze function. "MUSIC NOTE" icon will light up on the display to
indicate alarm is set. "Zzz" will appear on the display to indicate snooze is activated.
• When alarm time reached, alarm will ring for 1-minute, then snooze and ring again.
Press "SETTING BUTTON" to turn OFF alarm or touch "UP BUTTON" and "DOWN
BUTTON" to activate snooze. NOTE: Snooze defaults to 60-minutes, if loss of
power occurs.
BATTERY REPLACEMENT
• This lamp uses a CR2032 battery. For battery replacement see diagram 3.
Battery compartment (K) is located on the bottom of lamp body base (A).
• To remove/install button cell battery: use a scredriver to remove battery
compartment door (M). Button cell battery is to be installed with the "+" or flat side
facing upward.
C8USC
Thrive LED Sanitizing Lamp with USB Charging
BATTERY DISPOSAL:
®
product.
• Battery disposal should be in compliance with local regulations pertaining to the
disposal of hazardous materials. DO NOT INCINERATE.
SAFETY WARNING:
CAUTION: DO NOT INGEST BATTERY; CHEMICAL BURN HAZARD!
•
• This lamp contains a coin/button cell battery. If the coin/button cell battery is
swallowed, it can cause severe internal burns in just two hours and can lead to death.
• Keep new and used batteries away from children.
• If the battery compartment does not close securely, stop using the product and
keep it away from children.
• If you think batteries might have been swallowed or placed inside any part of the
body, seek immediate medical attention.
NOTE: Coin/button cell batteries are small, single cell devices having a diameter
greater than their height.
SAFETY WARNING:
TO REDUCE THE RISK OF FIRE, ELECTRIC SHOCK,
OR INJURY TO PERSONS
1. Turn lamp off and WAIT UNTIL LAMP HEAD (D) IS COOL before handling.
2. The LED panel (E) might get hot after several hours of continuous use DO NOT place
your hands directly on LED light panel.
3. Never use with an extension cord unless the plug can be fully inserted into the
receptacles in the extension cord.
4. Do not alter the plug.
5. The lamp head included with this unit cannot be replaced by the consumer.
NOTE: The important safety instructions appearing in this instruction sheet are not meant
to cover all possible conditions and situations that may occur. It must be understood that
common sense, caution, and care must be used with any electrical product.
CAUTION!
IF THE EXTERNAL FLEXIBLE CABLE OR CORD OF THIS LUMINAIRE IS
DAMAGED, IT SHALL BE EXCLUSIVELY REPLACED BY THE MANUFACTURER OR ITS SERVICE
AGENT OR A SIMILAR QUALIFIED PERSON IN ORDER TO AVOID A HAZARD. INDOOR USE ONLY.
CAUTION!
THE LIGHT SOURCE OF THIS LUMINAIRE IS NOT REPLACEABLE; WHEN
THE LIGHT SOURCE REACHES ITS END OF LIFE THE WHOLE LUMINAIRE SHALL BE REPLACED.
FCC PART 15
Note: This equipment has been tested and found to comply with the limits for a Class B digital
device, pursuant to Part 15 of the FCC rules. These limits are designed to provide reasonable
protection against harmful interference in a residential installation. This equipment generates,
uses and can radiate radio frequency energy and, if not installed and used in accordance with
the instructions, may cause harmful interference to radio communications. However, there is no
guarantee that the interference will not occur in a particular installation. If this equipment does
cause harmful interference to radio or television reception, which can be determined by turning
the equipment off and on, the user is encouraged to try to correct the interference by one or
more of the following measures:
• Reorient or relocate the receiving antenna.
• Increase the separation between the equipment and receiver.
• Connect the equipment into an outlet on a circuit different from that of the receiver.
• Consult the dealer or an experienced radio/TV technician for help.
Changes or modifications not expressly approved by the party responsible for compliance could
void the user's authority to operate the equipment.
This device complies with Part 15 of the FCC Rules. Operation is subject to the following two
conditions:
(1) this device may not cause harmful interference, and
(2) this device must accept any interference received, including interference that may cause
undesired operation.
CAN ICES-005 (B)/NMB-005 (B)
CAUTION: Any change or modification to product not expressly recognized by OttLite
Technologies voids OttLite's responsibility for proper function of product.
POWER ADAPTER SPECIFICATION:
Input: AC 100-240V, 50/60 Hz, 0.8A
Output: 12V DC, 2.0A with a Male DC Plug
THIS LAMP CONTAINS a 5V, 2,1A USB output port (L) located on the bottom rear of lamp.
USB port can charge items such as tablets, cellular phones, etc.
REV090320
Advertisement
Table of Contents

Subscribe to Our Youtube Channel
Summary of Contents for OttLite SCEY700S
- Page 1 Battery Safety: This product contains a CONGRATULATIONS! BATTERY DISPOSAL: button battery. If swallowed, it could cause You’ve purchased the finest in natural lighting technology with your new OttLite ® product. • Battery disposal should be in compliance with local regulations pertaining to the severe injury or death in just 2 hours.
- Page 2 ATTENTION! Toute modification ou tout changement apporté au produit, lorsque non activer la répétition. REMARQUE : La fonction de répétition de réveil par défaut est reconnu expressément par OttLite Technologies, annule la responsabilité d’OttLite en ce qui de 60 minutes, en cas de perte de courant.
Need help?
Do you have a question about the SCEY700S and is the answer not in the manual?
Questions and answers
my desk lamp the clock is flashing and won't allow me to set the time
The clock on your OttLite SCEY700S desk lamp may be flashing because it has lost power, possibly due to a drained or missing CR2032 battery. The battery compartment is located on the bottom of the lamp body base. To resolve this issue, replace the CR2032 button cell battery, ensuring the “+” side is facing upward. Then, use the "SETTING BUTTON" to enter the setting mode and adjust the time. If the lamp remains idle for 60 seconds in setting mode, it will automatically exit to normal mode.
This answer is automatically generated