Table of Contents
Advertisement
Quick Links
P/N 900982-00 REV. D 12/2019
Ce manuel est disponible en francais,
simplement en faire la demande. Numéro
de la pièce 900982-03.
INSTALLER: Leave this manual with the appliance.
CONSUMER: Retain this manual for future reference.
DANGER
CARBON MONOXIDE WARNING
• This appliance can produce carbon
monoxide which has no odor.
• Using it in an enclosed space can kill
you.
• Never use this appliance in an en-
closed space such as a camper, tent,
car or home.
WARNING: Do not store gasoline or other flammable vapors and liquids in the vicinity of this or any other appli-
ance. An LP-cylinder not connected for use shall not be stored in the vicinity of this or any other appliance.
WARNING: If the information in this manual is not followed exactly, a fire or explosion may result causing prop-
erty damage, personal injury, or loss of life
DANGER:
FIRE OR EXPLOSION HAZARD
Failure to follow safety warnings exactly could result
in serious injury, death, or property damage.
- Do not store or use gasoline or other flammable
vapors and liquids in the vicinity of this or any
other appliance.
- WHAT TO DO IF YOU SMELL GAS
• Do not try to light any appliance.
• Do not touch any electrical switch; do not use
any phone in your building.
• Leave the building immediately.
• Immediately call your gas supplier from a neighbor's
phone. Follow the gas supplier's instructions.
• If you cannot reach your gas supplier, call the
fire department.
- Installation and service must be performed by
a qualified installer, service agency or the gas
supplier.
PFS
®
C
US
Report No. F12-052
P900982-00
Installateur : Laissez cette notice avec l'appareil.
Consommateur : Conservez cette notice pour consultation ultérieure.
WHEN USED AS AN OUTDOOR APPLIANCE
DANGER
FIRE OR EXPLOSION HAZARD
If you smell gas:
• Shut off gas to the appliance.
• Extinguish any open flame.
• If odor continues, leave the area immediately.
• After leaving the area, call your gas supplier or fire department.
Failure to follow these instructions could result in fire or explosion, which
could cause property damage, personal injury, or death.
WARNING: For Outdoor Use Only.
Installation and service must be performed by a qualified installer, service
agency, or the gas supplier.
- Ne pas entreposer ni utilizer d'essence ni d'autres vapeurs
- QUE FAIRE SI VOUS SENTEZ UNE ODEUR DE GAZ:
Installation and Operation Instructions
Outdoor Decorative Gas Fireplace
Models
StarLiteLX36ZENWS
StarLiteLX36ZEPWS
StarLiteLX36ZENWH
StarLiteLX36ZEPWH
AVERTISSEMENT
RISQUED'INDENDIE OU D'EXPLOSION
Le non-respect Des avertissements de sécurité pourrait
d'entraîner des blessures graves, la mort ou des dommages
matériels.
ou liquides inflammables dans le voisinage de cet appareil
ou de tout autre appareil.
• Ne pas tenter d'allumer d'appareil.
• Ne touchez à aucan interrupteur. Ne pas vous servir des
téléphones se trouvant dans le bâtiment où vous trouvez.
• Sortez immédiatement de bâtiment.
• Appelez immédiatement votre fournisseur de gaz depuis un
voisin. Suivez les instructions du fournisseur.
• Si vous ne pouvez rejoindre le fournisseur de gaz, appelez
le service des incindies.
L'installation et l'entretien doivent être assurés par un instal-
lateur ou un service d'entretien qualifié ou par le fournisseur
de gaz.
StarLiteLX42ZENWS
StarLiteLX42ZEPWS
StarLiteLX42ZENWH
StarLiteLX42ZEPWH
1
Advertisement
Table of Contents

Subscribe to Our Youtube Channel
Related Manuals for Astria Fireplaces StarLiteLX36ZENWS

Summary of Contents for Astria Fireplaces StarLiteLX36ZENWS
- Page 1 Installation and Operation Instructions Outdoor Decorative Gas Fireplace ® Models Report No. F12-052 P/N 900982-00 REV. D 12/2019 StarLiteLX36ZENWS StarLiteLX36ZEPWS StarLiteLX42ZENWS StarLiteLX42ZEPWS Ce manuel est disponible en francais, StarLiteLX36ZENWH StarLiteLX36ZEPWH StarLiteLX42ZENWH StarLiteLX42ZEPWH simplement en faire la demande. Numéro P900982-00 de la pièce 900982-03.
-
Page 2: Table Of Contents
Thank you for your purchase. We appreciate your business! GENERAL INFORMATION Please carefully read and follow all instructions in this manual. Pay special attention to These appliances are designed to operate all warnings and safety information. on natural or propane gas only. An electronic Following these safety, care, and operation instructions will help ensure many years of intermittent pilot ignition system provides safe, dependable and enjoyable service from your fireplace. -
Page 3: Massachusetts Requirements
Orifice Sizes - Sea Level To High Altitude All Models - This appliance is only for use (All Models) All models have a manually modulated gas valve. with the type of gas indicated on Input is shown in Table 1: These appliances are tested and approved the rating plate. -
Page 4: Location
ASSEMBLY OUTLINE Carefully consider the position of the fireplace ASSEMBLY STEPS opening with respect to the location of adjacent Before You Start or nearby stairwells, doors, windows, walkways NOTE: The following steps represent the and over hanging trees, patios and wires. normal sequence of installation. -
Page 5: Appliance Clearances
When Planning for the installation of the fire- place, the framing height must be increased from 46-1/2" to 47-1/4", when installing the drain pan. An additional space below the fireplace will also be required to plumb a drain line. Threaded Threaded Reducer Elbow 3/4... -
Page 6: Clearance Specifications
CLEARANCE SPECIFICATIONS (See Note 2) J or K = FIREPLACE OPENING = AIR SUPPLY INLET = AREA WHERE FIREPLACE IS NOT PERMITTED 2 in..clearances above grade, 3 ft. (USA) ..clearance to service regulator veranda, porch, deck or 6 ft. -
Page 7: Fireplace Installation
ROUTING GAS LINE TYPICAL INSTALLATION Route a 1/2" (13 mm) gas line along the inside Weatherproof of the right side framing as shown in Figure 5. Enclosure Gas lines must be routed, constructed and made of materials that are in strict accordance with local codes and regulations. -
Page 8: Fireplace Specifications
FIREPLACE SPECIFICATIONS Dimensions - Inches (millimeters) Dimensions - Inches (millimeters) Model Model No. 41-3/4 23-1/2 41-3/4 23-1/2 StarLiteLX36 Polaris36 (1061) (597) (940) (940) (1061) (597) 47-3/4 29-1/2 47-3/4 29-1/2 Polaris42 StarLiteLX42 (1092) (1213) (749) (1213) (749) (1092) (508) Weight And Volume Model Ship. -
Page 9: Framing Specifications
FRAMING SPECIFICATIONS Back Wall Of Corner Installation Opening StarLiteLX36 StarLiteLX42 Chase/Enclosure 42-3/4" (1086) 48-3/4" (1238) Including Finishing Materials If Any 46-1/2" (1181) 46-1/2" (1181) 23-5/8" (600) 29-5/8" (753) 11-1/4" (286) 14-1/4" (362) 63-1/2" (1613) 69-1/2" (1765) 31-3/4" (807) 34-3/4" (883) 20-1/2"( 521) 20-1/2"( 521) 44-1/4"... -
Page 10: Field Wiring
FIELD WIRING Gas Flex Line Connector CAUTION: LABEL ALL WIRES PRIOR TO DIS- 3/8" NPT x 3/8" 1/2" x 3/8" Flare CONNECTION WHEN SERVICING CONTROLS. Flare Fitting Shut-Off Valve Valve WIRING ERRORS CAN CAUSE IMPROPER AND DANGEROUS OPERATION. VERIFY PROPER OPERATION AFTER SERVICING. -
Page 11: Installing The Logs
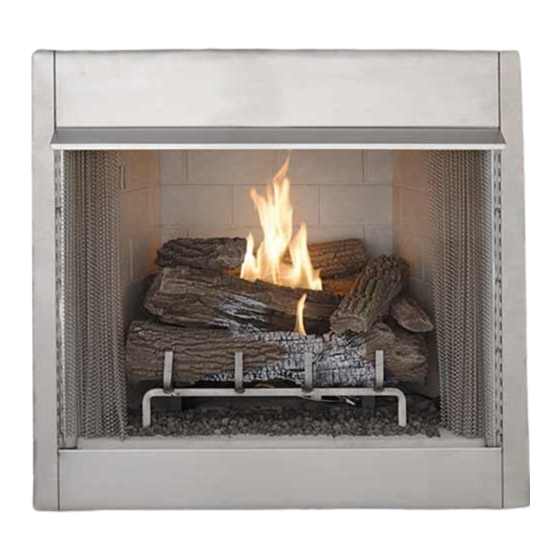
Install the Logs and Glowing Embers WARNING • Turn OFF all gas and electricity to the appliance before installing the embers, and logs. • Do NOT install the logs until the appliance has been completely installed, the gas line connected and tested for leaks, and the initial burner operation has been confirmed. - Page 12 Installing the StarLiteLX Series Log Set The logs have notches/tabs to assist proper positioning. Upper logs rest on lower logs via notches/tabs. Proper log placement is critical to prevent sooting. Place the logs in the gaps between flame peaks, so they do not impinge the flames. Follow the log placement instructions precisely.
- Page 13 Installing the StarLiteLX Series Log Set (continued) 5. Position top right log (5) using the round protrusion on the rear log (1) and the square protrusion on the middle log (2) (Figure 19). 6. Position middle twig log (6) using the pin on top right log (5) (Figure 20). Cut-out fits over protrusion on Log 2 Cut-out fits over...
-
Page 14: Burner Air Shutter Adjustments
FLAME APPEARANCE AND SOOTING Sooting is indicated by black puffs developing at the tips of very long orange flames. Sooting results in black deposits forming on the logs, appliance inside surfaces and on exterior sur- faces adjacent to the face opening. These appliances should not smoke. -
Page 15: Checking Appliance Operation
CHECKING APPLIANCE OPERATION FIREBOX FINISHES Use noncombustible caulking materials only to seal the metal facing to the surround material With gas line installed run initial system check- Only noncombustible materials like marble, on the finished wall. See Figure 24. out before installing any additional accessories. stone, tile, brick, etc. -
Page 16: Gas Conversion Kits
GAS CONVERSION KITS WARNING Gas conversion kits are available to adapt your This conversion kit shall be installed by a qualified service agency in appliance from the use of one type of gas to the use of another. These kits contain all the accordance with the manufacturer’s instructions and all applicable codes necessary components needed to complete the and requirements of the authority having jurisdiction. -
Page 17: Operation/Care Of Your Appliance
OPERATION AND CARE OF YOUR All Models - WARNING APPLIANCE To light these appliances refer to the detailed FAILURE TO COMPLY WITH THE INSTAL- lighting instructions found on Page 21. The Appliance operation may be controlled by a LATION AND OPERATING INSTRUCTIONS appliance lighting instructions may also remotely located wall switch. -
Page 18: Variable Flame Adjustment
IGNITER ASSEMBLY Variable Flame Height Adjustment WARNING The igniter assembly is factory preset for 1. All appliances are equipped with a variable proper ignition of the burner. Alterations may gas control valve. Flame height for these Turn off gas and any electrical •... -
Page 19: Gas Control Module System
GAS CONTROL MODULE SYSTEM REMOTE CONTROL FEATURE The module has a built in remote control receiver that allows the user to program the remote transmitter at any time during or after the installa- tion of the burner. 1. There is a switch located on the right side of the module that reads REMOTE/OFF (Figure 29). -
Page 20: Accessory Components
ACCESSORY COMPONENTS Purchase these accessories from your local dealer. If they can not supply these accessories contact IHP at Astria.us.com for information. Only kits supplied by IHP shall be used in the installation of this appliance. Use of non- approved accessory/part kit(s) can result in poor performance and safety hazards. -
Page 21: Lighting Instructions, Electronic
LIGHTING INSTRUCTIONS, ELECTRONIC FOR YOUR SAFETY READ BEFORE LIGHTING WARNING: If you do not follow these instructions exactly, a fire or explosion may result caus- ing property damage, personal injury or loss of life. A. This appliance does not have a pilot, it is equipped •... -
Page 22: Troubleshooting
TROUBLESHOOTING WARNING: Turn off appliance and let cool before servicing. Only a qualified service person should service and repair appliance. NOTE: All troubleshooting items are listed in order of operation. OBSERVED PROBLEM POSSIBLE CAUSE REMEDY When ''ON'' button on remote control 1. - Page 23 TROUBLESHOOTING Continued WARNING: If you smell gas • Shut off gas supply. • Do not try to light any appliance. • Do not touch any electrical switch; do not use any phone in your building. • Leave the building immediately. •...
-
Page 24: Maintenance Schedule
MAINTENANCE SCHEDULE Annually (Before the onset of the Burning Season) MAINTENANCE TASK ACCOMPLISHING PERSON PROCEDURE Inspecting/Cleaning Burner, Logs Qualified Service Technician Inspect valve and ensure it is properly operating. Check piping for leaks. and Controls Vacuum the control compartment, fireplace logs and burner area. Refer to Page 17. -
Page 25: Replacement Parts List
REPLACEMENT PARTS WARNING Cat.# Model Description Contact an IHP dealer to obtain any of these parts. Never F4110 StarLiteLX36ZENWS 36" White Stacked, NG F4111 StarLiteLX36ZENWH 36" White Herringbone, NG use substitute materials not approved by IHP. Use of F4112 StarLiteLX36ZEPWS 36"... - Page 26 REPLACEMENT PARTS LIST StarLiteLX 36 StarLiteLX 42 Item No. Description Part No. Qty. Part No. Qty. 1, 2, 3, 4, 5 Refractory Set, White Stacked F4155 F4157 Refractory, LH White Stacked Refractory, RH White Stacked Refractory, Rear White Stacked 1H, 2H, 3H, 4H, 5H Refractory Set, White Herringbone F4156 F4158...
- Page 27 REPLACEMENT PARTS (continued) NOTE: DIAGRAMS & ILLUSTRATIONS ARE NOT TO SCALE.
- Page 28 REPLACEMENT PARTS (continued) StarLiteLX 36/42 NG StarLiteLX 36/42 LP Item No. Description Part No. Qty. Part No. Qty. Gas Train Replacement Parts List Stainless Burner F4151 F4151 Assembly, Igniter and Flame Rod J6548 J6548 Pilot Bracket F4152 F4152 Orifice Holder J6127 J6127 Orifice...
-
Page 29: Warranty
Innovative Hearth Products Astria Brand Gas Fireplace ® Limited Lifetime Warranty THE WARRANTY Innovative Hearth Products ("IHP") Limited Lifetime Warranty warrants your Astria brand gas fireplace ("Product") to be free from defects in materials and workmanship ® at the time of manufacture. The product body, firebox and barrier carry the Limited Lifetime Warranty. Ceramic glass carries the Limited Lifetime Warranty against thermal breakage only. - Page 30 Astria.us.com Record the following important information about your fireplace: Appliance model number Appliance serial number Date appliance was Installed Type of gas appliance uses Dealer name Innovative Hearth Products (IHP) reserves the right to make changes at any time, without notice, in design, materials, specifications, prices and also to discontinue colors, styles and products.
Need help?
Do you have a question about the StarLiteLX36ZENWS and is the answer not in the manual?
Questions and answers