Table of Contents
Advertisement
Quick Links
Advertisement
Table of Contents

Related Manuals for Audio Creative GrooveMaster-II

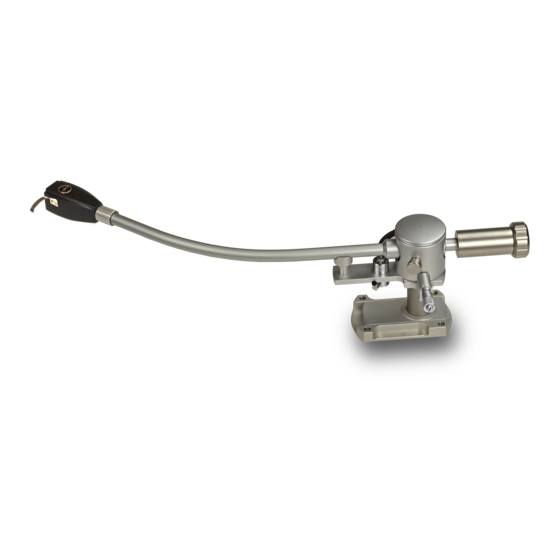
Summary of Contents for Audio Creative GrooveMaster-II
- Page 2 Audio Creative recommends the GrooveMaster III tonearm in combination with the Audio Creative Ebony or Walnut headshell for best performance or any of the Ortofon SPU cartridges.
-
Page 3: Table Of Contents
Content: General tonearm data ……………….…………..………………… 3 2. Setting up your GrooveMaster III…..………….…………… 4 3. Mounting the GrooveMaster III ………….………..……..… 5 4. Connect the Tonearm Cable …………………..……….……… 6 5. Setting the Tracking Force / VTF…………….…………….. 7 6. Vertical-Tracking-Angle / VTA)……………….…………….. 8 7. -
Page 4: General Tonearm Data
1. General Tonearm Data Construction details: High quality ceramic bearing technology tonearm, micrometer style adjustable magnetic antiskating, adjustable counterweight. Tonearm wiring 99.999% silver wire, 38AWG terminated with Te on 5 pin DIN connector Effective Mass 9”, 10”, 12” approx. 20, 25, 29 gram Cartridge compliance 5 - 15 µm/mN Tonearm connector... -
Page 5: Setting Up Your Groovemaster Iii
You nd the dimensions in the picture below and on the sjablone. audio creative sliding base template GrooveMaster-II 60 mm. A= pivot to spindle = 304.75 mm. pivot B= e ective length = 317.57 mm. -
Page 6: Mounting The Groovemaster Iii
3. Mounting the GrooveMaster III The GrooveMaster III is built with a speci c geometry. The Groovemaster needs to be adjusted exactly to the right pivot to spindle (P2S). This is best done with a good adjustment tool, such as the Smartractor. It is important that this is done accurately! A correct pivot to spindle distance is particularly important to ensure the correct setting for Ortofon SPU elements. -
Page 7: Connect The Tonearm Cable
. Connect the Tone-Arm Cable The tonearm connector is designed to the highest speci cation, with a POM base and high quality gold pins. This giving the best possible transmission of the signal. Carefully insert the 5-pin plug of the tonearm cable into the output connector of the tonearm and connect the RCA plugs of the tonearm cable to the input of the phono stage or the pre- ampli er. -
Page 8: Setting The Tracking Force / Vtf
5. Setting the Tracking force (VTF) The GrooveMaster III counterweight is a high quality threaded counterweight with which VTF can be ne-tuned very precise. Also the counterweight itself can be adjusted over the tonearm tube. When using more heavy cartridges or a heavy headshell, you can use a different end-knob by unscrewing it from the counterweight base and replacing it. -
Page 9: Vertical-Tracking-Angle / Vta
6. Vertical-Tracking-Angle / VTA You can change the height of your GrooveMaster III by loosening the locking screws on the side of the mounting collar or sliding base. Always set the VTF for your cartridge rst, or you might damage your cartridges needle/cantilever! For the adjustment please put a record on your turntable. -
Page 10: Alignment Of Cartridge And Tonearm
7 . Alignment of Cartridge and Tonearm For setup of the cartridge, you need the supplied ARC protractor. Slide the protractor over the spindle of the turntable platter and turn the platter into the position as shown on the picture. Lower the cartridge and place the diamond stylus of the cartridge on the reference point of the alignment gauge, making sure that the cartridge is parallel to the marked lines printed on the cartridge alignment gauge. -
Page 11: Azimuth
8. Azimuth The azimuth indicates the angle of the stylus relative to the record, viewed from the front. It should be 90°. The Azimuth is already preset horizontally. If you need to change the azimuth, please loosen the screw on the under side of the tonearm near the headshell using a 1.3 mm hex key screw driver. -
Page 12: Anti Skating Force
9. Anti Skating Force The anti skating setting of the GrooveMaster III is a frictionless, magnetic micrometer setting. With turning the micrometer up and down you can increase or decrease the anti skating force. Note: normally the anti skating on 12 “ tonearms is less important. The higher the VTF, the less important the anti skating. -
Page 13: Positioning Of The Groovemaster Iii
10. Positioning the GrooveMaster-III The distance of the needle to the spindle bearing is important for a correct functioning of the anti skating mechanism. Below you nd a schematic for the correct settings. -
Page 14: Maintenance, Transport & Service
Should further transportation of the GrooveMaster III tonearm be necessary, please alway use the original packing material. Otherwise serious damage could occur. Service If any servicing or repair of an Audio Creative product is necessary, please rst contact us rst. PLEASE RETAIN ALL ORIGINAL PACKAGING. - Page 15 Personal notes ………………………………………………………………………………………………………………… ………………………………………………………………………………………………………………… ………………………………………………………………………………………………………………… ………………………………………………………………………………………………………………… ………………………………………………………………………………………………………………… ………………………………………………………………………………………………………………… ………………………………………………………………………………………………………………… ………………………………………………………………………………………………………………… ………………………………………………………………………………………………………………… ………………………………………………………………………………………………………………… ………………………………………………………………………………………………………………… ………………………………………………………………………………………………………………… ………………………………………………………………………………………………………………… ………………………………………………………………………………………………………………… ………………………………………………………………………………………………………………… ………………………………………………………………………………………………………………… ………………………………………………………………………………………………………………… ………………………………………………………………………………………………………………… ………………………………………………………………………………………………………………… ………………………………………………………………………………………………………………… ………………………………………………………………………………………………………………… ………………………………………………………………………………………………………………… ………………………………………………………………………………………………………………… ………………………………………………………………………………………………………………… ………………………………………………………………………………………………………………… ………………………………………………………………………………………………………………… ………………………………………………………………………………………………………………… …………………………………………………………………………………………………………………...
Need help?
Do you have a question about the GrooveMaster-II and is the answer not in the manual?
Questions and answers