Advertisement
Quick Links
Advertisement

Related Manuals for Aputure Light Storm LS 600d Pro

Summary of Contents for Aputure Light Storm LS 600d Pro
- Page 1 LS 600d Pro Product Manual English...
-
Page 2: Important Safety Instructions
Foreword Thank you for purchasing Aputure “Light Storm” LS 600d Pro. The Aputure LS 600d Pro is a perfect fixture with big power. It owns all features of previous series products,and further it will support the battery charging under the operation and another feature of it is that it can work on raining . - Page 3 19. The malfunctions caused by unauthorized disassembly are not covered under the warranty. 20. We recommend only using the original Aputure cable accessories. Please note that our warranty for this product does not apply to any repairs required due to any malfunctions of unauthorized Aputure accessories, although you may request such repairs for a fee.
-
Page 4: Fcc Compliance Statement
21. This product is certified by RoHS, CE, KC, PSE, and FCC. Please operate the product in full compliance with the operation standards. Please note that this warranty does not apply to repairs arising from malfunctions, although you may request such repairs on a chargeable basis. 22. - Page 5 Increase the separation between the equipment and receiver. Connect the equipment to an outlet on a different circuit than the receiver is connected to. Consult the dealer or an experienced radio/TV technician for help. RF Warning Statement: This device has been evaluated to meet general RF exposure requirements.This equipment should be installed and operated with minimum distance 20cm between the radiator &...
-
Page 6: Product Details
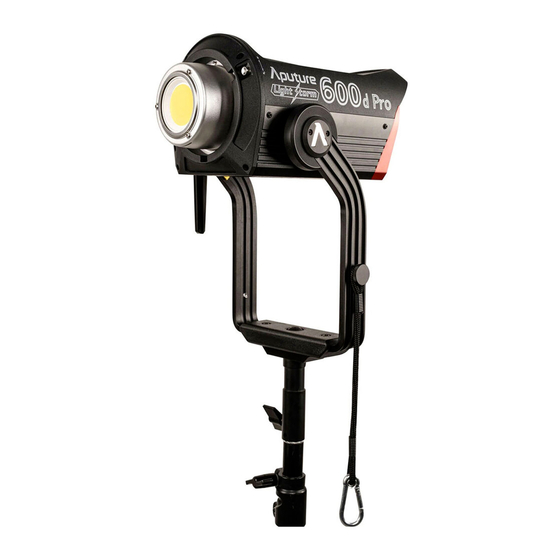
Product Details 1. Lamp Head Bowens Mount Release Latch Bowens Mount Label LED Light Source Made in China 55° Hyper-Reflector 5-Pin Male XLR Receiver Cable Relief Hook T-Handle Ratcheting Disk / Baby Pin Baby Pin Receiver/Mounting Brake Handle Mounting Screw Column (5/8in. - Page 7 5-Pin Female XLR Power Output DMX OUT DMX IN Battery Input Neutrik® Port Port (DC) powerCON Power Input 3. VA-Remote RC1+ Channel Indicators Group A Dimming Controls Group A On/Off Group B Dimming Controls Group B On/Off Group C Dimming Controls Group C On/Off...
-
Page 8: Installations
Installations 1. Attaching/detaching the protection cover Pull back the retaining pin, rotate the cover clockwise, then detach the cover. To reattach the cover, insert it into the Bowens mount and rotate counterclockwise. Notice: Always remove the protection cover prior to turning on the light. Always re-install the cover when packing it away. 2. - Page 9 4. Instructions for the Quick-Release "Lightning Clamp" 1) Clamp the Lightning Clamp onto a light stand. 2) To attach the control box, rotate the release lever to unlock the quick-release baseplate, then mount the control box onto the Lightning Clamp (the release lever will automatically spring back).
-
Page 10: Powering Up The Controller
6. Powering up the controller 1) Powering by AC Neutrik® powerCON Male Connector AC 100V-240V Neutrik® powerCON Female Locking Connector To disconnect the Neutrik® powerCon cable, pull back on the yellow release tab on the cable connector, and rotate the connector counterclockwise. 2) Powering by Batteries V-Mount Battery Anton Bauer Battery... -
Page 11: Manual Control
Operations 1. Press the power button to turn the light on and off Brightness Dimming Curve Wireless Mode Remaining Operating Time Battery Level/ Fixture Serial AC Power Symbol Number 2. Manual Control 1) Rotate the select button to adjust the intensity of the light from 0-100%. 2) Press the MENU button to enter the system menu interface, They are DMX Mode、Dimming curve、Fan Mode、Studio Mode、Control System、Language、Update、Effects. - Page 12 2.1) DMX Mode Press the MENU button to enter the system menu, rotate the select knob to select DMX Mode, and press the select button again to enter DMX Mode. 2.2) Dimming curve Press the MENU button to enter the system menu, rotate the select knob to select Dimming Curve, and press the select button again to enter the dimming curve.
- Page 13 2.4) Studio Mode Press the MENU button to enter the system menu, rotate the select knob to select Studio Mode, and press the select button again to enter the Studio Mode.Via press select button can choose "YES" or "NO". 2.5) Control System There are 4 control systems on it,namely Bluetooth、2.4G、Lumenradio and Art-Net.
- Page 14 (2) After resetting the light's Bluetooth connection, your mobile phone or tablet will be able to connect to and control the light;If the Bluetooth Reset fails, a [Reset Failed] screen will pop-up, and the light will return to Bluetooth mode after 2 seconds. 2.5.2) 2.4G Control Under the control system, rotate the select knob to select 2.4G Control.Press the select button again to enter the 2.4G Control.You can adjust on or off、channel...
- Page 15 2.5.4) Art-Net Under the control system, rotate the select knob to select Art-Net.Press the select button again to enter the Art-Net,You can see the information of Local IP、Remote IP、Gateway and MAC Address. 2.6) Language Press the MENU button to enter the system menu, rotate the select konb to select Language, and press the select button again to enter the Language menu.
- Page 16 2.8) Effects Press the MENU button to enter the system menu, rotate the select konb to select Effects, and press the select button again to enter the Effects toggled between Paparazzi, Fireworks, Faulty Bulb, Lightning, TV, Pulsing, Strobe, Explosion. a. Paparazzi Effect b.
- Page 17 g. Strobe Effect h. Explosion Effect* * In explosion mode, short press the Effects button to single trigger the light effect. When in Lighting FX mode, short press the "select" button to enter Intensity Adjustment Mode. Then rotate the select wheel to adjust the intensity from 0% to 100% as displayed on the screen.
- Page 18 4) You can return effects interface whatever under any status via press Effects button. 5) You can also do an OTA wireless firmware update using the Sidus Link mobile app. 3. Remote Control You can control the LS 600d Pro from any channel or group configuration. * Light Storm lights have three channels (1/2/3) and four groups (A/B/C/D).
- Page 19 3) FX Control Press the ( ) button to enter or exit lighting effect mode. Press the ) to toggle between different effects. Press the ( ) buttons to adjust the output of the light. Press the ( ) buttons to toggle the effect frequency.
- Page 20 * The DMX interface schematic is shown in the pictures below: Data 1+ Data 1+ (Primary Data Link) (Primary Data Link) Data 2- (Optional Data 2- (Optional Secondary Data Link) Data 1- Secondary Data Link) Data 1- (Primary Data Link) (Primary Data Link) Data 2+ (Optional Data 2+ (Optional...
- Page 21 2) DMX Chart DMX Channel Values / Functions 20-39 (5 DMX Channels) Channel Value Function 40-59 Dimmer 60-79 0-255 Intensity 0 to 100% 80-99 100-119 Mode Selection 120-139 0-127 Manual Mode 128-255 FX Mode 140-159 160-179 FX Control 180-199 Paparazzi 0-19 20-39 Fireworks...
-
Page 22: Specifications
You can download the Sidus Link app from the iOS App Store or Google Play Store for enhancing the functionality of the light. Please visit sidus.link/app/help for more details regarding how to use the app to control your Aputure lights. Get Sidus Link Sidus.link/app/help... - Page 23 Photometrics Distance 22150(lux) 2600(lux) 1020(lux) Bare Bulb 2058(fc) 242(fc) 95(fc) 98500(lux) 8500(lux) 3000(lux) Hyper-Reflector 9150(fc) 790(fc) 280(fc) * This is an averaged result, the number might be slightly different on each light. Trademarks Bowens is a trademark registered by Bowens in China and other countries. Anton Bauer is a trademark registered by Anton Bauer in the US and other countries.
- Page 24 光 • 风 暴 LS 600d Pro 使 用 者 指 南 中 文...
- Page 25 前 言 感谢您购买爱图仕“光·风暴”系列LED摄影灯—LS 600d Pro。 爱图仕LS 600d Pro 是一款大功率LED灯具。它拥有以往光风暴系列产品所 有的特性,并且在工作中支持电池充电,另外一个显著特点是雨天也能正 常工作。 重要的安全说明 使用此摄影灯时,应始终遵循基本的安全预防措施,包括: 1. 使用前阅读并理解所有说明。 2. 当儿童靠近设备或使用设备时,必须进行密切监督。在使用设备时,请 勿将设备置于无人看管状态。 3. 必须小心接触高温部件防止被烫伤。 4. 请勿操作电源线损坏的设备以及掉落或损坏的设备,直到合格的维修人 员检查过。 5. 请归置好电源线,防止被电源线绊倒或拉扯电源线导致设备断电,且电 源线不可接触灼热表面。 6. 如果需要延长线,应使用额定电流至少等于设备额定电流的延长线。额 定电流小于设备的电线可能过热。 7. 在清洁和维修之前以及不使用时,务必从电源插座上拔下电器插头。切 勿拉扯电线从插座拔出插头,应抓住插头并拉动来拔出。 8. 在存放前让设备完全冷却。存放时,请将电源线从设备上拔出,待冷却 后归置在手提包对应位置。 9. 为降低电击风险,请勿将本产品浸入水中或其他液体中。 您可以在本公司网站 www.aputure.com/cn 中找到本设备的详细使用者指南。...
- Page 26 10.为降低电击风险,请勿拆卸本产品,在需要维修时将其交给合格的维修 人员。不正确的重装可能会在随后使用设备时引起电击。 11.使用非制造商推荐的配件可能会引起火灾、电击或人身伤害。 12.请将本产品连接到接地插座。 13.使用前请将保护罩取下。 14.使用标准罩前将EVA内托取下。 注 意 15.本产品工作时,请勿遮挡散热孔,勿直视灯珠; 任何情况下勿触摸灯珠。 LED光源灯珠, 切勿触碰 16.勿将本产品置于液体或其他易燃,易挥发溶剂附近,避免损坏产品。 17.请用软布、干布清洁本设备。 18.请勿在潮湿的环境下使用本设备,否则有短路或电击的危险。 19.需要维修时请联系授权的维修人员。本设备内有精密电子线路。未经许 可擅自拆卸导致故障不在本司保修范围内,但用户可以付费维修。 20.建议使用爱图仕原厂线缆。由于使用非爱图仕原厂附件导致本产品的任 何损坏,不在本司保修范围内,但用户可以付费维修。 21.本产品已通过RoHS, CE, KC, PSE和FCC认证,请参考相关国家标准使 用和操作。因使用操作不当而造成机器损坏,不在保修范围内,但用户 可以付费维修。 22.此使用者指南依据本公司严格测试制定。设计和规格如有变更,恕不另 行通知。 保存这些说明...
- Page 27 F C C 符 合 声 明 : 此设备符合 FCC 规则第 15 部分中的规范。操作设备须符合以下两个条件: (1) 此设备不会导致有害干扰; (2) 此设备可承受任何外来干扰,包括可能导致非预期操作的干扰。 【警告】如果用户未经爱图仕明确许可而进行改动或改装,可能会丧失继续 操作该设备的权利。 【注】此设备经测试确定符合 B 类数码设备(依照 FCC 规则第 15 部分规范) 的限制。这些限制的设计旨在为居住场所安装条件下的有害干扰提供合理的 保护。此设备生成、使用并可以发射射频能量。如果未按照指示安装和使用 ,可能对无线电通信造成有害干扰。但是,在特定安装条件下,不保证这类 干扰不会发生。如果此设备确实对无线电或电视机接收信号造成有害干扰, 而这点可以通过关闭和打开设备来确定,那么建议用户尝试使用以下一种或 多种措施来消除干扰: 扩大设备与接收器之间的距离。 将设备连接到其他电路的插座中,而不是接收器所连接电路的插座。 咨询经销商或有经验的无线电/电视机技术人员以获得帮助。 FCC 辐射暴露声明 本设备符合FCC针对未受控制环境所制定的辐射暴露限制。...
- Page 28 物 品 清 单 使用本产品前,请检查包装内是否包含所有以下物品。如有缺失,请与经销商联系。 保护罩 (1 pc) 挂绳 (1 pc) 快装件 (1 pc) 摇控器 控制盒 (1 pc) (1 pc) 灯体 (1 pc) 55° 标准罩 (1 pc) 集线绑带 集线绑带 手提包 (1 pc) 电源线 连接线 (1 pc) (1 pc)
- Page 29 产 品 视 图 1. 灯体 顶杆手柄 保荣卡口 灯体贴纸 光源 Made in China 标准罩 接口公座 挂线柱 碟刹手柄 紧固手柄 灯体支撑柱 2. 控制盒 天线盒 挂绳板 显示窗 亮度调节按键 菜单键 支架 光效模式键 USB插口 返回键 选择/确认键 RJ45网口 电源开关 快装板 电池扣板 (*含V-mount或 A-mount两种型号) 支架...
- Page 30 控制盒输出接口 DMX OUT DMX IN 电池输入接口 NEUTRIK® 接口 接口 电源接口 (DC) 3. 遥控器 频道指示灯 A组亮度调节 A组开关 B组亮度调节 B组开关 C组亮度调节 C组开关 C组光效频率 FX按钮 D组亮度调节 D组开关 D组光效频率 频道选择按钮 电池仓...
- Page 31 安 装 1. 保护罩的拆卸与安装 按照图示箭头方向拨顶杆手柄,同时将保护罩旋转拔出。反方向旋转则将保护罩装入。 * 使用时, 务必将保护罩拔出, 否则会烧掉。 不使用时, 将保护罩装入以保护灯头。 2. 标准罩的安装与拆卸 按照图示箭头方向拨顶杆手柄,同时将标准罩旋转装入。反方向旋转则将标准罩拔出。 3. 固定灯体 调节灯体到合适角度,旋转紧固手柄安装灯体在三脚架上,再旋转把手固定灯体。...
- Page 32 4. 快装件使用说明 1)将快装件装到灯架或支架上; 2)打开快装件旋柄,将控制盒装进快装件(旋钮自动弹回); 3)打开快装件(必须抓住控制盒,不然会摔落),取下控制盒。 快装件规格 重量 670g / 1.48lbs 尺寸(长X宽X高) 10.35x8.74x12.5cm / 4.07x3.44x4.92in * 快装件能夹直径2-5cm / 0.79-1.97in的圆管或方管。 5. 连接灯体和控制盒 用连接线连接灯体和控制盒(如图)。 弹簧锁口 锁口槽 弹簧锁口 锁口槽 * 您可将绑有连接线的集线绑带系到挂线柱上 * 拆卸连接线时,请压住灯体和控制盒上的弹簧锁口再拆卸,切勿硬拔。...
- Page 33 6. 供电 1) 交流电供电 弹簧锁口 AC 100V-240V 锁口槽 * 拆卸电源线时,请下拉电源线上的弹簧锁口按钮再拆卸,切勿硬拔。 2)电池供电 V-mount电池 A-mount电池 * 电池规格:支持14.4~28.8V的电池使用,但容量必须大于180Wh。 * 客户可以根据需要购买V扣或A扣电池。 * 当灯具在工作时,也可对电池充电。...
- Page 34 操 作 1. 接通电源,打开控制盒电源开关。 亮度指示 调光曲线显示 无线模式显示 剩余使用 时间显示 电池电量显示/ 序列号 AC电源符号显示 2. 控制盒手动控制 1) 旋转选择按键旋钮来调节亮度,顺时针变强,逆时针变弱。可实现无级调节。 2) 短按Select键,进入菜单界面,包含DMX模式、调光曲线、风扇模式、演播室 模式、控制系统、语言、系统更新、光效。 -10-...
- Page 35 2.1) DMX模式 按MENU键进入菜单界面,旋转Select键并选择进入DMX模式。 2.2) 调光曲线 按MENU键进入菜单模式,旋转Select键并选择进入调光曲线,可以选择对应的 指数型、对数型、“S”型、线型曲线。 2.3) 风扇模式 按MENU键进入菜单模式,旋转Select键并选择进入风扇模式,可以选择开或关。 -11-...
- Page 36 2.4) 演播室模式 按MENU键进入菜单模式,旋转Select键选择演播厅模式,短按Select键进入演 播厅模式菜单,再旋转Select键选择”是“或”否“,短按Select键开启或关闭 演播厅模式。 2.5) 控制系统 有四种控制方式,它们分别是蓝牙、2.4G、Lumenradio和以太网。 2.5.1) 蓝牙 (1) 在控制界面,旋转Select键选择演蓝牙模式,短按Select键进入演蓝牙子模 式,可以选择开与关或蓝牙重置,蓝牙重置界面可以选择升级或返回上菜单。 -12-...
- Page 37 (2) 蓝牙重置成功后,可使用智能终端(手机或平板电脑)与灯进行配对连接,连 接 成功后,可以对灯进行相关控制;如果蓝牙重置不成功,将会弹出界面【 Reset Failed】,显示2秒后返回蓝牙界面。 2.5.2) 2.4G 控制 在控制界面,旋转Select键选择2.4G 模式,短按menu键进入2.4G子界面,通 过旋转、按压Select键可以调节2.4G的开关、频道以及群组的选择。 2.5.3) Lumenradio 在控制界面,旋转Select键选择Lumenradio 模式,短按Select键进入 lumenradio子界面,通过旋转、按压Select键可以调节Lumenradio的开关、 以及配对状况。 -13-...
- Page 38 2.5.4) 以太网 在控制界面,旋转Select键选择以太网,短按Select键进入以太网子界面,你可 以看到子网、IP地址、网关以及MAC地址。 2.6) 语言 按MENU键进入菜单模式,旋转Select键选择Language,短按Select键进入语言 菜单, 旋转Select键选择English或中文,再短按Select键确认选择。 2.7) 系统更新 按MENU键进入菜单模式,旋转Select键选择升级,短按Select键进入升级菜 单, 在升级子界面可以升级固件,也可以查看固件版本号。 -14-...
- Page 39 2.8) 光效 按MENU键进入菜单模式,旋转Select键选择光效,短按Select键进入光效子 界面,可以选择狗仔队模式、烟花模式、故障灯泡模式、闪电模式、电视模式 、脉搏模式、闪光灯模式、爆炸模式。 a. 狗仔队模式 b.烟花模式 c. 故障灯泡模式 d. 闪电模式 * 闪电模式下,需通过Effects按键触发光效,短按一次Effects按键触发一次光效。 e. 电视模式 f. 脉搏模式 -15-...
- Page 40 g. 闪光灯模式 h. 爆炸模式 * 爆炸模式下,需通过Effects按键触发光效,短按一次Effects按键触发一次光效。 短按select键选择亮度调整,如下图,再调节旋钮改变灯的亮度值,亮度调节范围 为0%~100%。 短按select键选择频率调整,如下图,再调节旋钮改变灯的频率值,频率调节范围 为1~10,R(随机)。 * 光效模式下,若突然断电,机器再次上电后,OLED屏显示断电前的界面并根据界面的数值 作响应。 3) 可以通过按压Lighting按键直接返回常规灯光界面,无论处于什么状态下。 -16-...
- Page 41 4) 可以通过按压Effects按键快速回到光效界面,无论处于什么状态下。 5) 固件升级可以通过Sidus Link app进行OTA在线升级更新。 3. 遥控器远程遥控 设置遥控频道为2,群组为B时,控制亮度可按如下操作: * 光•风暴控制盒和遥控器分1、2、3三个频道和A、B、C、D四个群组。 * A、B只能控制亮度,C、D控制亮度和光效的选择。 1) 遥控器设置和显示 按( )键,选择频道2 “ ”指示灯亮,选择频道成功 2) 亮度调节 按遥控器B组的( )按键调节亮度,亮度以0.1%的变量均匀变化。亮度可调节范围 为0~100%。 * DMX、DMX光效模式下,不可以进行遥控操作。 * 使用遥控器进行调节操作,必须切换至2.4G模式,否则操作无效。 -17-...
- Page 42 (3) 光效控制 按遥控器的( )按键进入或退出光效模式,按( )切换光效模式。 按遥控器的( )控制光效的亮度,按( )控制光效的频率。 进入或退出光效模式 a. 狗仔队模式 b.烟花模式 c. 故障灯泡模式 d. 闪电模式 e. 电视模式 f. 脉搏模式 g. 闪光灯模式 h. 爆炸模式 * 遥控器只能在灯处于C或D组时用于控制光效。 4. DMX控制台控制 1) 连接DMX标准控制台与光•风暴LS 600d Pro。 OUTPUT DMX512 连接一台 OUTPUT DMX512 连接多台 -18-...
- Page 43 *DMX接口定义如图所示: 数据正(+) 数据正(+) 备用数据负(-) 备用数据负(-) 数据负(-) 数据负(-) 地 备用数据正(+) 地 备用数据正(+) 2) 频道选择 DMX控制台通道数与控制盒DMX通道数保持一致时,可使用控制台进行亮度调节操作。 适用于单台或多台连接方式。 *光•风暴在DMX模式下,控制通道号出厂默认值为1。 *光•风暴在DMX模式下,LS 600d Pro可设置通道范围为1-512。 5. DMX控制操作 1) DMX控制台与控制盒连接,见下图所示 OUTPUT DMX512 -19-...
- Page 44 2) DMX 实用表 DMX 频道数值-功能对应表 2档 20-39 (5个频道) 频道 数值 功能 3档 40-59 亮度调节 4档 60-79 亮度0-100% 0-255 5档 80-99 6档 模式选择 100-119 7档 常规模式 120-139 0-127 光效模式 8档 128-255 140-159 9档 光效控制 160-179 10档 狗仔队 180-199 0-19 R档 烟花 20-39 200-219 故障灯...
- Page 45 6. Sidus Link APP 的使用 您可以在App store和安卓市场搜索sidus link下载专业控制软件来控制爱图仕灯具, 更多详细使用方法请访问:sidus.link/app/help Get Sidus Link Sidus.link/app/help Specifications 工作电流 工作电压 100V~240V 50Hz/60Hz 输入功率 输出功率 ≤720W ≤600W TLCI ≥96 ≥96 工作频率 ≥95 2.4GHz 频道 群组 1/2/3 A/B/C/D 色温 防水等级 5600±200K IP54 14.4V-15A ≥180Wh 电池要求 散热方式 主动散热...
- Page 46 亮 度 测 试 数 据 距离 22150(lux) 2600(lux) 1020(lux) 裸光源 2058(fc) 242(fc) 95(fc) 98500(lux) 8500(lux) 3000(lux) 标准罩 9150(fc) 790(fc) 280(fc) * 亮度数据为平均数据,不同灯的亮度会有微小差异。 商 标 声 明 Bowens是保荣公司在中国或其他国家的商标及产品型号。 Anton bauer是安东保尔公司在美国或其他国家的商标及产品型号。 Neutrik®是 Neutrik® 公司在美国或其他国家的商标及产品型号。 -22-...
Need help?
Do you have a question about the Light Storm LS 600d Pro and is the answer not in the manual?
Questions and answers