Table of Contents
Advertisement
Quick Links
Advertisement
Table of Contents

Subscribe to Our Youtube Channel
Summary of Contents for Paratec NeXt Wingman
- Page 1 Personal Emergency Parachute - Manual - Edition 1 - 2019...
-
Page 2: Table Of Contents
Content Preface ............................- 3 - Description ..........................- 4 - Description of Parts ........................- 5 - Parachute Activation ......................... - 6 - 4.1. Manual Activation: Ripcord ....................- 6 - 4.2. Automatic Activation: Static Line ..................- 7 - Opening Characteristics: Ram-Air Parachute ................ -
Page 3: Preface
Preface This manual is intended to serve as both a source of information for users, regardless of parachute jump experience, as well as a reference for technical personnel. The following product descriptions, explanations and examples may contain specific terminology and names not commonly used or understood. In case of any open questions, please feel free to contact us. -
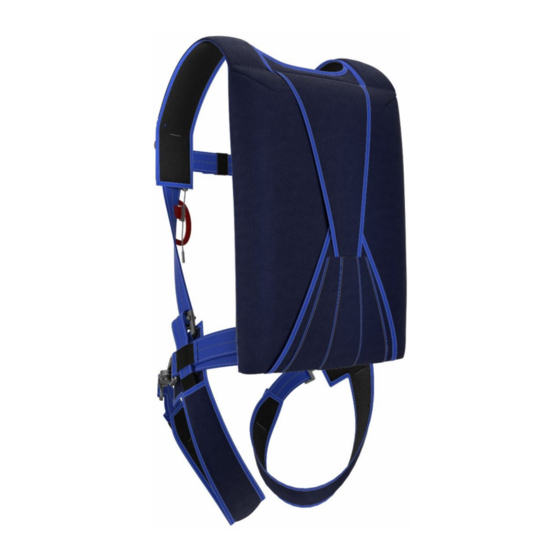
Page 4: Description
Description The NeXt WINGMAN System was specifically designed for the pilot and their unique environment. Remarkably thin, ergonomic and extremely comfortable, it has been optimized for the use in all types types of aircraft. The NeXt Wingman consist of two main components, the harness/container (available in “Standard”... -
Page 5: Description Of Parts
Description of Parts Pic 3.1 Canopy Lines and Attachment Points Pic 3.2 Canopy Terminology - 5 -... -
Page 6: Parachute Activation
Parachute Activation 4.1. Manual Activation: Ripcord The ripcord handle is located on the left side of the operator’s harness. It is secured to the inside of the handle pouch with a layer of Velcro. For activation: pull the handle sideways out of the pocket towards the center of your body, then pull handle down forcefully as illustrated below. -
Page 7: Automatic Activation: Static Line
4.2. Automatic Activation: Static Line The NeXt Wingman is equipped with an activation static line which is located under the left Riser cover (see picture 4.2 below). The static line must be attached to the aircraft prior to ! Attention ! exit. -
Page 8: Opening Characteristics: Ram-Air Parachute
Opening Characteristics: Ram-Air Parachute After the activation of the parachute deployment sequence by either ripcord or static line, the parachute canopy will deploy within seconds and begin performing as designed. The parachute opening takes place in 3 phases: Phase1: The container opens. The spring of the auxiliary pilot parachute, which is under tension, is released and immediately transports the pilot parachute into the air flow. -
Page 9: Line Twist
Line Twist Although the Speed 2000 reserve parachute is designed to mitigate line twist after canopy inflation, they principally could occur in any parachute canopy. Therefore, should a line twist occur, the operator must grip the risers and actively counter the twist with swinging the body and legs in the opposite direction. -
Page 10: Operation: Ram-Air Parachute
Operation: Ram-Air Parachute 7.1. Canopy Flight: Brakes Set at 50% (see picture 14.3.1.2) SPEED 2000 reserve parachute brake lines are pre-set and stowed at 50% when the canopy is packed. Following opening and inflation of the canopy, this setting translates to a more equivalent horizontal and vertical speed with the trailing edge of the canopy pulled slightly down. -
Page 11: Manuvering: Steering Toggles (Brakes Released)
7.2.2. Manuvering: Steering Toggles (Brakes Released) In order to initiate a change in direction, pull the toggle downwards, parallel to the longitudinal axis of the body; left toggle initiates a left turn and right toggle initiates a right turn. To stop the turn (rotation) and resume straight ahead flight simply return the toggle position to neutral (see pic 7.2.1.1.) Pic 7.2.2.1 Pic 7.2.2.2... -
Page 12: Parachute Landing Fall
7.3. Parachute Landing Fall In order to better absorb the vertical energy when landing, execute a Parachute Landing Fall (PLF). A PLF is appropriate at any time and provides the best protection against injury when landing in or on obstacles such as roof tops, trees, roads, shallow water, power lines, etc. Pic 7.3.1 Scheme of a Parachute landing fall ! Attention ! -
Page 13: Maintenance Of The Parachute System
The following table provides an overview of the minimum requirements (based on German Aviation Equipment Ordnance) for the maintenance of the parachute equipment and components manufactured by Paratec GmbH. (The repair permissions, maintenance intervals, and scope of repair may vary from country to country. Please consult your local/national Skydiving Organization and/or your National Aviation Authority for further information). -
Page 14: Cleaning
8.3. Cleaning ! Attention ! Do not use acidic agents! Avoid salt water contact! Remove dirt and grass stains with soap, a brush and warm water. • The cover of the removable back pad cushion is made of cotton, it is machine •... -
Page 15: Disposal
Disposal The NeXt Wingman parachute system consists mainly of woven fabrics, as well as metal and plastic parts. For disposal, the individual parts should be separated according to applicable waste separation criteria and, if necessary, sent to recycling. Based on the custom composition of individual Wingman systems, cadmium-plated fittings may have been used. -
Page 16: Packing Instructions
Packing Instructions The following instructions, to include pictures and tables, are provided as a guide for licensed rigging specialists to safely and effectively pack the NeXt Wingman. (The reserve should only be packed by qualified personnel). 12.1. Tools (Recommended) (Not included in scope of delivery) Pic 14.1.1... - Page 17 12.2. Preparing the Free Bag Pic 14.2.1 Pic 14.2.2 Cover the hook part of the Velcrco using packing Feed packing cord (2) through free bag aid (1) Pic 14.2.3 Pic 14.2.4 After inspecting H/C and canopy; place canopy as Attach H/C (as required) shown - 17 -...
-
Page 18: Packing / Flaking Of Canopy
12.3. Packing / Flaking the Canopy 12.3.1. Prepare Toggles and Brake Lines Setting Pic 14.3.1.1 Pic 14.3.1.2 Pull down untwisted steering line until the „eye“ is Slide the hard toggle tip through the eye and below the break ring match the toggle and riser Velcro Bild 14.3.1.4 Pic 14.3.1.3 Close the Velcro;... -
Page 19: Prepare The Canopy
12.3.2. Prepare the Canopy Pic 14.3.2.1 Pic 14.3.2.2 Temporarily connect the 4 riser below the Separate the lines ( front/rear/steering) and check connector links (e.g. with a clamp) all the way up to the canopy Pic 14.3.2.3 Pic 14.3.2.4 Lift up the canopy, check lines, and hold them Check steering lines for free unentangled routing under tension Pic 14.3.2.5... -
Page 20: Prepare And Pack Canopy Into Free Bag
12.3.3. Prepare and Pack Canopy Into Free Bag Pic 14.3.3.1 Pic 14.3.3.2 Reorganize lines and canopy fabric Organized canopy; 3ea. cells left and right; center cell facing down Pic 14.3.3.3 Pic 14.3.3.4 Prepare free bag and pull down center cell Prepare separation of canopy left and right Pic 14.3.3.5 Pic 14.3.3.6... - Page 21 Pic 14.3.3.9 Pic 14.3.3.10 Fold tip under And compress before pushing into the free bag Pic 14.3.3.11 Pic 14.3.3.12 Completely push left side of canopy into left side Now compress right side of free bag Pic 14.3.3.13 Pic 14.3.3.14 Continue as on right side And compress before pushing into the free bag Pic 14.3.3.15 Pic 14.3.3.16...
- Page 22 Pic 14.3.3.19 Pic 14.3.3.20 Route left end of the elastic loop through the left Pull the lines through the elastic; approx. 2 inches grommet Pic 14.3.3.21 Pic 14.3.3.22 Check both sides of the line bundle for symmetry Release the H/C (Pic 14.2.4) Flip the free bag over Pic 14.3.3.23 Pic 14.3.3.24...
-
Page 23: Pack And Close The Container
12.4. Pack and Close the Container 12.4.1. Installation of Closing Loop and Stowing of Risers Pic 14.4.1.1 Pic 14.4.1.2 Free bag and container prepared Length of closing loop from tip to washer: 6cm Pic 14.4.1.3 Pic 14.4.1.4 Insert closing loop, stow washer, knot and end of Insert pull up cord into closing loop loop under the elastic tape Pic 14.4.1.5... -
Page 24: Pack Free Bag Into Container
Pic 14.4.1.9 Pic 14.4.1.10 Place risers under the tape to protect them Check correct routing of static line against Velcro wear Pic 14.4.1.11 Pic 14.4.1.12 Feed pull up cord (white) through packing cord White pull up cord through free bag (red) and pull white cord by red cord through free bag as shown 12.4.2. -
Page 25: Compress The Pilot Chute
Pic 14.4.2.5 Pic 14.4.2.6 Fold bridle in “S” folds on top of the free bag as Push the ends of the bridle gently under flap #1 shown using your tool Bild 14.4.2.7 Bild 14.4.2.8 Route the bridle on top of flap #1 Close flap # 2 (Obere Klappe) and secure with temporary pin 12.4.3. - Page 26 Pic 14.4.3.5 Pic 14.4.3.6 Close flap #3 and secure with temporary pin Close flap #4 and secure with temporary pin Pic 14.4.3.7 Pic 14.4.3.8 Close flap #5 and compress pilot chute fabric, Close flap ‚6 and use pin of ripcord cable to secure with temporary pin secure;...
- Page 27 Paratec Fallschirmbau – Technik – Service – Vertrieb GmbH Flugplatz, 66798 Wallerfangen Phone: +49 - 6837 – 900 62 – 0 Fax: +49 - 6837 – 74373 E-Mail: info@paratec.de www.paratec.de - 27 -...
Need help?
Do you have a question about the NeXt Wingman and is the answer not in the manual?
Questions and answers