Advertisement
Table of Contents
Advertisement
Table of Contents

Related Manuals for ACME FlyCamOne eco

Summary of Contents for ACME FlyCamOne eco
- Page 1 V.1.02 Copyright © 2009 by ACME the game company GmbH, Germany ...
- Page 2 Vielen Dank für den Erwerb der FlyCamOne eco. Installation Fixieren Sie den Kopf der FlyCamOne eco auf oder unter Ihrem Modell. Verwenden Sie Schrauben oder auch doppelseitiges Klebeband. Um den Kopf anzusteuern können Sie auch einen optional erhältlichen Servo verbauen. Fixieren Sie die Hauptplatine und schieben Sie eine Micro SD Karte in den Kartenslot. Beachten Sie, das durch den Einbau der Schwerpunkt des Flugmodells nicht beeinträchtigt wird! Verbinden Sie das RX Anschlusskabel mit einem freien Kanal an dem Empfänger ihres Modells. Die Modes Die aktuellen Modes werden durch die LED und deren Farbe und Blinkfrequenzen unterschieden. bereit Aufzeichnung Video LED grün LED rot Serienbild LED blinkt grün 1x/sec LED blinkt rot 1x/Aufnahme Foto LED blinkt grün 1x /2sec LED blinkt 1x rot Um die Aufnahme im jeweiligen Mode zu starten oder zu stoppen drücken sie kurz den Taster des freien Kanals an Ihrer Fernbedienung. (bzw. schalten mit einem Schalter den Kanal ein und sofort wieder aus) Um in den nächsten Mode zu gelangen drücken Sie den Taster für 3 Sekunden. Um das Bild um 180° zu drehen drücken Sie den Taster für 10 Sekunden – doppeltes Blinken zeigt die erfolgreiche Drehung: grün Standard, rot: gedreht Technische Daten Auflösung: VGA 640x480pix USB: 1.1 Mini USB BPS: 28 ...
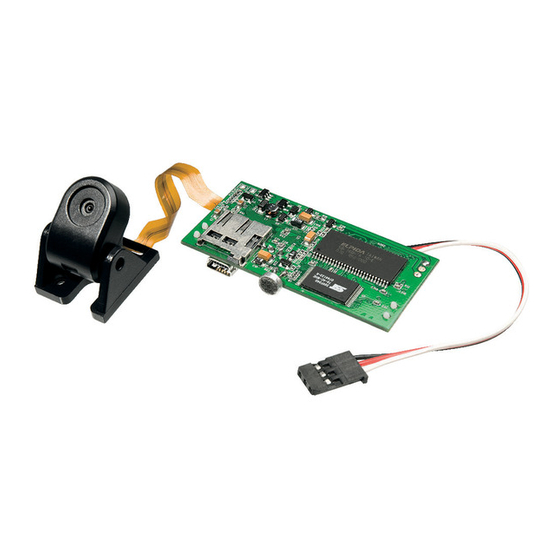
- Page 3 Thank you for purchasing the FlyCamOne eco. Installation Fix the cams head on top or bottom of your model using screws or double sided tape. You might also install an optional servo to move the head. Fix the main pcb as well and do not miss to insert a Micro SD‐card. Take care not to move the point of gravitation! Connect the RX Cable to the free Channel of your model! The Modes The selected mode will be indicated by blinking frequency and color. ready recording Video LED green LED red Serial Photo LED blinks green 1x/sec LED blinks red 1x/picture Still Photo LED blinks green 1x /2sec LED blinks 1x red To start the selected mode press the button of the transmitter once.(Switch the button to on and directly to off again) To switch to the next mode, press the button for 3 seconds. To turn the picture press the button for 10 Seconds – double blinking indicates the success of turning: green: standard, red: turned 180° Technical Data Resolution: VGA 640x480pix USB: 1.1 Mini USB FPS: 28 Power: ...
- Page 4 Thank you for purchasing the FlyCamOne eco. Installation Fix the cams head on top or bottom of your model using screws or double sided tape. You might also install an optional servo to move the head. Fix the main pcb as well and do not miss to insert a Micro SD‐card. Take care not to move the point of gravitation! Connect the RX Cable to the free Channel of your model! The Modes The selected mode will be indicated by blinking frequency and color. ready recording Video LED green LED red Serial Photo LED blinks green 1x/sec LED blinks red 1x/picture Still Photo LED blinks green 1x /2sec LED blinks 1x red To start the selected mode press the button of the transmitter once.(Switch the button to on and directly to off again) To switch to the next mode, press the button for 3 seconds. To turn the picture press the button for 10 Seconds – double blinking indicates the success of turning: green: standard, red: turned 180° Technical Data Resolution: VGA 640x480pix USB: 1.1 Mini USB FPS: 28 Power: ...
- Page 5 Thank you for purchasing the FlyCamOne eco. Installation Fix the cams head on top or bottom of your model using screws or double sided tape. You might also install an optional servo to move the head. Fix the main pcb as well and do not miss to insert a Micro SD‐card. Take care not to move the point of gravitation! Connect the RX Cable to the free Channel of your model! The Modes The selected mode will be indicated by blinking frequency and color. ready recording Video LED green LED red Serial Photo LED blinks green 1x/sec LED blinks red 1x/picture Still Photo LED blinks green 1x /2sec LED blinks 1x red To start the selected mode press the button of the transmitter once.(Switch the button to on and directly to off again) To switch to the next mode, press the button for 3 seconds. To turn the picture press the button for 10 Seconds – double blinking indicates the success of turning: green: standard, red: turned 180° Technical Data Resolution: VGA 640x480pix USB: 1.1 Mini USB FPS: 28 Power: ...
Need help?
Do you have a question about the FlyCamOne eco and is the answer not in the manual?
Questions and answers