Table of Contents
Advertisement
Quick Links
eXtrending your Vision
User Manual
Introduction
Dear customer,
Thank you for choosing Xtrend.
This user manual will assist you to install the Xtrend box successfully and to get familiar with numerous
features.
The Xtrend ET7500 and ET7000 is a new generation of Full HD Linux receiver with 2,000 DMIPS, 512MB DDR3,
and an eSATAp port, which you can also use as an USB port. You can experience unlimited possibilities with the
new Xtrend receivers.
The ET7500 and ET7000 allow you to experience various features such as web browser, media player, HbbTV,
and other multimedia features.
In order to extend your experience, you can install various plugins on your Xtrend box.
We strongly recommend reading the user manual before using your Xtrend box.
For any further questions, please visit
http://www.et-view.net
We wish you a great experience with your Xtrend Box.
Best regards,
Xtrend Team
1
Advertisement
Table of Contents

Subscribe to Our Youtube Channel
Related Manuals for Xtrend ET7500

Summary of Contents for Xtrend ET7500
- Page 1 The Xtrend ET7500 and ET7000 is a new generation of Full HD Linux receiver with 2,000 DMIPS, 512MB DDR3, and an eSATAp port, which you can also use as an USB port. You can experience unlimited possibilities with the new Xtrend receivers.
-
Page 2: Table Of Contents
Language Selection ......................... 23 Configuring Basic Setup ........................23 Check the internet connection ....................... 24 Configuring Tuner A and Tuner B (ET7500 inlcudes Tuner B Slot) ..........25 Automatic & Manual Scan ......................27 (K) System Configuration – Network-Setup ....................29 (L) Mounting HDD (For ET7500)........................ -
Page 3: (A) Safety Instructions
eXtrending your Vision User Manual (A) Safety Instructions This Linux Set-Top-Box has been designed and manufactured in compliance with EU consumer safety requirements (CE). Please read the following safety precautions carefully. 1. Connecting Power ● This product operates only in the range of AC 100V~250V and 50Hz/60Hz. Please check first your power supply to see if it fits this range. - Page 4 eXtrending your Vision User Manual 8. Lightening, Storm or Not In Use ● Unplug the product and disconnect the antenna cable during a thunderstorm or lightening, especially when left unattended and unused for a long period of time. This will prevent possible damages from power surges or lightening.
-
Page 5: (B) Main Features
1 x Common Interface 1 x Smartcard Reader (ET7000) 2 x Smartcard Reader (ET7500) Power Touch-button with 2 LED (ET7500) User-friendly Linux Menu system Various Channel editing programs (Favorite, lock, rename, delete, and sort) ... -
Page 6: (C) Specification
Vision User Manual (C) Specification Property ET7000 ET7500 2,000 DMIPS 2,000 DMIPS CPU/Memory Nand Flash 256MB 256MB DDR 3 512MB 512MB FRONT PANEL Display 2-LED VFD(dot Matrix) I/O PORTS 1 port 1 port SMART CARD 1 port 2 port... -
Page 7: (D) Packaging Contents
eXtrending your Vision User Manual (D) Packaging Contents (ET7000) Please check all package contents before using your product. ● STB ● Remote Control ● Batteries ● User Manual ● DC Power Adapter... - Page 8 Vision User Manual Packaging Contents (ET7500) Please check all package contents before using your product. ● STB ● Remote Control ● Batteries ● User Manual ● DC Power Adapter ● Sata Cable ● HDD bracket (installed) ● Screws for HDD...
-
Page 9: (E) Product Description
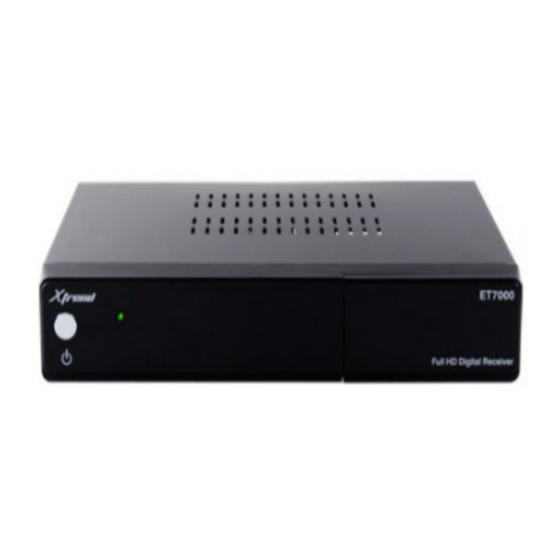
(E) Product Descriptions Front Panel (ET7000) 1. Power : Sets your Xtrend box into standby mode 2. 2 LED : Red LED will be displayed when booting/ Green LED will be displayed during operation 3. Smartcard reader slot: Insert a Smartcard... - Page 10 User Manual Product Descriptions Front Panel (ET7500) 1. Power : Sets your Xtrend box into standby mode 2. Display: Displays the current menu information. 12 character dot matrix VFD. 3. USB : Connect a USB storage device 4. CI Module slot: Insert a CAM...
- Page 11 eXtrending your Vision User Manual Rear Panel (ET7000) 1. CI Module slot: Insert a CAM 2. On/Off Switch: Power on/off. 3. Power Input : Connect DC Power Adapter 4. TUNER : DVB-S/S2 integrated 5. Composite (CVBS, L, R) : Video/Audio connection via RCA 6.
- Page 12 Vision User Manual Rear Panel (ET7500) 1. TUNER B : Plug & Play Tuner Slot for DVB-C/T/T2/S/S2 2. TUNER A : Single Tuner DVB-S/S2 integrated 3. Ethernet Port : Connect LAN connection 10/100 Mbit 4. HDMI out : HDMI output to connect to your Television 5.
-
Page 13: (F) Smartcard Reader & Ci
Vision User Manual (F) Smartcard Reader & CAM ET7000 provides a Smartcard Reader slot and ET7500 provides two Smartcard Reader slots. Insertion of Smartcard ① Open the door on the right. ② Insert Smartcard as the image below... - Page 14 User Manual Insertion of CAM (Conditional Access Module) ET7000 & ET7500 provide a CI slot. ① Insert a Smartcard into the CAM as in the image below ② Once the Smartcard inserted into the CAM, insert the CAM into the CI slot...
-
Page 15: (G) Remote Control
Vision User Manual (G) Remote Control -Type A (ET7000/ET7500) 0. Power: puts your Xtrend box to standby mode Mute: tone off/on Function: function button TV: zap to TV Mode Portal: ET-Portal Radio: zap to Radio Mode Number field... - Page 16 Vision User Manual Remote Control - Type B (ET7000/ET7500) 0. Power: switch the receiver to stand-by mode. STB: switch the remote control to receiver mode. Number field < : Navigates left on the menu options or delete << : Fast Rewind ▶ll : Play and Pause...
-
Page 17: (H) Basic Installation
A. ET7500 Tuner A & B If you have received the ET7500 with a built-in Plug & Play DVB-S2 tuner, you can connect 2x Satellite connections to Tuner B / RF IN and Tuner A / RF IN as the image below B. -
Page 18: Connecting The Tv (And Vcr)
Vision User Manual 2. Connecting the TV (and VCR) STB provides a variety of audio/video connection methods. A. Connecting TV via HDMI Cable Connect your ET7500/ET7000’s HDMI output with a HDMI Cable to your Television’s HDMI input. - Page 19 Television with RCA If you connect your Xtrend the box via audio / video (also called RCA) please follow the graphic shown below. The individual connections are color coded for both the TV and the Xtrend box. Note that if you use Component for connecting an additional audio output for the audio connection must be used.
-
Page 20: (I) Replacing Tuner (For Et7500)
User Manual (I) Replacing Tuner (For ET7500) The Xtrend ET7500 offers as standard a built-in DVB-S/S2 tuner with an additional tuner slot. The Plug and Play DVB-S/S2, DVB-C and DVB-T/T2/C tuners are all pluggable. To protect your Electronic from unwanted static discharges, they should be carefully handled only by the edge of the board. - Page 21 eXtrending your Vision User Manual [Figure 2] [Figure 3]...
-
Page 22: (J) Turn On Xtrend Et7000/Et7500
(J) Turn on Xtrend ET7000/ET7500 Wizard Guide The Wizard Guide will assist you to help configure the Xtrend ET7000/ET7500 in a simple way. Step 1. Choose Video input selection The first step of the wizard guide allows you to choose the desired Video input between HDMI, Scart, or YPbPr. -
Page 23: Language Selection
Step 2. Language Selection Xtrend provides various languages and here you can choose the main language for your Xtrend box. Use UP/DOWN key to scroll up and down to find the language you want. Use the OK button to confirm your choice. -
Page 24: Check The Internet Connection
Step 4 Check the internet connection Please connect your Xtrend receivers with a LAN connection or a WiFi USB stick (optional). Then select "Check the Internet Connection". (Fig. 5) If the Internet connection is successfully initialized, you will see an IP Address with the following message: "Your internet connection is working (ip: xxx.xxx.x.xx)"... -
Page 25: Configuring Tuner A And Tuner B (Et7500 Inlcudes Tuner B Slot)
Vision User Manual Step 5. Configuring Tuner A and Tuner B (ET7500 includes a Plug&Play Tuner B Slot) A. DVB-S/S2 Configuration Mode Using LEFT/RIGHT key, you can choose one of the following Configuration Modes: ● Not configured. ● Simple ●... - Page 26 eXtrending your Vision User Manual Fig. 8 Configuration Mode DVB-T2 Using LEFT/RIGHT key, you can choose one of the following Configuration Modes: ● Enabled ● Nothing connected Once you have set "Enabled" as a configuration, select the appropriate region for your DVB-T2 System and press the OK button (Fig.
-
Page 27: Automatic & Manual Scan
eXtrending your Vision User Manual Step 6. Automatic Scan & Manual Scan After you have configured the tuner(s), you can perform an automatic search or manual search on the desired tuner. (Fig. 10) Fig. 10 Select on which tuner you want to do an automatic or manual search. (Fig. 11) Fig.11 Manual Scan If you know well enough to configure each exact setting required for manual search of services, you can select... - Page 28 eXtrending your Vision User Manual Fig. 12 Amongst other things, the below parameters are what you need to decide prior to performing manual scan. 1. Tuner You need to decide which tuner you want to use for manual scan. 2. System Here you have two options between DVB-S (SD) and DVB-S2 (HD).
-
Page 29: (K) System Configuration - Network-Setup
Press “OK” to activate the manual scan. This will take some minutes. As the scan proceeds, you will see the progressive bar and the newly found services underneath. After an automatic or manual search, your Xtrend box is now ready for use. Press “OK” to continue. (Fig. 13) Fig. 13 (K) System Configuration –... - Page 30 If your Ethernet port is not active for any reason, please select "network restart" This option is used when you want to restart the Ethernet interface of your Xtrend box.
-
Page 31: (L) Mounting Hdd (For Et7500)
User Manual (L) Mounting HDD (For ET7500) Xtrend ET7500’s HDD bracket is designed to mount 2.5” HDD You can mount a 2.5” HDD using the already installed bracket in the image below. After inserting a 2.5” HDD on to the bracket, tighten 4 screws on the bottom side of the HDD bracket... - Page 32 Vision User Manual Insert the HDD bracket into the case of ET7500 as in the image below. Then tighten the 4 screws of the HDD bracket where 4 arrows are marked in the image below. Connect the HDD Cable with your 2.5” HDD on to your main board using the 3 connections port where 3...
-
Page 33: (M) Download And Install Plugins
eXtrending your Vision User Manual (M) Download and Install Plugins [Menu -> Plugins -> Download Plugins] In order to download and install more Plugins, please go to the Plugin Browser and press the green button on your remote control. You will be able to see a list of available plugins and you can choose which plugins you want to download and install. -
Page 34: (N) Gnu General Public License
eXtrending your Vision User Manual (N) Copyright - GNU GPL GNU GENERAL PUBLIC LICENSE Version 2, June 1991 Copyright (C) 1989, 1991 Free Software Foundation, Inc. 51 Franklin Street, Fifth Floor, Boston, MA 02110-1301, USA Everyone is permitted to copy and distribute verbatim copies of this license document, but changing it is not allowed. - Page 35 eXtrending your Vision User Manual TERMS AND CONDITIONS FOR COPYING, DISTRIBUTION AND MODIFICATION 0. This License applies to any program or other work which contains a notice placed by the copyright holder saying it may be distributed under the terms of this General Public License. The ‘Program’, below, refers to any such program or work, and a ‘work based on the Program’...
- Page 36 eXtrending your Vision User Manual In addition, mere aggregation of another work not based on the Program with the Program (or with a work based on the Program) on a volume of a storage or distribution medium does not bring the other work under the scope of this License.
- Page 37 eXtrending your Vision User Manual 7. If, as a consequence of a court judgment or allegation of patent infringement or for any other reason (not limited to patent issues), conditions are imposed on you (whether by court order, agreement or otherwise) that contradict the conditions of this License, they do not excuse you from the conditions of this License.
- Page 38 eXtrending your Vision User Manual HOLDERS AND/OR OTHER PARTIES PROVIDE THE PROGRAM ‘AS IS’ WITHOUT WARRANTY OF ANY KIND, EITHER EXPRESSED OR IMPLIED, INCLUDING, BUT NOT LIMITED TO, THE IMPLIED WARRANTIES OF MERCHANTABILITY AND FITNESS FOR A PARTICULAR PURPOSE. THE ENTIRE RISK AS TO THE QUALITY AND PERFORMANCE OF THE PROGRAM IS WITH YOU.SHOULD THE PROGRAM PROVE DEFECTIVE, YOU ASSUME THE COST OF ALL NECESSARY SERVICING, REPAIR OR CORRECTION.
Need help?
Do you have a question about the ET7500 and is the answer not in the manual?
Questions and answers