Table of Contents
Advertisement
Quick Links
User's Guide
for Echo
III Desktop
™
Thunderbolt
Support Note:
This document was up to date at the
time of printing. However, changes to the hardware or
software may have occurred since then. Please check the Sonnet
website for the latest documentation.
1. Go to www.sonnettech.com/support/kb/kb.php
2. Navigate to and click the Echo III Desktop link.
3. Click the Manual link.
4. Click the Echo III Desktop User's Guide [English] link and then
check the Document Version information. If the version listed is
later than this document (revision A), click the Download Now
button for the latest version.
3
to PCIe
™
®
Card Expansion System
For
Windows
Advertisement
Table of Contents

Summary of Contents for Sonnet Echo III
- Page 1 2. Navigate to and click the Echo III Desktop link. 3. Click the Manual link. 4. Click the Echo III Desktop User’s Guide [English] link and then check the Document Version information. If the version listed is later than this document (revision A), click the Download Now button for the latest version.
-
Page 2: Table Of Contents
Preparing to Use the Echo Chassis With a Mac Computer Preparing to Use the Echo Chassis With a Windows Computer Preparing to Use the Echo Chassis With a Linux Computer 2 Echo III Desktop Description Exterior Inner Assembly Thunderbolt 3 (40Gbps) Cable... -
Page 3: Introduction And System Requirements
Preparing to Use the Echo Chassis With a Mac Computer Congratulations on your purchase! The Echo III Desktop is a Thunderbolt 3 expansion system for PCIe cards. Through its The drivers required to support the Echo chassis are installed as PCIe slots, you may connect three non-GPU adapter cards to any part of macOS;... -
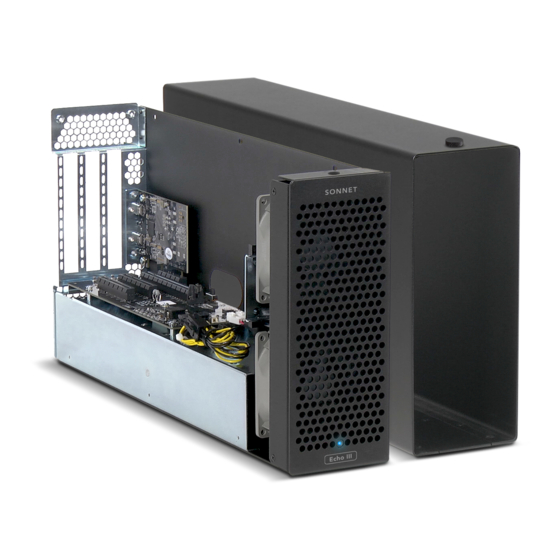
Page 4: Echo Iii Desktop Description
1 – Power Indicator LED 3 – Threaded Nuts for ThunderLok 3 This indicator lights when the Echo III Desktop is powered, the Attach the included Thunderbolt connector retainer clip here. Thunderbolt cable between the chassis and your computer is Also compatible with ThunderLok 3L. -
Page 5: Thunderbolt 3 (40Gbps) Cable
Echo module’s Thunderbolt 3 ports to prevent accidental cable disconnection. This clip is compatible with Sonnet 0.5- and 0.7-meter Thunderbolt 3 cables, but not with Sonnet 1- or 2-meter Thunderbolt 3 cables. * PCIe 2.0 slot when PCIe Gen 3/Gen 2 (HDX) Mode Switch... -
Page 6: Pcie Card Installation And Chassis Setup Steps
Chapter 3 – PCIe Card Installation and Chassis Setup Steps 1. Remove the Echo III Desktop from its packaging, and then set it on a flat, level surface. 2. Using a Phillips screwdriver, remove and set aside the four screws securing the bottom of the enclosure to the Echo III Module (Figure 1). - Page 7 Chapter 3 – PCIe Card Installation and Chassis Setup Steps 10. Remove a PCIe card from its packaging, handling the card by its edges and without touching any components or gold connector pins. 11. Line up the card’s connector with the slot, and then gently but firmly press the card straight into the slot;...
- Page 8 20. Connect the included power cord between a wall outlet or power strip and the Echo chassis’ power socket. Note that the Echo III Desktop chassis’ power indicator will not light until the computer and any other Thunderbolt device connected between it and the Echo chassis is powered on.
-
Page 9: Complete Setup And Configuration
This page instructs Mac users how to verify the Echo chassis and installed cards are recognized by the computer; Windows users should skip to the next page. A – Confirm the Echo III Desktop Chassis is Recognized 1. With the Echo chassis powered and connected to the computer, turn on the computer. -
Page 10: Setup And Configuration Steps-Windows Users
Chapter 4 – Complete Setup and Configuration SETUP AND CONFIGURATION STEPS—WINDOWS USERS A – Confirm the Echo III Desktop Chassis and Installed Cards Are Recognized 1. With the Echo chassis connected to a power source and to the computer, turn on the computer. Note that if there... -
Page 11: Tips, General Information, And Known Issues
) are NOT compatible for connecting the Echo chassis to There’s No Need to Unplug the Power Cable the computer. Because the Echo III Module automatically powers on and off with KNOWN ISSUES the computer to which it’s connected, there’s no power switch, nor is there any need to disconnect the power cable under normal use. -
Page 12: Precautions, Fcc Compliance, And Support Information
©2020 Sonnet Technologies, Inc. All rights reserved. Sonnet, the Sonnet logotype, Allegro, and Echo are trademarks of Sonnet Technologies, Inc. Mac, the Mac logo, MacBook Air, MacBook Pro, and macOS are trademarks of Apple Inc., registered in the United States and other countries. Thunderbolt and the Thunderbolt logo are trademarks of Intel Corporation in the U.S.
Need help?
Do you have a question about the Echo III and is the answer not in the manual?
Questions and answers