Table of Contents
Advertisement
Quick Links
Advertisement
Table of Contents

Subscribe to Our Youtube Channel
Summary of Contents for ROBBE TAK5-SA2-KFA-27-F1
- Page 1 September 2003 Instruction Manual Automatic Calf Feeder Stand Alone 2 Plus Combi with Concentrate Feeder and Animal Scales As of Program Version 00.16 TAK5- -SA2- -KFA- -27- -F1 TAK5- -SA2- -KFA- -28- -P1 TAK5- -SA2- -KFA- -30- -P1 TAK5- -SA2- -KFA- -32- -P1 TAK5- -SA2- -KFA- -38- -P1...
-
Page 3: Table Of Contents
Table of contents 1 Introduction ............1.1 Icons Used in This Manual . - Page 4 Table of contents 7.6 Filling the Milk Storage Tank ............8 Basic Inputs during Installation .
- Page 5 Table of contents 9.4.1 The Long Electrode is free ........... 9.4.2 The Long Electrode is Covered .
- Page 6 Table of contents 13.2.5 Visits ..............13.2.6 Animal Scales .
- Page 7 Table of contents 18.2 The Heat Exchanger Is Not Active ..........18.3 The Feeding Mode Cuts Off .
-
Page 8: Introduction
Introduction 1 Introduction 1.1 Icons Used in This Manual The little graphic pictures that frequently appear in the margin of this book should give you a better overall view on the user’s manual. Attention: The exclamation point within an equilateral triangle is intended to alert you to follow the instructions contained in this manual in order to avoid injury and damage to persons, animals and appliance. -
Page 9: Safety Instructions
Introduction 1.2 Safety Instructions Read and understand the instruction manual and all safety instructions before using the equipment. Use the equipment only to feed calves. The equipment is to be serviced by trained and authorized personnel only. To facilitate servicing, store the instruction manual next to the equipment. Expert installation, correct handling, as well as careful care and maintenance are the pre- requisits to ensure faultless functioning of the equipment. -
Page 10: Safety Signs On The Automatic Feeder And The Concentrate Feeder
Introduction 1.3 Safety Signs on the Automatic Feeder and the Concentrate Feeder WARNING! Crush and cut hazard. Moving parts starting automatically can crush and cut. Keep hands and fingers clear before operating! This sign is located on potential danger areas on the automatic feeder, such as the milk powder hopper, the milk powder outlet, the mixer as well as the outlet for powder additives on the additive dispenser. -
Page 11: Construction Parts Stand Alone Combi
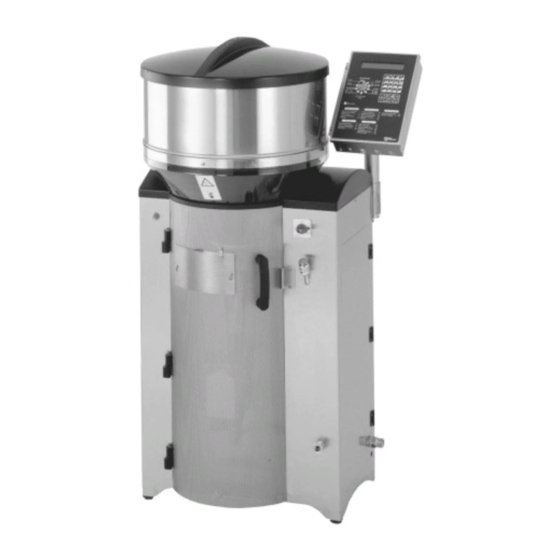
Construction Parts Stand Alone Combi 1.5 Construction Parts Stand Alone Combi Milk powder hopper with top section Control: Operating unit with processor Quick coupling for suction hose cleaning (not illustra- ted) Push- - button for Main switch „ON/OFF“ feeding pump Nameplate Milk- - resp. -
Page 12: Construction Parts Concentrate Feeder
Construction Parts Concentrate Feeder 1.6 Construction Parts Concentrate Feeder Storage tank for concentrate (with top section) Feeding bowl Dimensions of the concentrate feeder: Height = approx. 955 mm, width = approx. 496 mm, depth without feeding bowl = approx. 383 mm, depth with feeding bowl = approx. 650 mm. Light Emitting Diode (LED) for reed switch Adjustable plate with reed switch... - Page 13 Construction Parts Concentrate Feeder Master- -control Slide switch for adlib or Coding switch to set the baud rate restricted mode (Control unit at the rear of the Master- - Program chip RESET key Concentrate feeder) Interface card RS 422 (for connection to Stand Alone) LED (green) for data exchange...
-
Page 14: Control Of The Automatic Feeder
Control of the Automatic Feeder 1.7 Control of the Automatic Feeder 1.7.1 Operating and Control Unit (with Motherboard) On the operating and control unit are located the following operating elements: program switch, keyboard, manual keys and display. The boards for display, keyboard, distribution as well as the motherboard are located inside the operating and control unit of the automatic feeder. -
Page 15: Power Unit Combi
Control of the Automatic Feeder 1.7.2 Power Unit Combi Relay board as well as distribution board are located next to each other inside the power unit. 1.7.2.1 Relay Board On the relay board are located the transformer for weak current supply of the processor control, the relays, the connectors for external components, the fuses and LEDs. -
Page 16: Distribution Board
Control of the Automatic Feeder 1.7.2.2 Distribution Board On the distribution board are located, among other things, two integrated switches. By means of the left switch you can switch on and off the heating of the milk powder outlet (vapour screen). By means of the right switch you can switch on and off the heating cable. See chapter 8.7, page 56, „Heating for Milk Powder Outlet and Protection against Frost“. -
Page 17: Heat Exchanger With Separate Heating Circuits For Milk And Water
Heat Exchanger with Separate Heating Circuits 1.8 Heat Exchanger with Separate Heating Circuits for Milk and Water Mixer jar to mix up the feed components Stop valve Heat exchanger with Sucking station for stainless steel coil. milk distribution Mixer outlet valve Milk pump to deliver Hose connection to water line and dose the milk... -
Page 18: Manual Feeding Pump
Manual Feeding Pump 1.10 Manual Feeding Pump Thanks to the manual feeding pump calves may get easily accustomed to the teat. The fee- ding pump is located between mixer exit and feeding station. You can activate it by pushing a button at the lower side of the chassis or at the feeding station. The milk is then delivered directly from the mixer to the teat and into the mouth of the calf. -
Page 19: Technical Data Of The Automatic Feeder
Technical Data of the Automatic Feeder 2 Technical Data of the Automatic Feeder Please observe the information on the nameplate located at the left of the chassis! Electrical Connection TAK5- -SA2- -38- -P1, TAK5- -SA2- -27- -F1 (400 V) 230V / 400V / 3 / N / PE, 50 Hz, 16 A TAK5- -SA2- -27- -F1 (230 V) 230V / L / N / PE, 50 Hz, 16 A TAK5- -SA2- -32- -P1... - Page 20 Technical Data of the Automatic Feeder Number of feeding stations An automatic feeder can feed 20 - - 30 rearing calves or 15 - - 20 fattening calves per feeding station. In case of two feeding stations an automatic feeder can provide approx. 50 - - 60 rea- ring calves or 20 - - 30 fattening calves or 20 rearing calves and 15 fattening calves with feed.
-
Page 21: Specifications Concentrate Feeder
Kalibrieren 3 Specifications Concentrate Feeder Electrical connection Safety transformer according to VDE 0551 Power supply: Mains voltage: 230 V/50 Hz Output voltage: safety low voltage 24 V AC Power: 72 VA safety class IP 54 Safety low voltage 24 V AC, power consumption: 48 W Master: Safety low voltage 24 V AC, power consumption: 36 W Slave:... -
Page 22: Locating The Automatic Feeder
Locating the Automatic Feeder 4 Locating the Automatic Feeder 4.1 Local Electrical Connection The local electrical connection must be installed by qualified electricians. Observe local regulations and protective measures. A fault- -current circuit breaker (30 mA) in the local power supply is compulsory to operate the automatic feeder. The automatic feeder requires its own power supply: refer to chapter 2, page 19, „Technical Data“. -
Page 23: Mounting The Feeding Station
Mounting the Feeding Station 4.3 Mounting the Feeding Station Install the feeding station max. 70 cm above the calf house ground. Mount the teat approx. 15 cm above the suction hose connection to the mixer. Fix the suction hose in such a way, that the mixer jar can be easily tipped in forward direction. -
Page 24: Mounting The Race--Way
Mounting the Race--Way 4.4 Mounting the Race- -Way Mount an appropriate race- -way in front of the sucking station resp. of the concentrate feeder, to protect a calf from being pushed aside by other calves. Mount the race- -way according to mounting instructions. -
Page 25: Connecting The Micro--Identification
Mounting the Race--Way 4.5 Connecting the Micro- -Identification Connect the micro- -identification according to mounting instructions. Install the cable for the micro- -identification in such a way that calves cannot touch it. 4.5.1 Identification „Mikro- -Nedap“ In case of „Mikro- -Nedap“: carefully check the wiring as well as the program chip. Check the identification range of the antennas by means of an antenna test (refer to chapter 8.8.3, page 58 ff, „Automatic Reading of the Responder Number and Antenna Test“). -
Page 26: Water And Milk Connection
Water and Milk Connection 4.6 Water and Milk Connection Water connection Milk connection 4.6.1 Water Connection Connect the 1/2“ water hose to the 3/4“ hose coupling at the right of the automatic feeder. The water pressure supplied by the customer has to be between 2.5 and 6 bar. Note : To ensure troublefree functioning of the automatic feeder, take care that the water pressure does not fall below 2.5 bar! -
Page 27: Milk Connection
Water and Milk Connection 4.6.2 Milk Connection Convey the milk from the milk storage tank straight to the automatic feeder. If long pipes are inevitable, use larger diameters. Install the connection for the milk pipe at the bottom of the milk tank. Air- -containing pipes, very long and thin, as well as thin- -walled pipes being prone to con- tract, lead to untimely switching- -off or change- -over of the system. -
Page 28: Locating The Concentrate Feeder
Locating the Concentrate Feeder 5 Locating the Concentrate Feeder Connection of the concentrate feeder: refer to wiring diagram. Place the concentrate feeder in a location where you can easily fill in the concentrate and carry out service. The distance between Master- -Station and Slave- -Station must not exceed 6 m. 5.1 Mounting the Concentrate Feeder Mount the feeding bowl max. -
Page 29: Filling The Concentrate Feeder
Locating the Concentrate Feeder 5.2 Filling the Concentrate Feeder You can fill the concentrate feeder with pellets, calf flakes and crushed or coarsely milled grain. Fine- -milled fodder or fodder with a high oat content may cause bridging. This can possibly lead to malfunctioning of the concentrate feeder. - Page 30 Locating the Concentrate Feeder Adjusting the dosing flap Remove the cover next to the feeding bowl. Dosing flap Adjustable plate with reed switch Only loosen the upper screw on adjustable plate with reed switch (refer to above drawing). Move the adjustable plate up- - or downward to change the position of the dosing flap. Upward: less fodder in the bowl.
-
Page 31: Operation And Operating Elements
Operation and Operating Elements 6 Operation and Operating Elements 6.1 Operating Elements 6.1.1 Program Switch and Switch Menu Turn the program switch to select the switch menus (switch position 1 to 9). Switch Menu 6.1.2 Keyboard and Keyboard Menu Turn the program switch to position 10 to select the keyboard menus. If the program switch is on position 2 - - 10 the keyboard is active. - Page 32 Operation and Operating Elements You will find the keyboard menus at the lower part of the operating unit. Turn the program switch to position 10. The display shows: keyboard input: Enter the number of the desired menu. The number of the se- 5# setup lected keyboard menu appears at the upper left of the screen.
- Page 33 Operation and Operating Elements If you activate the feeding pump simultaneously, the liquid in the mixer jar will be pumped off via the box valves and the feeding stations or the mixer outlet valve. ”Escape“ brings you back, step by step, to the menu. ”Extra”...
-
Page 34: Manual Keys
Operation and Operating Elements 6.1.3 Manual Keys Press the manual keys in order to activate the corresponding functions regardless of the con- trol. Mixer motor Powder motor Detergent dosing pump Additives Mixer outlet valve Water solenoid valve Milk pump Milk solenoid valve In order to save the sealing, make sure that the mixer never runs without liquid! -
Page 35: Input Routine
Input Routine 6.2 Input Routine Keep the function table at your fingertips. Function table At the left of the function table „Switch Menu“ are listed the names of the main menus cor- responding to the relevant position of the program switch. At the right of them are indicated the submenus and the corresponding messages displayed on the screen. -
Page 36: Exercises Concerning The Switch Menus
Input Routine 6.2.1 Exercises Concerning the Switch Menus Turn the program switch to 5 = calibration. The first submenu calibration „Water boiler“ is displayed. water boiler Press Arrow Up or Arrow Down to move to further submenus calibration (Water HE, Milk, MP, Additives, Detergent). water boiler Press Arrow Right to move to the following screen. -
Page 37: Start- -Up
Start--Up 7 Start- -Up 7.1 Connecting the Mains Plug Warning: Before switching on the heating, fill up the heat exchanger, otherwise the boiler will be damaged. There will be no guarantee for a reliable functioning of the automatic feeder. Open the door on the right- -hand side of the automatic feeder. Turn back both thermostats to zero and turn the main switch „ON/OFF“... -
Page 38: Dry--Running Protection For Circulation Pump (If Available)
Start--Up 7.3 Dry- -Running Protection for Circulation Pump (if available) Open the door on the right- -hand side of the automatic feeder. Plug in the connecting plug of the circulation pump only after you have filled the heat exchanger with water. Circulation pump connect 7.4 Deaerating the Circulation Pump (if available) -
Page 39: Filling The Milk Storage Tank
Start--Up There is no warning when the powder hopper is empty! The automatic feeder continues working in the feeding mode without milk powder. 7.6 Filling the Milk Storage Tank The milk has always to be clean. Straw, hay or other foreign material reduce the operational reliability considerably. -
Page 40: Basic Inputs During Installation
Basic Inputs during Installation 8 Basic Inputs during Installation 8.1 Checking Date and Time When installing the automatic feeder first of all you have to check and, if necessary, change date and time in the keyboard menu „Machine Data“. Time goes on, even after the machine has been switched off. - Page 41 Basic Inputs during Installation The display shows the following message: instruction manual read ? no Select „yes“ and press ENTER to confirm the input. instruction manual read ? yes After „New installation“ has been carried out, the message 99#new installation „finished“...
-
Page 42: Setup
Setup 8.3 Setup In Setup you can select the additional functions concerning concentrate, animal scales, heat exchanger and printing and enter the baud rate for the PC and the concentrate feeders. In addition, in this menu you can test the interfaces, register and cancel the feeding stations. In Setup you can also set the draining time. -
Page 43: Setting The Baud Rate For Pc And Concentrate Feeder
Setup Here you can select whether the concentrate has to be dispen- 5# dosing code sed proportionately to the concentrate plan or the concentrate C-plan^ consumption. Enter the concentrate amount to be dispensed by the screw- - 5# dosing code conveyor after the dosing flap has been released. -
Page 44: Selecting The Printing Function
Setup Press ENTER to confirm the input. 5# baud rate 19200 baud ^ Standard value for baud rate: 19200 baud Set the transmission speed at the Master station of the concentrate feeders by means of the DIP switches. The value entered into the Stand Alone feeder must correspond with the setting of the DIP switches at the concentrate feeder. -
Page 45: Selecting The Animal Scales
Setup case you have to enter the corresponding output of the serial multiplexer that is connected to the printer. Printer channel 0 means that no serial multiplexer is connected. 8.3.4 Selecting the Animal Scales Press Arrow Up or Arrow Down to select menu „Animal Sca- 5# setup les“. -
Page 46: Carrying Out An Interface Test
Setup Put a weight on the scales (in case of 50 kg e. g. two sacks of 50 kg put on milk powder). Press Start/Stop once again. The display scales..... shows: The tare value is automatically set for the connected half- - HW1 tare value body scales. -
Page 47: Portion
Setup Enter „yes“ to register the feeding station and press ENTER 5# box no. to confirm the input. available ? yes The feeding stations 1 and 2 are registered as a standard (yes). If the milk is delivered over a long distance, it is useful to prolong draining time. This ensu- res that the mixer jar is entirely emptied after the last portion has been consumed. -
Page 48: Heat Exchanger
Setup Mixer run time In submenu „Mixer run time“ you can extend the standard mixing time by up to 16 seconds. How long and whether mixer run time should be extended depends on milk powder’s solu- bility. Press Arrow Up or Arrow Down to select menu „Mixer run mixer run time time“. -
Page 49: Activating Compressed Air--Cleaning
Setup Enter the detergent amount in switch menu 2 = rinsing, submenu „Settings, Cleaning Settings, Detergent“. 8.3.10 Activating Compressed Air- -Cleaning If the automatic feeder is equipped with a device for compressed air- -cleaning, make sure that you have activated it in Setup. Press Arrow Up or Arrow Down to select menu „Air Clea- 5# setup ning“. -
Page 50: Connection Test Towards The Concentrate Feeder
Connection Test towards the Concentrate Feeder 8.4 Connection Test towards the Concentrate Feeder Carry out a connection test after expert installation of the cable that connects the Stand Alone to the concentrate feeders. Turn program switch to 10 = keyboard. Enter 49 and press ENTER to confirm the input. -
Page 51: Calibration
Calibration 8.5 Calibration 8.5.1 Calibrating Water, Milk, MP and Detergent Calibration is defined as the input into the computer of the amount of water, milk , MP and detergent dispensed during a specific time. Turn the program switch to 5 = calibration. calibration water boiler Select submenu „Water Boiler“, „Water HE“, „Milk“, „MP“... -
Page 52: Calibrating Additives
Calibration For all other liquid and powder components, proceed as for boiler water. Repeat the calibration process in order to be sure that the dispensed quantity is correct. 8.5.2 Calibrating Additives If the automatic feeder is equipped with an additive dispenser, you have to calibrate the ad- ditives, too. -
Page 53: Calibrating The Concentrate
Calibrating the Concentrate 8.5.3 Calibrating the Concentrate The concentrate has to be calibrated separately for each concentrate station. Clean the feeding bowl. Press the calibration key at the corresponding concentrate station and wait until dosing switches off automatically. Remove the entire quantity from the feeding bowl and weigh it. The quantity to be calibrated is distributed only if no animal is staying within the identifica- tion range of the feeding station. -
Page 54: Setting The Heating
Setting the Heating 8.6 Setting the Heating It is imperative to fill the heat exchanger with water before switching the heating on! Thermostat for minimum operating temperature and heating: The thermostat for minimum operating temperature prevents too cold milk or water from being dispensed. -
Page 55: Recommendations For Temperature Settings
Setting the Heating 8.6.2 Recommendations for Temperature Settings The heat exchanger is designed in such a way that also cheaper milk powders with higher fat melting point can be used without problems. In this case, the outlet temperature has to be exactly between 42°C and 43°C. -
Page 56: Heating For Milk Powder Outlet And Protection Against Frost
Setting the Heating 8.7 Heating for Milk Powder Outlet and Protection against Frost Before opening the power unit you have to make the automatic feeder currentless, in order to avoid electric shocks. To this end, turn the main switch to position „0“/„OFF“ or pull the mains plug. -
Page 57: Animal Identification And Responder Number Input
Animal Identification 8.8 Animal Identification and Responder Number Input 8.8.1 Animal Identification Ear tag- - Responder Mikro- - Nedap or Mikro- - Tiris Collar Mikro- - Nedap or 4576 4576 Mikro- - Tiris 4576 4576 Each animal has to wear a collar with a Responder or an ear tag Responder in order to be identified. -
Page 58: Check Connection Between Micro--Identification And Stand Alone
Animal Identification 8.8.2 Check Connection between Micro- -Identification and Stand Alone If the micro- -identification is connected correctly, in switch position „Feeding mode“ the display will show the symbol in the second line of the screen, as soon as an animal is identified. -
Page 59: Manual Input Of Responder Numbers
Animal Identification case of micro- -identification „Mikro- -Tiris“, install a screening of the antennas by means of earthed metal sheet plates. If necessary, close off the area beside the feeding station. Move to the next screen. Set the input or reading sensitivity squelch antenna of the antennas. -
Page 60: Registering The Animals
Registering the Animals 8.9 Registering the Animals At animal registration the animals are allocated to several feeding groups according to their animal numbers. You can choose between individual, group or automatic registration. The animals can be allocated to four different groups (A, B, C, D), thus being fed group- -specifi- cally. - Page 61 Registering the Animals Enter animal’s weight and press ENTER to confirm the input. 12B^ weight 55 kg LWG +561 g/day It is indispensable to key in animals’ weight if during the feeding period weight- -dependent additive prescriptions are fed. This ensures that the animals automatically get the additive amount corresponding to their weight.
-
Page 62: Registering Groups
Registering the Animals 8.9.2 Registering Groups If the livestock is homogeneous (gender, age, weight) you can register several animals si- multaneously in a group. Turn the program switch to 6 = animal data and Info. animal data & Info weight, days fed^ Select submenu „Register groups“. -
Page 63: Registering Automatically
Registering the Animals 8.9.3 Registering Automatically Automatic registration shortens and simplifies the registration process of the animals. Contrary to the registration of individual animals or groups, in this menu there is no need to enter animal numbers and animal- -specific data, such as e.g. weight and estimated daily weight gain. -
Page 64: Entering The Correction Days
Entering the Correction Days 8.10 Entering the Correction Days The correction days are intended to shift each animal to any point of the relevant curve of e.g. the feeding plan and the concentration plan. Refer to chapter 10 ff, page 78 ff, „Altering the Operational Data“). -
Page 65: Entering Deviations (Addition/Reduction)
Entering Deviations (Addition/Reduction) 8.11 Entering Deviations (Addition/Reduction) In this menu you can change the milk quantity, the concentration- -, the concentrate or the additive amount for each individual animal. The submenus relating to the additives are displayed only if at least one animal gets an addi- tive. -
Page 66: Deviations Of Concentration
Entering Deviations (Addition/Reduction) 8.11.2 Deviations of Concentration Select submenu „Concentration“. +/- deviation concentration Go to the next screen. The first line contains information on 14C^ conc: 120 g/L the current concentration. In the second line you can raise or 0 days +0 g/L reduce the concentration for a certain number of days (starting from the concentration plan). -
Page 67: Deviations Of Additives
Entering Deviations (Addition/Reduction) 8.11.4 Deviations of Additives This submenu is displayed only if additive distribution is active. Select submenu „Additives“. +/- deviation additives ^ Go to the next screen. In the first line are displayed the num- 14C^ X1 20g/100kg ber of the active prescription (X 1- -4), whether an electrolyte 0 d. -
Page 68: Accustoming Aid
Accustoming Aid 8.12 Accustoming Aid If the automatic feeder is equipped with two feeding stations, one station can be temporarily blocked in order to allow undisturbed accustoming at the other feeding station. Turn the program switch to 10 = keyboard. Enter 4 and press ENTER to confirm the input. -
Page 69: Functioning Of Automatic Feeder And Concentrate Feeder
Functioning of Automatic Feeder and Concentrate Feeder 9 Functioning of Automatic Feeder and Concentrate Feeder After the animals (A, B, C, D) have been registered in a group, they are fed according to the corresponding plans. The current drinking or concentrate entitlement is determined in the interval feeding system according to the corresponding plan. -
Page 70: Preparing The Milk Portions
Preparing the Milk Portions Carryover: If an animal does not entirely consume the available feed quantity until midnight, there will be a quantity left that is carried over to the following day. Consequently, at midnight the va- lue is not zero but it corresponds to the carryover. The quantity exceeding the carryover is not transferred to the next day but it is cancelled. -
Page 71: Distributing The Milk
Distributing the Milk 9.2 Distributing the Milk As soon as the level electrode is free (long electrode), the machine starts preparing the next portion. 9.2.1 In the Restricted Mode The electrode is free: If an entitled animal enters the feeding station and is identified, the automatic feeder prepa- res a milk portion as soon as the mixer jar is empty. -
Page 72: Distributing The Concentrate
Distributing the Concentrate 9.3 Distributing the Concentrate The concentrate feeder distributes the next portion as soon as the dosing flap in the feeding bowl is not covered anymore. 9.3.1 In the Restricted Mode A concentrate portion is dispensed as soon as an entitled animal enters the concentrate sta- tion and is identified. -
Page 73: Releasing An Extra--Portion
Releasing an Extra--Portion 9.4 Releasing an Extra- -Portion 9.4.1 The Long Electrode is free If the long electrode is free, in switch position „Feeding Mode“ you can manually release any number of milk portions whatever. These milk portions are neither deducted from the feed entitlement nor they are stored by the program. -
Page 74: The Long Electrode Is Covered
Releasing an Extra--Portion If the milk portions have been dispensed into a separate con- extra-portion finish. tainer (e.g. a bucket), after dispense of the last portion the dis- continue with 0/C play will show: To dispense any further milk portion, enter the desired output quantity and concentration and repress „Start“. -
Page 75: Feed Delay/Delete Consumption
Feed Delay/Delete Consumption 9.5 Feed Delay/Delete Consumption You can delete feed delay as well as milk and concentrate consumption for each individual animal and for each group. If an animal has already claimed the maximum milk quantity, feed delay will prevent it from excessive milk or concentrate consumption. -
Page 76: Delete Consumption For The Entire Group
Feed Delay/Delete Consumption 9.5.2 Delete Consumption for the Entire Group Go to the next screen. 3A^consum.group A^ delete Select the group. 3A^consum.group A^ delete Select „yes“. Press ENTER to confirm the input. 3A^consum.group A^ delete 9.5.3 Delete Consumption for Individual Animals Move to the next screen. -
Page 77: Daily Calculation
Daily Calculation 9.6 Daily Calculation Daily calculation takes place every day at midnight, thus completing the feeding day. At daily calculation the date, feeding days and remaining days (until the end of the plan) are updated, the carryover is transferred to the next feeding day, the alarms are calculated, the weight is updated, the milk ratio is checked,... -
Page 78: Altering The Operational Data
Altering the Operational Data 10 Altering the Operational Data Operational data are defined as those data concerning milk- - and concentrate distribution, such as e.g. feeding plans, alarm levels etc. During installation (after „New Installation“) the standard values are used as operational data. These standard values are empirical. You can alter them at any time according to the needs of each individual animal. - Page 79 Altering the Operational Data Press ENTER to confirm the input. Enter the start and end value of period 1 in litres and press 10# A per.1 4 days ENTER to confirm the input. Enter and confirm separately fr. 5.0L to 6.0L the figures preceding the decimal point.
-
Page 80: Weaning
Altering the Operational Data 10.1.2 Weaning In this submenu you can select whether the individual animal groups are to be weaned ac- cording to the feeding plan, to concentrate consumption or to weight (provided that the au- tomatic feeder is equipped with a concentrate feeder or an animal scales previously selected in Setup). - Page 81 Altering the Operational Data Go to the next screen. 45# A start: 0.5 kg end: 2.0 kg Press ENTER. Enter the initial value for the beginning of 45# A start: 0.6 kg weaning. end: 2.0 kg Press ENTER to confirm the input. If the initial value is not attained, the animal will be fed according to the feeding plan.
-
Page 82: Concentration Plans
Altering the Operational Data 10.2 Concentration Plans You can enter one concentration plan splitted up into 5 periods (P1- -P5) for each of the four groups (A, B, C, D). See the annex of this instruction manual. The periods of the concentra- tion plans are not bound to the periods of the feeding plans. -
Page 83: Concentrate Plans
Altering the Operational Data 10.3 Concentrate Plans Two concentrate types (C 1 and C 2), such as e.g. calf starter or farm- -derived coarse meal mix can be fed, provided that two concentrate feeders have been installed. For settings, see chapter 8.3.1, page 42, „Setup, Activating the Concentrate“). - Page 84 Altering the Operational Data Press Arrow Right to move to period 2. 40# A per.2 42 days fr. 0.5 to 2.0kg Press ENTER and enter the duration of period 2. Press ENTER to confirm the input. Enter the start and end value of the concentrate quantity in kg. Press ENTER to confirm the input.
-
Page 85: Entitlement Intervals
Entitlement Intervals 10.4 Entitlement Intervals The day quantity of milk or concentrate is divided by the number of entitlement intervals. Example: If an animal is entitled to 10 liters between midnight and 8 p.m., this entitlement (in case you entered 20 entitlement intervals) will increase at each feeding interval (1 hour) by 0.5 L. -
Page 86: Concentrate Intervals
Entitlement Intervals 10.4.2 Concentrate Intervals Turn the program switch to 10 = keyboard. Enter 44. Press ENTER to confirm the input. 44# C intervals for group A^ Select the group. 44# C intervals for group B^ Press Arrow Right to move to the next screen. Press ENTER. 44# B 1. -
Page 87: Limited Quantities
Limited Quantities 10.5 Limited Quantities The limited quantities control the assignment of milk and concentrate by the entitlement intervals. They are based on standard values with which the automatic feeder operates. Minimum saved quantity: The milk quantities are continuously saved during the day according to the interval feeding time system. -
Page 88: Minimum Save--Up Quantity And Maximum Quantity For Milk
Limited Quantities Carryover: If an animal does not consume the total milk- - or concentrate amount, the remaining quan- tity will be carried over to the following day. Consequently, the value at day- -shift is not zero but it corresponds to the carryover. The carryover can be bound to the minimum save- - up quantity, i.e. -
Page 89: Carryover Of The Milk
Limited Quantities Standard values for minimum save- -up quantity and maximum quantity of the groups A, B, C and D: Period Minimum save- -up quantity Maximum quantity Group A 14 days 1.5 L 2.0 L 14 days 2.0 L 2.5 L 49 days 2.5 L 3.0 L... -
Page 90: Limited Quantities For Concentrate
Limited Quantities 10.5.3 Limited Quantities for Concentrate Turn the program switch to 10 = keyboard. Enter 42 and press ENTER. 42# concentrate minimum save up^ Select submenu „Minimum Save Up“. 42# concentrate minimum save up^ Press Arrow Right to go to the next screen. 42# save up group A^ Select the group. -
Page 91: Carryover Of The Concentrate
Limited Quantities 10.5.4 Carryover of the Concentrate Select submenu „Carryover“. 15# concentrate carryover ^ Move to the next screen. carryover Gr.A^: no Select the group. carryover Gr.A^: no Select „yes“ or „no“. Press ENTER to confirm the input. carryover Gr.A^: yes „Carryover, yes“... -
Page 92: Warning Levels
Warning Levels 10.6 Warning Levels The warning levels determine the warning threshold, i.e. the time or the value when a war- ning is triggered. All warning levels are fixed per group. Chapter 14 „Warnings“, page 117 contains more detailed information on the different types of warnings. -
Page 93: Warning Levels For Concentrate
Warning Levels Enter the warning level for breaks with additive. Press EN- TER to confirm the input. Standard values for all four groups: Consumption 80 % Feeding speed 70 % Breaks without additive 2 Breaks with additive 2 10.6.2 Warning Levels for Concentrate Select submenu „Concentrate“. -
Page 94: Machine Data: Station Number
Machine Data: Station Number 10.7 Machine Data: Station Number The station number is an internal company designation of the automatic feeders for plants with more than one automatic feeder. It facilitates identification of each individual automa- tic feeder connected to the PC- -program „KalbManager“ or in case one printer is used for several feeders. -
Page 95: Restricted/Ad Libitum Mode
Restricted/Ad Libitum Mode 10.8 Restricted/Ad Libitum Mode By standard the automatic feeder operates in the restricted mode. Yet you can also commute to the ad libitum mode. In the restricted mode the automatic feeder operates with animal identification, i.e. the an- Restricted imals are fed individually and in a restricted way and all data are recorded per animal. -
Page 96: Restricted/Ad Libitum Mode (Concentrate Feeders)
Restricted/Ad Libitum Mode 10.8.2 Restricted/Ad Libitum Mode (Concentrate Feeders) Set the slide switch located on the Master board to the desired position. ADLIB Slide switch RESET- - Taste Press the RESET- -key. -
Page 97: Milk Functions
Milk Functions 11 Milk Functions In menu „Milk functions“ you can carry out all settings relating to fresh milk feeding. 11.1 Selecting the Milk Mode Turn the program switch to 10 = keyboard. Enter 3 and press ENTER to confirm the input. 3# milk functions^ Press Arrow Right to go to the next screen. -
Page 98: Activating Milk Expelling
Milk Functions Press ENTER to confirm the input. After the automatic feeder has commuted to the milk powder mode resp. the milk/water- -mix- -mode, the missing milk will be replaced by water and MP. The concentration of a feeding portion is always taken from the concentration plan. If the entered concentration value is below or above the milk value, either water or MP will be added to the milk. -
Page 99: Selecting The Milk Ratio For Change--Over To Single Heating Circuit
Milk Functions 11.5 Selecting the Milk Ratio for Change- -Over to Single Heating Circuit This menu is displayed only if you select the heat exchanger with separate heating circuits with circulation pump in Setup. Press Arrow Right to go to the next screen. Select the milk 3# milk ratio <... -
Page 100: Entering The Milk Ratio Plan
Milk Functions 11.6 Entering the Milk Ratio Plan The milk ratio plan is divided into 5 periods. You can enter the milk composition (fresh milk and milk powder) for each group. Milk and water can be mixed from 30 % to 90 % in 1 % steps. -
Page 101: Additives
Additives 12 Additives Two additive dispensers are available: one for powder and another for liquid additives. Please note that you cannot utilize both dispensers simultaneously. In addition, a special electrolyte program allows you to prevent or treat scours. Electrolyte and milk can be fed alternately. On the one hand this ensures that the animals are provided with the vital nutriments of the milk, on the other hand the electrolyte compen- sates for the loss of liquid thus stabilizing the mineral balance. - Page 102 Additives Medicine distribution is either milk- -dependent in grams per liter (g/L) or weight- -dependent in grams per 100 kg animal weight (g/100 kg) or it is related to the day- -quantity per animal and day (g/day). Drink- -dependent additive distribution: Each milk portion contains the same additive amount, i.e.
- Page 103 Additives The prescription plans can be splitted up into 5 periods like the feeding- - and the concentra- tion plans (P1 - - P5). This ensures e.g. that the additive amount is distributed and raised over a long period of time or reduced at the end of treatment. Press ENTER.
-
Page 104: Making Out The Electrolyte Prescription
Additives 12.2 Making Out the Electrolyte Prescription You can distribute powder electrolyte only via the dispenser for powder additives. Make out a prescription before starting electrolyte distribution. After you made out the electrolyte pre- scription, it will be stored and kept up until you change it. The day quantity and concentra- tion (g/L) of electrolyte drinking is related to animal’s weight and the severity of scours. -
Page 105: Distributing The Medicine
Additives 12.3 Distributing the Medicine After you have made out a prescription, you have to activate it resp. allocate it to individual animals or to a group. The medicine can also be fed to the animals as a prophylaxis. If this prophylaxis is active, in the future, after housing, each animal will automatically be fed with medicine according to the selected prescription. - Page 106 Additives The animals can only be fed according to one powder addi- active tive prescription. If you try to select another prescription, the adjust treatment display will indicate that one or more animals are already being treated. Check these animals. Change the medicine in the additive dispenser if you want to activate another pre- scription.
-
Page 107: Distributing The Electrolyte
Additives imal will be interrupted automatically as soon as its duration has lapsed. In switch menu „Alarms“ you can view as an expire message that the plan relating to additive distribution has lapsed. If the treatment has been completed according to the entered prescription, an expire mes- sage for the corresponding animal or group will be displayed in switch menu „... -
Page 108: Blocking The Remaining Portion With Additive
Additives If you select „yes“, here you can enter the maximum quantity 5B^ per visit 9.5L that is available for each individual animal each time it visits with milk^ the feeding station (max. 9.5 L). Press ENTER to confirm the input. -
Page 109: Additives Info
Additives The electrolyte solution cannot be blocked. Turn the program switch to 9 = additives. The display shows: medicine distribute^ Press Arrow Up or Arrow Down to move to menu „Block remain. port. with Remaining Portion with Additive“. additive block^ Press Arrow Right to go to the next screen. - Page 110 Additives Press Arrow Right to move to the next screen. The display 21C^breaks, w.add. shows the number of breaks with additive today and yester- today 0 yesterd. 0 day. Press Arrow Right to go to the next screen. Here you can 21C^X1 rest view the number of remaining days till the end of additive...
-
Page 111: Check Functions
Check Functions 13 Check Functions 13.1 Switch Position „Feeding Mode“ Feeding station without animal: If milk is fed, the display will show: milk and MP mode dr-warn: 0 exp:0 If MP is fed, the display will show: MP mode dr-warn: 0 exp:0 The display shows the number of warnings or expire periods: milk and MP mode... - Page 112 Check Functions The display shows whether animal’s feed entitlement has 123A feeding been blocked because the animal has already consumed the blocked maximum quantity: The display shows whether the animal has to wait (2- -4 hours) 123Afeeding blocked or not until it is fed again after having consumed electrolyte wait.time electrol.
-
Page 113: Animal Verification
Animal Verification 13.2 Animal Verification Menu „Animal Verification“ in switch position 4 contains all information about animals’ feeding behaviour, the concentrate feeder and the animal scales. While menu „Alarms“ in switch position 3 only displays the warning animals, menu „Verification“ in switch position 4 shows all check functions for all animals. -
Page 114: C1 And C2
Animal Verification Move to the next screen. The second line shows yesterday’s 12A^dr.speed L/min feeding speed compared to the average of the last 3 days as a yest. 103%=1.39 percentage and in litres per minute. 13.2.2 C1 and C2 This submenu contains all information on concentrate type 1 and 2. Select submenu „C1 + C2“. -
Page 115: Animal Verification C2
Animal Verification 13.2.4 Animal Verification C2 This submenu displays the information about consumption, deviation from average con- sumption and dosing quantity for concentrate type 2. The screens for C2 correspond to those for C1. 13.2.5 Visits This submenu contains information on the number of visits to the feeding station and to the concentrate station. -
Page 116: Number Of Animals
Animal Verification Press Arrow Up or Arrow Down to check the weight determi- ned during the relevant visit. Press Arrow Right to go to the next screen. The display shows day weight the day weight of yesterday or the day before yesterday of the yesterd^ w:151.0kg corresponding animal. -
Page 117: Alarms
Alarms 14 Alarms The automatic feeder and the concentrate feeder are continuously monitored by the proces- sor control. In switch position 3 = alarms you can view all those alarm messages relating to the failures of the automatic feeder or to animals’ drinking behaviour. The failures that interrupt the feeding mode are immediately displayed in program switch position 1 = „Feeding Mode“. -
Page 118: Checking The Calibration Values For Concentrate
Alarms les. Press „C“ to manually set back the connection errors to 0. 14.1.2 Checking the Calibration Values for Concentrate If an animal enters a concentrate station where the concentrate machine alarms has not been calibrated and is identified, the display will show see alarms an error message. -
Page 119: Mixer Outlet
Alarms Check feed for bridging. Press „C“ to delete the message. The date is then updated au- tomatically. 14.1.5 Mixer Outlet If during automatic mixer cleaning, heat exchanger cleaning or automatic calibration, the water in the mixer jar is not drained off within 2 minutes (the long electrode is not free), an alarm for mixer outlet will be triggered. -
Page 120: Animal Alarms
Alarms 14.2 Animal Alarms Menu „Animal Alarms“ contains all data referring to animals’ drinking behaviour that may lead to alarm messages as a result of the alarm levels. All alarms are animal- -specific. In switch position 4 = verifications you can view all animal data. 14.2.1 Drinking Alarms If an animal does not consume the available milk amount within 3 hours after release, it will Warning today... -
Page 121: Break
Alarms station where the animal has been identified followed by the actual consumption in % and in liters. This animal appears e.g. in Warning Yesterday because yesterday it consumed only 50% of its day ration. 14.2.2 Break A break occurs either when an animal leaves the feeding station before having emptied the mixer jar or when an animal does not drink up its portion within 2 minutes. -
Page 122: Unknown Transmitters
Alarms If the dispensed additive amount falls below the minimum 17C^ additive alarm value of 1 gram per portion, the display will show the follo- dos.quant. only ..g wing warning message: 14.2.5 Unknown Transmitters If a Responder number that could not be allocated to none of unknown transmitter the animal numbers (collar number) is read, it will be automa- No.: 1234... -
Page 123: Concentrate Alarms
Alarms 14.3 Concentrate Alarms Warning today is determined by the warning level and is displayed as of a certain time for Warning today those animals that have not consumed enough concentrate. Warning today disappears auto- matically as soon as the animal has consumed the total feed quantity. You can delete warning today only temporarily. -
Page 124: Expire Date
Alarms 14.4 Expire Date In this menu, all animals for which a temporary action has lapsed, like e.g. addition to the feed quantity, are displayed as expire animals for the corresponding action. Press „0/C“ to delete expire date messages. Expire date messages referring to the feeding and the concentrate plan are always displayed at day- -change until the animal is cancelled. - Page 125 Alarms End of addition/reduction: The animal is fed according to the feeding plan. 12C^ feeding +/- deviation exp. The animal is fed according to the concentration plan. 12C^ concentration +/- deviation exp. The animal is fed according to the concentrate plan. 14A^ C1 +/- deviation exp.
-
Page 126: Animal Data And Info
Animal Data and Info 14.5 Animal Data and Info In switch menu „Animal Data & Info“ you can enter the Responder number and register, cancel and relocate the animals. In addition, you can enter and check the most important animal data, like e.g. weight gain, housing date as well as the days until the end of the fee- ding plan. - Page 127 Animal Data and Info Press ENTER to confirm the input. Positive numbers: Enter positive numbers to „make the animals older“ and shift them to the right of the feeding curve. Negative numbers: Enter negative numbers to „make the animals younger“ and shift them to the left of the feeding curve.
-
Page 128: Ration/Day/Animal
Animal Data and Info 14.5.2 Ration/Day/Animal In this menu you can view the composition of drinking and concentrate per animal and current day. Select submenu „Ration/Day/Animal“. animal data & Info ration/day/animal^ Go to the next screen. The display shows information on the 12B^ feed. -
Page 129: Cancel Registration
Animal Data and Info 14.5.3 Cancel Registration You have to cancel the animals each time they are removed from the house. The little „a“ displayed next to the animal number means that this number is available again. In this menu you can cancel individual or all animals (before and after the end of the fee- ding plan). -
Page 130: Change Registration
Animal Data and Info 14.5.4 Change Registration In menu „Change Registration“ each animal can be allocated to another group. Select submenu „Change Registration“. animal data &Info change registrat. ^ Go to the next screen. The second line shows the remaining 10B^change into A^ days until the end of the plan. -
Page 131: Consumption
Consumption 14.6 Consumption In switch menu „Consumption“ the total requirement for each feed component (milk, MP, additives and concentrate) is calculated per day and appliance. Turn the program switch to 8 = consumption. The first screen milk req. 47.1L shows the calculated milk requirement for all animals in litres consumed 10.0L as well as the quantity in litres already consumed today. -
Page 132: Total Consumption
Total Consumption 14.7 Total Consumption In menu „Consumption Totals“ you can view the total quantities of milk, milk powder, con- centrate and additives consumed up to now by each individual animal. Turn the program switch to 10 = keyboard. Enter 22. Press ENTER to confirm the input. 1A^ milk 20.5 L 9.8 kg Select the animal. -
Page 133: Cleaning
Cleaning 15 Cleaning The automatic feeder has to be cleaned regularly, particularly if fresh milk is fed. You can choose between the following options: HE with sponge (HE = Heat Exchanger) Heat exchanger HE with hoses Mixer Compressed air- -cleaning Cleaning settings for: heat exchanger, mixer, suction hoses, remaining portions, detergent and compressed air- -cleaning. -
Page 134: Heat Exchanger
Cleaning Open the quick- -coupling for sponge cleaning. If necessary, soak the sponge with a cleansing agent and insert it into the opening. Close the quick- -coupling. Press Start/Stop, in order to start the cleaning process. During the cleaning process approx. 750 ml of water are delivered into the stainless steel coil located inside the heat exchanger. - Page 135 Cleaning Press Start/Stop. If the automatic feeder is equipped with a clean HE detergent dosing pump that has previously been selected in detergent 0 g/L Setup, the display will show: Enter the detergent amount and press ENTER to confirm the clean HE input (see annex).
-
Page 136: Heat Exchanger With Suction Hoses
Cleaning After the animal has drunk up the liquid in the mixer jar, the valve control closes the corres- ponding suction pipe and the heat exchanger cleaning starts running. If no entitled animal is identified within 1 hour, the milk will be pressed out of the stainless steel coil by some wa- ter and then drained off via the mixer outlet valve. - Page 137 Cleaning If the milk hose has to be rinsed too, connect it to the quick coupling of the cleaning adaptor. As soon as the suction hoses are ready for cleaning, press EN- hoses TER to confirm „yes“ in order to activate the cleaning cycle ready ? (see annex).
-
Page 138: Mixer
Cleaning The rinsing process is completed as soon as the mixer jar is empty. The display jumps back to the initial menu „HE with Hoses, Clean? Start“. Turn the program switch to „Feeding Mode“ again. Turn the program switch back to position „Feeding Mode“ only if no detergent has been utilized or after you have verified that the system does not contain any water with detergent anymore. -
Page 139: Calling Up Automatic Mixer Cleaning Manually
Cleaning Alarms“). You can view and delete the alarm message in menu „Alarms“ (program switch position 3). If necessary, check whether the suction hose or the mixer outlet valve are blok- ked. Remove the rinsing water from the mixer jar. If the detergent has been added automatically to the rinsing water, the feeding mode will be interrupted until the problem has been solved. -
Page 140: Compressed Air--Cleaning
Cleaning After the automatic cleaning has been completed, turn the program switch back to position 1 = Feeding Mode. Turn the program switch back to position „Feeding Mode“ only if no detergent has been utilized or after you have verified that the system does not contain any water with detergent. 15.4.3 Compressed Air- -Cleaning Compressed air facilitates suction hose cleaning up to the top of the teat without detergent. -
Page 141: Cleaning Settings Mixer
Cleaning Press Arrow Up or Arrow Down to select submenu cleaning „Settings“. settings^ Press Arrow Right to move to the next screen. cleaning settings heat exchanger^ Press Arrow Right to go to the next screen. clean HE automatically Enter „no“ if the heat exchanger must not be cleaned automa- clean HE tically. -
Page 142: Cleaning Settings Suction Hose
Cleaning Press Arrow Up or Arrow Down to select submenu cleaning „Settings“. settings^ Press Arrow Right to move to the next screen. cleaning settings heat exchanger^ Press Arrow Up or Arrow Down to select submenu „Mixer“. cleaning settings mixer^ Press Arrow Right to go to the next screen. cleaning mixer automatically Enter „no“... -
Page 143: Cleaning Settings Remaining Portion
Cleaning Press Arrow Up or Arrow Down to select the group for which clean hose pipe the suction hose should be cleaned. group B^ Enter „no“ if for group B the suction hose should not be clea- clean hose pipe ned automatically (standard setting: „yes“). -
Page 144: Cleaning Settings Detergent
Cleaning Enter after which time the remaining portion should be remain.portionafter drained off. Press ENTER to confirm the input. Potential in- 25 min empty put: up to 99 minutes. Potential input: 0 to 99 minutes. Standard value: 30 minutes. 15.5.5 Cleaning Settings Detergent This menu is only displayed if the automatic feeder is equipped with a detergent dosing pump that has been previously selected in Setup. - Page 145 Cleaning Press Arrow Right to go to the next screen. air cleaning automatically If compressed- -air cleaning has to be carried out automati- air cleaning cally, enter „yes“ and press ENTER to confirm the input. automatically Press Arrow Right to move to the next screen. Select the fee- air cleaning ding station where the compressed air has been installed.
-
Page 146: Service And Maintenance
Service and Maintenance 16 Service and Maintenance 16.1 Service and Maintenance of the Automatic Feeder Always keep the automatic feeder clean and dry. Never spray it with water! Take care that the electrode is in the correct position. Keep the electrode shaft and the clamps clean and dry. Moisture causes earthing of the electrode preventing preparation of the next milk portion. -
Page 147: The Day After The First Commissioning
Service and Maintenance week by adding a liquid cleansing agent utilized in dairy farming (also refer to chapter 15.5.1, page 140, „Cleaning Settings, Heat Exchanger“). Clean the milk storage tank thoroughly twice a day each time before filling it. Thoroughly clean the milk supply hose at regular intervals. Carry out daily check of the powder outlet and, if necessary, remove incrustations. -
Page 148: Carrying Out A Regular Check Routine
Service and Maintenance 16.1.2 Carrying Out a Regular Check Routine Measure the milk temperature by means of a precision thermometer. Check the calibration of milk powder at least after each new delivery. Check the calibration of the components: Deviations of the amount of milk and water: - - in case of deviations with rising tendency (more than 500 ml are dispensed), carry out a new calibration. -
Page 149: Service And Maintenance Of The Concentrate Feeder
Service and Maintenance of the Concentrate Feeder Commissioning the automatic feeder once again: When commissioning the feeder again, check whether there is enough water in the heat exchanger. Proceed as for first commissioning. Fill up the boiler of the heat exchanger with water. - - You do not need to fill up the boiler regularly in case a few animals are fed with milk containing a water share. -
Page 150: List Printing
List Printing 17 List Printing In keyboard menu 10 = print list you can activate printing of a warning list and a verifica- tion list at any time. The annex of this instruction manual contains more detailed informa- tion on how to connect the printer to the automatic feeder. The Warning list contains all warning animals with the corresponding warning messages. -
Page 151: Error Messages
Error Messages 18 Error Messages The automatic feeder and the concentrate feeder are continuously monitored by the proces- sor control. Errors caused are displayed on the screen. 18.1 Checking the Calibration Values of the Milk If one or more calibration values are missing, the display will calibration values show: adjust !!! -
Page 152: The Supply Electrode Is Earthed
Error Messages All data are deleted and the operational data are overwritten by standard values! For programming, proceed as for start- -up. 18.5 The Supply Electrode is Earthed If the short (supply) electrode is earthed before a portion is test sensor probe prepared, the display will show: please wait If, after a short time, the display shows the message „Error,... -
Page 153: Water Shortage
Error Messages 18.7 Water Shortage If the short electrode is not hit in water mode, the automatic feeder will start a water check. The repeat switching mechanism checks up to 5 times whether the water really does not come out. After 5 vain attempts, the preparation of milk portions as well as animal identifi- cation are switched off. - Page 154 Error Messages water check will be carried out if the short electrode has not at all or not long enough been hit by the water jet. Press „0/C“ to set the number of water checks to 0 and to up- date the date.
-
Page 155: Animal Scales
Animal Scales 19 Animal Scales For connection, see Connection Plan. Make sure that animal scales 1 is connected to feeding station 1 and animal scales 2 to fee- ding station 2. On the motherboard, scales 1 corresponds to channel 4 and scales 2 to chan- nel 5. - Page 156 Animal Scales After tare has been carried out the display shows: 25#HS1 at box:2 tare finished The scales will be tared automatically every 15 minutes if no animal is identified or less than 10 kg weight are on the scales. Press Arrow Right to move to the next screen.
-
Page 157: Accessories
Accessories 20 Accessories 20.1 Two- -Group- -Valve- -Unit Thanks to the priority control with two- -group- -valve- -unit, the automatic feeder can provide, in succession, two feeding stations with milk, i.e. as soon as an entitled animal enters the feeding station the available milk amount for this animal will be distributed without inter- ruption while the other feeding station is blocked during this time. -
Page 158: Additive Dispenser Powder And Additive Dispenser Liquid
Accessories 20.2 Additive Dispenser Powder and Additive Dispenser Liquid You can connect only one dosing device (Powder or Liquid) to Stand Alone II Plus. For installation and start- -up refer to the mounting instructions „Additive Dispenser Powder“ Installation: resp. „Additive Dispenser Liquid“. -
Page 159: Electrical Vapour Screen For Mp-- And Powder Additive Outlet
Accessories 20.3 Electrical Vapour Screen for MP- - and Powder Additive Outlet The electrical vapour screen consists of a heating element located right below the milk pow- der- - resp. powder additive outlet. In case of bad weather conditions, such as e.g. too high atmospheric humidity, the electrical vapour screen should prevent the milk powder and the powder additive from sticking to the outlet. -
Page 160: Fully Automatic Heat Exchanger Cleaning
Accessories 20.4 Fully Automatic Heat Exchanger Cleaning The fully automatic heat exchanger cleaning facilitates fully automatic, time- -controlled cleaning with detergent (up to 2 times/day) of all milk- -supplying parts of the automatic fee- der except for the suction hoses. In this way, milk deposits or similar impurities are remo- ved. -
Page 161: Detergent Dosing Pump
Accessories 20.5 Detergent Dosing Pump Thanks to the detergent dosing pump, liquid additives are added automatically to the water during the different cleaning cycles. There is no need anymore to add the detergent ma- nually. The detergent dosing pump is located in the left interior of the automatic feeder below the two- -group- -valve- -unit. -
Page 162: Fly Protection Door
Accessories 20.6 Fly Protection Door In case of fly infestation occurring particularly in summer, we recommend to protect the mixer jar by a large fly protection door. Water vapour can easily escape through the ope- nings of the fly protection door. The fly protection door can be mounted together with the dispenser for powder additives. - Page 163 Index drinking speed, 121 unknown transmitters, 122 accessories, 17 animal data, 126 additive dispenser, 158 cancel animal registration, 129 detergent dosing pump, 161 change registration, 130 electrical vapour screen, 159 ration/day/animal, 128 fly protection door, 162 transmitter input, 126 fully automatic heat exchanger cleaning, 160 weight/days fed, 126 two- - group- - valve- - unit, 157 animal identification, 57...
- Page 164 Index compressed air- - cleaning, 140 HE with sponge, 133 heat exchanger, 134 daily calculation, 77 heat exchanger with suction hoses, 136 date/time mixer, 138 check, 40 compressed air- - cleaning, 140 input, 40 activate in Setup, 49 deaerate the circulation pump, 38, 147 concentrate, calibrate, 53 deaeration screw, 38 concentrate alarms, 123...
- Page 165 Index short, 70 with suction hoses, 136 heating ENTER key, 35 adjusting the thermostats, 54 entitlement intervals, 85 avoiding measuring errors, 55 concentrate, 86 for milk powder outlet and protection against frost, equipotential bonding, 22 measuring the temperature, 55 error messages setting the heating, 54 backups, 153 setting the temperature, 55...
- Page 166 Index connection error animal scales or concentrate feeder, mounting automatic feeder, 22 idling of the shaft, 118 the race- - way, 24 mixer outlet , 119 the feeding station, 23 remaining detergent, 119 the suction bracket, 23 the shaft is blocked, 118 machine data, 40, 94 machine type, machine number, 10 nameplate, machine type, machine number, 10...
- Page 167 Index information signs, 10 specifications, automatic feeder, 19 race- - way, mounting, 24 specifications automatic feeder rated frequency, 22 number of sucking stations, 20 storage capacity powder hopper, 19 rated voltage, 22 specifications concentrate feeder, 21 ration/day/animal, 128 Squelch, 43, 59 reach of the antennas, 59 overlapping, 58 start- - up, 37...
- Page 168 Annex EC DECLARATION OF CONFORMITY Förster Technik GmbH Gerwigstr. 25 D- -78234 Engen Tel.:+49- -( 0)7733- -9406- -0 Fax: +49- -(0)7733- -9406- -99 declare that our products with the designation: TAK*- -SA2- -27- -F1 TAP*- -SA2- -27- -F1 VDW*- -SA2- -27- -F1 TAK*- -SA2- -28- -P1 TAP*- -SA2- -28- -P1 VDW*- -SA2- -28- -P1...
-
Page 169: Connection Between Printer And Stand Alone
Annex Connection between Printer and Stand Alone July 2003 Printer connected to Stand Alone A printer can be connected to the auto- matic feeder „Stand Alone“. The alarm list, the verification list and/or the trans- mitter list can be printed either manually or automatically after midnight calcula- tion. -
Page 170: Functional Steps „Cleaning, Heat Exchanger" (See Chapter 15.2)
Annex Functional Steps „Cleaning, Heat Exchanger“ (see chapter 15.2) Heat exchanger cleaning consists of pre- -cleaning, main cleaning and rinsing and has to be carried out every day. During heat exchanger cleaning, all milk- -supplying parts of the auto- matic feeder (except for the suction hoses) are thoroughly cleaned to prevent creation of milk deposits or other impurities. - Page 171 Annex delivered once again into the mixer jar via the coil and is drained off again via the mixer outlet valve. Finally the mixer jar is rinsed by a 500 ml water portion that is subsequently pumped out. During the pre- -cleaning process, the display shows: pre-rinse HE Main cleaning During the main cleaning process, 1.25 liters of water and - -...
-
Page 172: Functional Steps „Cleaning, He With Suction Hoses" (See Chapter 15.3)
Annex If there is still milk in the stainless steel coil, the automatic heat exchanger cleaning will be deferred for 1 hour at most, too. If an entitled animal enters the feeding station within this time, the automatic feeder starts to prepare at least two portions of water + milk powder. After the animal has drunk up the liquid in the mixer jar the valve control closes the corres- ponding suction pipe and the heat exchanger cleaning starts running. - Page 173 Annex If you want to rinse the milk hose too, you have to connect it to the quick coupling of the cleaning adaptor. As soon as the suction hoses are ready for cleaning, press EN- hoses TER to confirm „yes“ in order to activate the cleaning cycle . ready ? Pre- -cleaning First the coil, the mixer jar, the valve unit as well as the hoses...
- Page 174 Annex If the supply electrode is not earthed, the automatic feeder solenoid valves will check whether the electrodes and the solenoid valves are are being checked tight. The display shows: The cleaning valve as well as the solenoid valve close auto- matically while the milk pump is running.
-
Page 175: Standard - - Feeding Plan Group A
Annex Standard - - Feeding Plan Group A... -
Page 176: Standard - - Feeding Plan Group B
Annex Standard - - Feeding Plan Group B... -
Page 177: Standard - - Feeding Plan Group C
Annex Standard - - Feeding Plan Group C... -
Page 178: Standard - - Feeding Plan Group D
Annex Standard - - Feeding Plan Group D... -
Page 179: Example: Milk Ratio Plan Group A
Annex Example: Milk ratio plan group A... -
Page 180: Example: Milk Ratio Plan Group B
Annex Example: Milk ratio plan group B... -
Page 181: Form: Feeding Plan
Annex Form: Feeding plan... -
Page 182: Form: Concentration Plan
Annex Form: Concentration plan...
Need help?
Do you have a question about the TAK5-SA2-KFA-27-F1 and is the answer not in the manual?
Questions and answers