
Related Manuals for Lloyd's LC-1219

Summary of Contents for Lloyd's LC-1219
- Page 1 Cámara inalámbrica FAVOR DE LEER LA PRESENTE GUÍA DE INSTALACIÓN ANTES DE OPERAR SU PRODUCTO...
- Page 2 Características • Monitoreo y control desde su Smartphone • Soporta vista múltiple desde la app (hasta 4 vistas simultáneas) • Almacenamiento en la nube por detección de movimiento (requiere suscripción) • Reciba alertas por detección de movimiento • Material: plástico ABS •...
-
Page 3: Antes De Comenzar
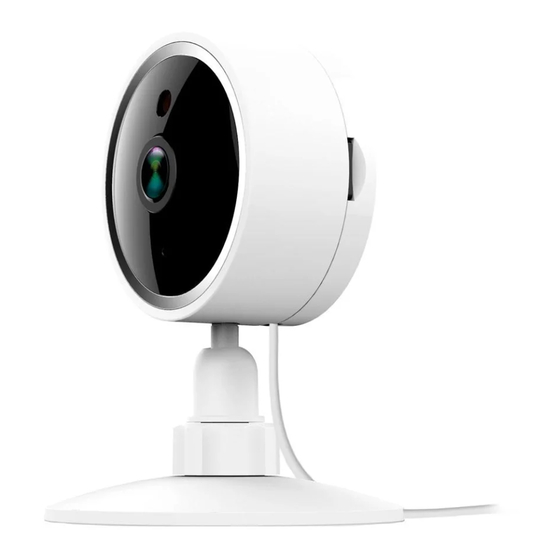
Diagrama Bocina LEDs infrarrojos x 2 Micrófono Sensor de Entrada para luminosidad adaptador Lente de corriente Sensor de movimiento Botón de reinicio Ranura para tarjeta de memoria NOTA: • No deben situarse sobre el aparato fuentes de flama viva, tales como velas encendidas. •... - Page 4 Registro y acceso Inicie la app Lloyds Smart. Para registrarse, haga clic en “Crear cuenta nueva” (1), para continuar haga clic en “De acuerdo”, elija su país e ingrese una dirección de correo electrónico, luego haga clic en “Obtenga el código de verificación”...
- Page 5 Añadir dispositivo Abra la app Lloyds Smart, seleccione “+” en la esquina superior derecha (1). Elija el tipo de dispositivo que desea añadir, en este caso vaya a “Seguridad” (2), luego seleccione “Cámara de seguridad” (3). Conecte la cámara a la corriente eléc- trica.
- Page 6 Introduzca la información de su red Wi Fi y la contraseña de la misma, haga clic en “Siguiente” (6). Coloque la cámara entre 15 y 20 cm frente al Smartphone, para que escanee el codigo QR y haga clic en “Oír el tono de aviso ” cuando haya escuchado el mismo.
- Page 7 Una vez configurado el dispositivo, puede cambiar el nombre (8), por último haga clic en “Finalizado” (9). NOTA: Asegúrese de que la contraseña Wi Fi que ingrese sea la correcta y de que el dispositivo esté cerca del módem durante el proceso. Al concluir la configuración, busque y seleccione la cámara en la lista de dispo- sitivos (10)
- Page 8 Funciones de video en la app 1 Cambio de resolución 10 Edición del panel 2 Pantalla completa 11 Sonido 3 Captura de imágenes 12 Más funciones 4 Hablar 13 Ampliar / Reducir pantalla 5 Grabación de videos 14 Calidad de la señal (SQ) 6 Desplegar / Ocultar menú...
- Page 9 Funciones de reproducción de video en la app Para utilizar esta función requiere instalar una tarjeta de memoria o adquirir una suscripción en la nube. Consulta de grabación por fecha Línea de tiempo Reproducir / Pausar NOTA: Podrá consultar lo grabado en la nube por detección de movimiento aun cuando la cámara esté...
- Page 10 Google Home y Amazon Alexa Cómo conectar a Google Home: 1. Descargue e Ingrese a la app Google Home previamente configurada con su cuenta de correo electrónico Gmail y su asistente virtual. 2. Haga clic en el ícono “+”, clic en “Configurar dispositivo”. Luego, en la sección “Funciona con Google”, haga clic en la barra de búsqueda y escriba Lloyds Smart.
- Page 11 Cómo conectar a Amazon Alexa: 1. Descargue e Ingrese a la app “Amazon Alexa” previamente configurada con su cuenta de correo electrónico y su asistente virtual. 2. Haga clic en la opción “Skills y juegos”, luego, en la barra de búsqueda escriba Lloyds Smart.
-
Page 12: Preguntas Frecuentes
Preguntas frecuentes: En el proceso de conexión de red, la barra no llega al 100%, ¿es un error? La cámara únicamente puede conectarse a redes de 2.4 GHz, por favor asegúrese que esa es la frecuencia de red e intente de nuevo. ¿Añadir dispositivos repetidamente puede causarles fallas? Si en algún momento un dispositivo presenta problemas de conexión, es recomendable reiniciarlo e intentar añadirlo de nuevo. -
Page 13: Especificaciones Eléctricas
Techo Techo Techo En caso de que requiera invertir la imagen, puede hacerlo de la siguiente ma- nera: ingrese a la app, luego en la interfaz principal haga clic en el ícono “Más funciones”, posteriormente clic en “Ajustes de funciones básicas”. Luego active o desactive la opción de “Vuelta o inversión de imagen”... - Page 14 Con LLoyd’s haz tu casa inteligente Cuida lo que más quieres desde donde te encuentres Incrementa la seguridad en tu hogar o negocio...
-
Page 15: Wireless Camera
Wireless camera READ THE INSTALLATION GUIDE BEFORE OPERATING YOUR PRODUCT... - Page 16 Characteristics • Monitoring and control from your smartphone • Supports multiple views from the app (Quad View) • Cloud storage for motion detection recordings (subscription required) • Receive alerts in case of motion detection • Material: ABS plastic • Supports a memory card (up to 128 GB) •...
-
Page 17: Before Getting Started
Speaker Diagram Infrared LEDs x 2 Microphone Power adapter Brightness input sensor Lens Motion sensor Reset button Memory card slot NOTE: • No open flame sources, such as lighted candles, should be placed on the appliance. • The appliance should not be exposed to dripping or splashing water and no objects filled with liquids, such as glasses, should be placed on top of it. - Page 18 Registration and access Launch the Lloyds Smart app. To register, click “Sign Up” (1), to continue, click “Agree”, choose your country and enter an email address, then click “Get Verification Code” (2). Enter the code sent to your email (check inbox or spam) (3). Set a password and click “Done”...
-
Page 19: Add Device
Add device Start the Lloyds Smart app on your smartphone, select “+” (upper right corner) (1), choose the type of device that you want to add, in this case, go to “Security” (2), then select “Fixed IP Camera” (3). Connect the camera to the power su- pply. - Page 20 Enter your Wi Fi network information and password, then click “Next” (6). Place the camera between 15 and 20 cm in front of your smartphone to scan the QR code and click “I heard a prompt”(7) once you hear it. Wait for the device to configure...
- Page 21 Once the device is configured, you can change the name and finally click “Done” (9). NOTE: Make sure that the Wi Fi password you enter is correct and that the device is close to the modem during the process. After completing the setup, find and select the camera in the device list (10) to monitor and control it through the app from wherever you are.
- Page 22 Video functions in the app 1 Change resolution 10 Edit panel 2 Full screen 11 Sound 3 Image capture 12 More functions 4 Talk 13 Enlarge / reduce screen size 5 Video recording 14 Signal quality (SQ) 6 Drop down / Hide menu 15 Disable camera 7 Video playback from the 16 Interface theme selection (dark...
- Page 23 Playback functions in the app To use this feature, you need to install a memory card or purchase a cloud subscription. Recordings query by date Timeline Play / Pause NOTE: You can check what is recorded in the cloud by motion detection even when the camera is offline or it has been lost or stolen (subscription required).
- Page 24 Google Home and Amazon Alexa How to connect to Google Home: 1. Download and launch the Google Home app, previously configured with your Gmail account and your Google Assistant-enabled device. 2. Click on the “+” icon, choose “Set up Device,” then in the “Works with Google”...
- Page 25 How to connect to Amazon Alexa: 1. Download and access the “Amazon Alexa” app, previously configured with your email account and your virtual assistant. 2. Click on the option “Skills & games”, then in the search bar type Lloyds Smart. When you get the icon, click on it. Then press the “Activate to use”...
-
Page 26: Frequently Asked Questions
Frequently asked questions In the network connection process, the bar does not reach 100%, is this an error? The camera can only connect to a 2.4 GHz network, please make sure that is the network frequency and try again. Can adding devices repeatedly cause them failures? Verify that your Wi Fi network is working. -
Page 27: Electrical Specifications
Ceiling Ceiling Ceiling In case you need to invert the image, you can do it as follows: enter the app, in the main interface click on the “More functions” icon and click on “Basic function settings”. Then enable or disable the “Flip screen” option as required. Be sure to set the desired viewing angle before fixing it. - Page 28 Importador / Imported by Zutto Technologies, S.A. de C.V. R.F.C. ZTE161017KT6 Avenida Ejército Nacional No. 505 Interior 1602 Colonia Granada, C.P. 11520 Miguel Hidalgo, Ciudad de México, México. Tel / Phone: 55 68447575...
Need help?
Do you have a question about the LC-1219 and is the answer not in the manual?
Questions and answers