Table of Contents
Advertisement
Quick Links
Advertisement
Table of Contents

Related Manuals for Ironton 54127

Summary of Contents for Ironton 54127
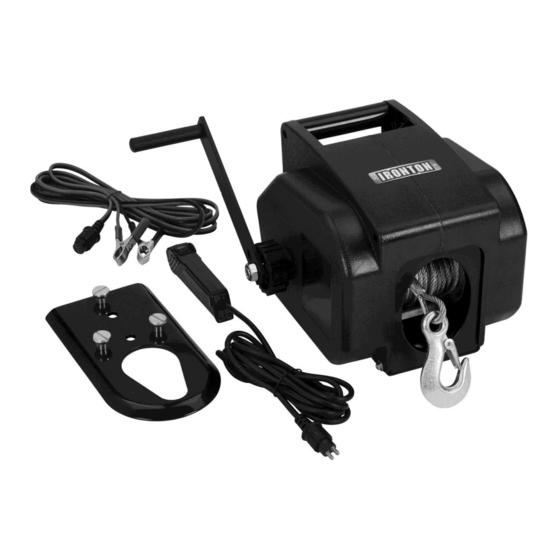
- Page 1 2000-Lb. 12 V DC Electric Marine Winch Owner’s Manual WARNING: Read carefully and understand all ASSEMBLY AND OPERATION INSTRUCTIONS before operating. Failure to follow the safety rules and other basic safety precautions may result in serious personal injury. Item #54127 SAVE THESE INSTRUCTIONS...
- Page 2 Thank you very much for choosing an Ironton™ product! For future reference, please complete the owner’s record below: Serial Number/Lot Date Code: ________________________________ Purchase Date: ____________________________________________ Save the receipt, warranty, and this manual. It is important that you read the entire manual to become familiar with this product before you begin using it.
-
Page 3: Table Of Contents
Table of Contents Intended Use ............................4 Technical Specifications ........................4 Important Safety Information ....................... 4 Specific Operation Warnings ....................... 6 Assembly Instructions .......................... 7 Before Each Use ............................ 9 Operating Instructions ........................10 After Each Use ............................. 12 Maintenance ............................12 Troubleshooting .......................... -
Page 4: Intended Use
Intended Use The Ironton 2000-Lb. 12 V DC Electric Marine Winch can be mounted permanently on your trailer, truck bed, bumper, or you can use the adapter plate to anchor the winch to your trailer ball. The weather resistant high-impact housing has a molded handle for easy portability. - Page 5 Industrial or commercial applications must follow OSHA requirements. ⚠WARNING This product may contain chemicals known to the State of California to cause cancer, birth defects or other reproductive harm. Wash hands after handling. ⚠WARNING WORK AREA SAFETY Inspect the work area before each use. Keep work area clean, dry, free of clutter, and well-lit. Cluttered, wet, or dark work areas can result in injury.
-
Page 6: Specific Operation Warnings
Use only accessories that are recommended by the manufacturer for use with your electric winch. Accessories that may be suitable for one product may create a risk of injury when used with another tool. Never use an accessory that has a lower operating speed or operating pressure than the tool itself. -
Page 7: Assembly Instructions
Stay out of the direct line that the wire rope is pulling. If it slips or breaks, it will create a whiplash effect. Utilize a winch dampener to help absorb the force released if the wire rope breaks. Do not use for overhead hoisting. - Page 8 Remove the winch after use. Do not drive vehicle with winch temporarily mounted. Temporary Winch Mounting Use the adapter plate (31) to temporarily attach the winch to a hitch ball on a vehicle. The adapter plate has three pre-mounting plate stud bolt (38)/Nut (30)/Lock Washer (29) sets. Push the bolt heads into the keyhole slots on the bottom of the frame assembly (34) and slide them into the narrow section of the keyholes.
-
Page 9: Before Each Use
2. If you drill through the bumper or any part of the body to route the wires, be sure to install a rubber grommet in the hole to prevent fraying of the wires at that point. 3. Route the cables (44) from the solenoid to the battery and from the solenoid to the winch, following the precautions discussed above. -
Page 10: Operating Instructions
Operating Instructions ⚠WARNING • Read the entire Important Safety Information section at the beginning of this manual, including all text under subheadings before set up or use of this electric winch. • The instructions that follow are basic guidelines only and cannot cover all situations encountered during use. - Page 11 To pull out the wire rope, disengage the clutch control by loosening two lock nuts and turning the clutch knob (19) counterclockwise, to loosen it. Slide the loop of the hook strap over the hook and then pull on the hook strap to pull out the wire rope. ⚠WARNING Leave at least five full turns of wire rope on the drum.
-
Page 12: After Each Use
15. If the object to be pulled must be pulled at an angle in relation to the winch, use a pulley (sold separately) and an anchor point directly in front of the winch, as shown in the illustration below, to keep the wire rope pulled straight. -
Page 13: Troubleshooting
if the winch is submerged, it should be opened, dried, and re-lubricated by a qualified technician as soon as possible to prevent corrosion. Troubleshooting ⚠WARNING • Follow all safety precautions whenever diagnosing or servicing the tool. • Disconnect power supply before service. Use the table below to troubleshoot problems before contacting service personnel or your local dealer. -
Page 14: Parts Diagram
Parts Diagram Page 14 of 18... -
Page 15: Parts List
Parts List Part Number Description Quantity M12 Nut Spring Washer Washer Driver Gear (Big) Bearing Housing Oil Bearing Washer Small Plate Big Plate Shaft Wire rope & Hook 10 Ring-Shield Shaft Shaft Cotter Pin Plate M12 Nut Hand Crank Clutch Knob Frication Plate Frication Plate Large Gear Assembly 2... -
Page 16: Replacement Parts
M5x8 Screw D5 Washer D10 Washer Large Gear Assembly 1 Shaft Assembly D12 Washer M5 x10 Screw Replacement Parts For replacement parts and technical questions, please call Customer Service at 1-800-222-5381. Not all product components are available for replacement. The illustrations provided are a convenient reference to the location and position of parts in the assembly sequence. -
Page 17: Limited Warranty
Northern Tool and Equipment Company, Inc. ("We'' or "Us'') warrants to the original purchaser only ("You'' or “Your”) that the Ironton product purchased will be free from material defects in both materials and workmanship, normal wear and tear excepted, for a period of one year from date of purchase. - Page 18 Distributed by: Northern Tool & Equipment Company, Inc. Burnsville, Minnesota 55306 www.northerntool.com Made in China Page 18 of 18...
Need help?
Do you have a question about the 54127 and is the answer not in the manual?
Questions and answers