Table of Contents
Advertisement
Quick Links
Advertisement
Table of Contents

Related Manuals for Supereyes Qbot 3.0 Robot Car Kit

Summary of Contents for Supereyes Qbot 3.0 Robot Car Kit
- Page 1 Qbot 3.0 Robot Car Kit User Manual...
- Page 2 Warming tips 1. If the car is running slower, it means that the battery is already run out, and please charge it as soon as possible. You can play it for 2 hours after charging it for one hour 2. The indicator light will become red when the charging doesn’t finish, and when charing complete, the indicator light turns to the green.
-
Page 3: Table Of Contents
Catalog 1 Introduction ....................1 1.1 Product introduction ............... 1 1.2 Product Features ................1 2 Main assembly ..................2 2.1 Product list ..................2 2.2 Product parameters ................. 3 2.3 Components ..................4 3 Installation and Operation ..............5 3.1 Overview .................. -
Page 4: Introduction
1 Introduction 1.1 Product introduction Qbot is an educational robot based on graphical programming and Arduino platform. This robot is perfect for learning STEAM and robotic knowledge and suit for robot lovers and beginners to learn robot and programming. Besides, It has more than ten sensor modules. -
Page 5: Main Assembly
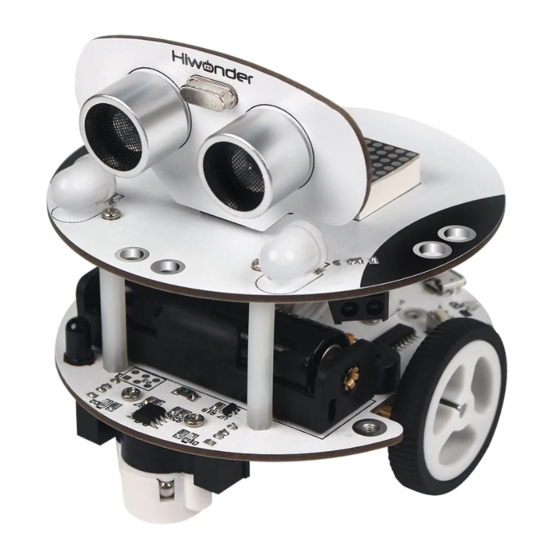
2 Main assembly 2.1 Product list Bottom board Upper board Ultrasonic sensor Lithium battery Infrared remote controller Screwdriver Screw and copper pillar kit USB cable... -
Page 6: Product Parameters
2.2 Product parameters Programming software WeMake(based on Scrach3.0)Windows Arduino IDE Support Input Obstacle avoidance sensor, Line follower, Ultrasonic sensor, Infrared receiver Output Buzzer, RGB lights, two motor ports, Microprocessor Arduino UNO Power supply 3.7V DC Lithium battery Offline mode Bluetooth module, Arduino App control, iOS App control, Infrared remote control Diameter... -
Page 7: Components
2.3 Components Name of Component Picture Quantity Upper Board Bottom Board Ultrasonic Sensor Infrared Remote Controller Copper Pillars and Several Screws Lithium Battery Connecting Wire... -
Page 8: Installation And Operation
3 Installation and Operation 3.1 Overview 1. Different functions require different program file; 2. The default program in Qbot is a mobile phone app and an infrared remote controller program so that you can use your cell phone and infrared remote controller to control the Qbot directly. - Page 9 3.2.2 Mobile phone APP to control the Qbot (1)First, turn on Qbot (2)Then enter Qbot APP that has been download on your mobile phone. (3)After your phone connects to Qbot, you can start to control your Qbot. Tips: 1. The app can connect to the Qbot automatically. 2.
- Page 10 If the app fails to connect to Qbot, restart the APP, and reconnect again. (Please remember using the Bluetooth module in the mobile phone app and do not use the one on your phone system). If you connect to it successfully, you will see the image as below after clicking the Qbot module:...
- Page 11 Here is the introduction of each icon: Icon Meaning Icon Meaning Turn on the Bluetooth Change to switch. gravity mode. Display distance The light color on the between the ultrasonic upper board will sensor and the obstacle change in each two second This mini bubble uses to control the motion of...
- Page 12 Then, you can click the Gravity control icon, and you can control the motion of Qbot by shaking your mobile phone. We offer two modes to control the motion of Qbot, and the other is stick mode, which means you can operate the Qbot through the virtual button on your phone.
- Page 13 If you click on the horn icon, the Qbot will raise the alarm. If you click the “draw line” icon, you will see the image as shown below:...
- Page 14 You can draw any lines you want on the app. After clicking “Play” icon, Qbot will follow the track and move, and you can clear the line you draw by clicking “Clear screen” icon as shown in the picture, if you draw a graph in the gray part, the Qbot will go around the shapes that you draw.
-
Page 15: Infrared Remote Controller
Here is the function of the icon: Clear the line you draw on the screen. Let Qbot follow the line you have drawn. When you press this button, you can stop the Qbot at any time. 3.3 Infrared remote controller Qbot package contains an infrared remote controller, and you can use it to control the motion Qbot. -
Page 16: Wemake Software
controller as a flashlight that can emit infrared light and the infrared receiver module as an eye that can see the infrared light. When we press button 2 on the remote controller. Qbot will move forward, and if we press button 8, it will move backward, and press 4 and 6 can let Qbot turn left and right respectively 3.4 WeMake Software 3.4.1 What’s WeMake Software... - Page 17 Click the “Next” button Then click the “Install” button. Wait for a while...
- Page 18 Finally, select “Launch Website” and click “Finish” button How to let Wemake connect to the Qbot: We only can use Wemake to program Qbot, when Qbot has been connected to Wemake. How can we connect Qbot to Wemake? First, we need to connect Qbot to the computer with the USB cable, enter Wemake software, and select the corresponding option in Menu>connect>...
- Page 19 After clicking the corresponding serial port, the serial port connection is successful. Different computers may have different USB ports, and you can open the device manager, expand "Ports (COM & LPT).
- Page 20 If you cannot find the corresponding USB port in the device manager, you need to install the driver again. Open Wemake software,Menu>Connect>Install Driver Open the driver installation interface...
- Page 21 Then click install Wait for installation. The dialog box will automatically close after the installation complete. Editing and uploading program: You should drag the module and build the corresponding logic to edit the program. The detail will demonstrate and explain in the learning course. After the program is written, click the “Switching mode”.
- Page 22 Click the upload icon after your Qbot is connected to Wemake, and wait for program upload: Arduino IDE You can also use ArduinoIDE to edit the code yourself for uploading.
-
Page 23: 4Faq
4FAQ Q1: I had bought Qbot for my children, and how do my children learn to use it? A: The products of our company are suitable for people of all ages. Children under the third grade are advised to use it with parents. In the process of operation, children not only can improve problem-solving skill but also develop the interest of programming. - Page 24 When Qbot doesn’t have enough power supply, it will make a sound like” DiDiDi.” When you hear that, the battery should be taken out and put into a special charger to charge at least two hours. Q5: Why does the .sb2 file fail to read? A: If your Makecode display “Fail to upload,”...
-
Page 25: The Historical Version Of The User Manual
5 The Historical version of the user manual Version Modification Instructions Modifier date Adding information: (1) Solve the problem of drawing line function on the mobile V2.1 2019.11.5 phone Peter (2) WeMake (Scratch 3.0) (3) Change Mini USB port to micro USB...
Need help?
Do you have a question about the Qbot 3.0 Robot Car Kit and is the answer not in the manual?
Questions and answers