Advertisement
Quick Links
Rescue 42, Inc.
P.O. Box 1242 Chico, CA 95927
(888) 427-3728 • (530) 891-3473
Rescue42.com • ThePodRunner.com
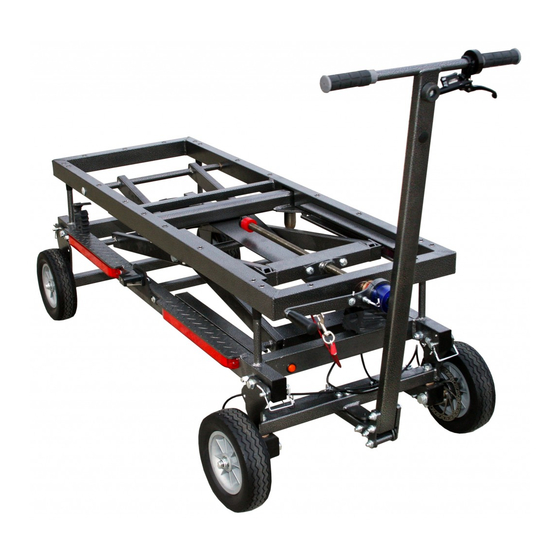
Quick Start Guide – Loading
Position the vehicle's tow hitch over solid, level ground.
Remove the Hitch Adapter from the Chassis Bed and insert the Receiver Tongue into the hitch of vehicle. Secure with
the Anti-Rattle Hitch Pin ensuring that the threaded block is on inserted side.
Set the Height Adjustment of the Hitch Adapter.
Pull the Hitch Adapter's Mounting Box up & away from the vehicle to seat the PitchLok Pins in the LOAD position.
Raise the SatRunner by rotating the Crank Handle CLOCKWISE to elevate the Mounting Pin above the Hitch
Adapter. Roll into position with the Mounting Pin above the Mounting Box Receiver Tube.
Turn the Crank Handle COUNTER-CLOCKWISE to lower the Mounting Pin into the Hitch Adapter until the
Mounting Tabs drop and lock into their respective holes.
LOAD
Continue lowering until the weight begins to transfer to the vehicle's suspension. STOP turning the handle. Give the
Unit a firm push towards the vehicle. The PitchLok Pins will slide down into the TRANSPORT position.
Connect the Runner's Chassis 4-pin connector to the vehicle's 4-pin receiver and test for proper operation of the Stop,
Turn, and Taillights.
After securing the unit into the TRANSPORT Position, continue raising the Lower Frame until the Mounting Box
locks on the tabs of the Lower Frame, then a ¼ to ½ a turn more to add compression securing it to the Hitch Adapter.
TRANSPORT
TAB
1
PodRunner™ by Rescue 42, Inc. – Celebrating 25 Years of Innovation
Advertisement

Related Manuals for Rescue 42 podRUNNER

Summary of Contents for Rescue 42 podRUNNER
- Page 1 After securing the unit into the TRANSPORT Position, continue raising the Lower Frame until the Mounting Box locks on the tabs of the Lower Frame, then a ¼ to ½ a turn more to add compression securing it to the Hitch Adapter. TRANSPORT PodRunner™ by Rescue 42, Inc. – Celebrating 25 Years of Innovation...
- Page 2 Rotate the wheels all the way into the UP position. Reinsert both leg pins (B) into UP position holes. Use the Red Safety Lanyard to secure the handle. Verify SatRunner chassis lights are fully functional before traveling. 180° PodRunner™ by Rescue 42, Inc. – Celebrating 25 Years of Innovation...
- Page 3 Rotate the Steering Axle downwards approximately halfway and then rotate the steering handle clockwise 180°. Align the steering link and tie rod holes (D) and insert the steering lock pin (C). Insert both leg pins (B) into DOWN position holes. 180° DOWN PodRunner™ by Rescue 42, Inc. – Celebrating 25 Years of Innovation...
- Page 4 Upper Frame onto the Lower Frame. The unit should only be moved with the Upper Frame fully lowered to prevent tipping. Roll the SatRunner to the desired location for operation. PodRunner™ by Rescue 42, Inc. – Celebrating 25 Years of Innovation...
- Page 5 Retighten the cables. Rotate chassis handle upright and secure with Red Safety Lanyard. Figure 3 Figure 4 PodRunner™ by Rescue 42, Inc. – Celebrating 25 Years of Innovation...
- Page 6 You are now connected to the High-Speed Ka-band ViaSat satellite broadband. Stowing 1. Stowing is the reverse of deploying. Push the red “Stow Antenna” button to start the process. PodRunner™ by Rescue 42, Inc. – Celebrating 25 Years of Innovation...
- Page 7 The Mast should not ever be extended to a point that the Red Ring is showing on the pole. The red ring must be below the cutout for the clamp. PodRunner™ by Rescue 42, Inc. – Celebrating 25 Years of Innovation...
- Page 8 Pull the rope through as Tensioner to make the Guy Cables Taught. shown to tension a. The Mast should not be angled. b. After tensioning the Guy Cables, securely fasten excess. PodRunner™ by Rescue 42, Inc. – Celebrating 25 Years of Innovation...
- Page 9 Perform initial setup on generator. Follow manufacturer specifications. This includes, but not limited to: Fill with oil b. Fill with gasoline c. Check for leaks Figure 2 Figure 3 PodRunner™ by Rescue 42, Inc. – Celebrating 25 Years of Innovation...
Need help?
Do you have a question about the podRUNNER and is the answer not in the manual?
Questions and answers