Advertisement
Available languages
Available languages
Quick Links
Advertisement

Subscribe to Our Youtube Channel
Related Manuals for CALITEK Grizzly 600

Summary of Contents for CALITEK Grizzly 600
- Page 1 FR - EN...
- Page 2 EN - FR TECHNICAL SPECIFICATIONS / SPÉCIFICATIONS TECHNIQUES Paramètres Grizzly 600 Grizzly Pro 600 SPECTRUM / SPECTRE Full spectrum / Spectre complet LIGHT OUTPUT PPF / SORTIE LUMINEUSE 1512 μmol/s 1700 μmol/s EFFICACY / EFFICACITÉ 2.4 μmol/J @277AC 2.7 μmol/J @277AC AC INPUT POWER / PUISSANCE D’ENTRÉE CA...
-
Page 3: Informations Légales
ENVIRONNEMENT Votre lampe CALITEK doit être utilisée dans un lieu de culture à climat contrôlé, en fermes intérieures ou en serres. Le produit peut être utilisé dans des lieux humides mais ne doit pas être utilisé dans des lieux mouillés ou à... - Page 4 Déconnectez toujours la lampe Calitek de l’alimentation avant d’effectuer quelconque maintenance. Laissez toujours refroidir la lampe pendant une période d’au moins 20-30 minutes avant de toucher les barres lumineuses. Toucher les barres lumineuses lorsque celles-ci sont chaudes peut engendrer de sévères brûlures La convection naturelle retire la chaleur du dissipateur.
- Page 5 Assurez-vous que le câblage local peut supporter les exigences de tension et de courant. Évitez les câbles enroulés et gardez les fils du secteur séparés pour éviter les interférences électromagné- tiques. Ne pas connecter ou déconnecter le luminaire à LED CALITEK sous charge. CONSIGNES DE MONTAGE 1- ASSEMBLAGE DU CADRE Les bars du maintient du ballast et le ballast est fixe 1.
- Page 6 3- CONNEXION DES BARRES LED Alignez le trou rond du support B avec le bout ma- Assurez-vous que le transformateur soit bien sécurisé gnétique de la lampe et insérez le pin mâle dans la et retournez la lampe afin que celui-ci se trouve en fiche femelle.
- Page 7 6- CONNEXION DES LAMPES EN SÉRIE POUR UN CONTRÔLE EXTERNE Pour des instructions détaillées, référez-vous au manuel du Panneau de contrôle Calitek. Positionnez et accrochez chaque lampe de façon appropriée. a) Connectez le câble de signal du contrôleur au port RJ14 (in).
- Page 8 Attendez toujours entre 20 et 30 minutes afin que les barres LED refroidissent. INSPECTION, MAINTENANCE ET RÉPARATION Déconnectez les 6 lampes Calitek de l’alimentation avant d’effectuer toute maintenance ou réparation. Ne connectez ou déconnectez pas la lampe sous tension. N’ouvrez pas et ne démontez pas la lampe car elle contient des pièces non remplaçables à...
-
Page 9: Product Description
This product is CE certified in accordance with LVD, EMC and ROHS testing standards. SAFETY RECOMMENDATIONS AND WARNINGS Always refer to local rules and regulations before installing or using this Calitek lamp. - Do not open or disassemble the LED lamp as it contains non-replaceable parts inside. Opening or tampering with theCalitek lamp may be dangerous and will void the warranty. - Page 10 Always disconnect the CALITEK lamp from the power supply before performing any maintenance. Always allow the LED lamp to cool for a period of at least 20-30 minutes before touching the LED light bars. Touching the light bars when they are hot can cause severe burns! Natural convection removes heat from the heat sink.
- Page 11 Assembly and installation must comply with local laws and regulations. The installer is responsible for a correct and safe installation. Make sure that the local wiring can withstand the voltage and current requirements. Avoid coiled cables and keep mains leads separate to avoid electromagnetic interference. Do not connect or disconnect the CALTEK light under load.
- Page 12 3- CONNECT THE LED LIGHT BARS Then insert the other end; align the round hole on Ensure the driver is secured and flip the fixture Frame B with the light bar’s magnetic end and in- over so the driver is now underneath. Insert the end sert male pin into female socket.
- Page 13 The Grizzly LED fixture light intensity can be adjusted without changing spectral power distribution or losing efficiency. 6- CONNECTING FIXTURES IN SERIES FOR EXTERNAL CONTROL For detailed instructions please refer to the Calitek Control Panel manual. Position and hang each fixture appropriately. a) Connect the signal wire to the fixture 1, RJ14 port (in).
-
Page 14: Inspection, Maintenance And Repair
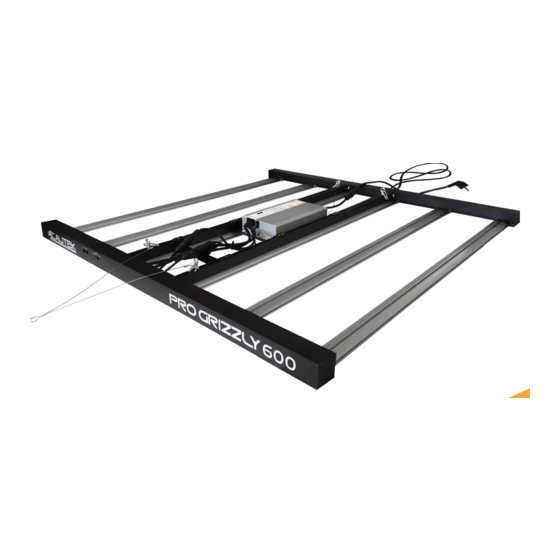
Always wait 20 – 30 minutes for the LED light bars to cool down. INSPECTION, MAINTENANCE AND REPAIR Disconnect the Calitek fixture from mains before performing any maintenance or repairs. Do not connect or disconnect the LED fixture under load. - Page 15 CONTENTS 1x MANUAL 2x METAL CABLE HANGERS 1x FRAME A 1x LED DRIVER Power output cables (male connectors) to face Frame B 1x FRAME B Contains power input cables (female connectors) - RJ14 (in/out) connector and built-in dimmer 1x SUPPORT FRAME Contains driver tray 6x LED LIGHT BARS CONTENU 1x MANUEL...
Need help?
Do you have a question about the Grizzly 600 and is the answer not in the manual?
Questions and answers