Table of Contents
Advertisement
Quick Links
© VIII-2011 BEYERTONE GmbH
C
R
-
1
0
0
C
R
-
1
0
0
C
R
-
2
C
R
-
2
T
h
e
A
c
o
T
h
e
A
c
o
T
e
l
e
p
h
o
n
e
N
T
e
l
e
p
h
o
n
e
Installation and
User Guide
CR-200 / CR-100 USB Ver. 2-3 - Installation and User Guide
BEYERTONE
www.beyertone.com
U
S
B
U
S
B
0
0
0
0
u
s
t
i
c
u
s
t
i
c
o
t
e
p
a
d
N
o
t
e
p
a
d
®
1/64
Advertisement
Table of Contents

Summary of Contents for BEYERTONE CR-100 USB
- Page 1 ® BEYERTONE www.beyertone.com Installation and User Guide © VIII-2011 BEYERTONE GmbH CR-200 / CR-100 USB Ver. 2-3 - Installation and User Guide 1/64...
- Page 2 IMPORTANT NOTE: This manual applies to both the CR-100 USB, which records phone calls via USB-cable directly onto a PC or laptop, and the CR 200, which records onto a USB flashdrive stick independently of a PC.
-
Page 3: Table Of Contents
Import of recordings from the USB flashdrive stick (CR-200) ........40 Recordings in the ‘Archive’ window ................42 Sending recordings by e-mail ..................47 © VIII-2011 BEYERTONE GmbH CR-200 / CR-100 USB Ver. 2-3 - Installation and User Guide 3/64... - Page 4 Troubleshooting ........................61 No USB connection to the PC (CR-100 USB) ............. 61 Recording / playback not working ................61 Support hotline......................61 Technical data........................62 © VIII-2011 BEYERTONE GmbH CR-200 / CR-100 USB Ver. 2-3 - Installation and User Guide 4/64...
-
Page 5: Callrecorder Applications And Functions
Can also be connected to the analogue phone line (a/b) • No need to open up the telephone or the telephone system • Connection to PC or laptop, including power supply, via USB cable (CR-100 USB) • Recording independently of a PC on USB memory flashdrive stick (CR-200) •... -
Page 6: Important Information
We cannot accept any liability for damage caused as a result of any incorrect connections not specifically described as permitted in section 3.2 of this installation guide. © VIII-2011 BEYERTONE GmbH CR-200 / CR-100 USB Ver. 2-3 - Installation and User Guide 6/64... -
Page 7: Safety Precautions
• Do not use detergents to clean the appliance. Wipe the unit with a slightly dampened cloth. Never use a dry cloth, as this can cause static to build up. • As a mains adapter for your CallRecorder, you must use a BEYERTONE adapter (optionally available for the CR-100 USB, if needed). -
Page 8: Installing The Appliance
An RJ11 cable with two large 6/4 Western plugs (approx. 1.5m) • An RJ16 cable with two small 4/4 Western plugs (approx. 0.5m) • A USB type A plug to type B plug cable (only with CR-100 USB) • A mains adapter plug 9V DC (only with CR-200) •... -
Page 9: Connecting To Telephones With A Handset Cable
Furthermore, in the case of rented or leased telephone systems, for example, you should check in advance whether such modifications are allowed. © VIII-2011 BEYERTONE GmbH CR-200 / CR-100 USB Ver. 2-3 - Installation and User Guide 9/64... -
Page 10: Interfacing To The Telephone's Analogue Connection Line
Furthermore, in the case of rented or leased telephone systems, for example, you should check in advance whether such modifications are allowed. Important: A connection directly to analogue landlines is not allowed! © VIII-2011 BEYERTONE GmbH CR-200 / CR-100 USB Ver. 2-3 - Installation and User Guide 10/64... -
Page 11: Callrecorder Settings
To do so, first disconnect all cables from the CR-100 USB and the carefully open the housing. Pull out the two single jumpers according to this drawing:: After that, first close the housing completely. - Page 12 CallRecorder device. Technical note: On delivery, the inner two jumpers are plugged, which means the inner pair of wires are being recorded. © VIII-2011 BEYERTONE GmbH CR-200 / CR-100 USB Ver. 2-3 - Installation and User Guide 12/64...
- Page 13 To the input jack 'ext. Mic' (3.5mm jack plug) you can connect a suitable external microphone. The integrated microphone will be deactivated automatically then. • Position of connections and switches on the left side of the unit (CR-100 USB): Line ext.
-
Page 14: Other Connections On The Callrecorder
(So-called ‘hands-free’ conversations are, however, not possible via the CallRecorder.) With the CR-100 USB unit, you can also listen to recorded conversations using the PC software, without the PC needing a sound card or speaker itself. -
Page 15: Connecting By Usb To Your Pc (Cr-100 Usb)
PC is ready for use). 2. Push the square (B type) USB plug into the socket marked ‘USB’ on the CR-100 USB unit. 3. Push the flat (A type) USB plug into a free USB port on your PC / laptop. -
Page 16: Operation Of The Usb Flashdrive Stick (Cr-200)
So you should make a copy of data needed , e.g. the PC software and the documents, on your harddrive. You can also download the latest version of these data from the website www.beyertone.com from the “Support“ area free of charge. if you should have deleted them by mistake. - Page 17 If you should find another line “Time ???” in the file, the realtime clock of the unit is currently invalid, and the clock has to be set by a configuration file (see section 7.2). © VIII-2011 BEYERTONE GmbH CR-200 / CR-100 USB Ver. 2-3 - Installation and User Guide 17/64...
-
Page 18: Installing The Software
The menu options available to you are: • ‘Control Dialog’ *: Launch the record / playback dialog window (* this menu item is only active when a CR-100 USB is connected) • ‘Archive’: Launch the archive function for managing and replaying recordings ©... -
Page 19: Installing The Usb Driver For Usb-Connection (Cr-100 Usb)
3.3.2 Installing the USB driver for USB-connection (CR-100 USB) As soon as you connect the CR-100 USB to your PC for the first time, a ‘New hardware component found’ message (or similar) will appear on the screen. Follow the instructions here step by step. As soon as you are asked to specify a driver for the new hardware, click on ‘Browse’... - Page 20 5. You will now see the ‘USB Serial Port - CR 100 USB (COM x)’ entry. ‘x’ here is the number of the COM port assigned for your CR-100 USB device. Please make a note of this. NOTE: The entry described above is only visible in the control panel if your CR-100 USB unit is connected to your PC and ready for use.
-
Page 21: Entering The Com Port Number (Cr-100 Usb)
Windows control panel (see section 3.3.3). • ‘General’ tab: Now you can make the first recordings with your CR-100 USB (continue with section 4). Later, you can also make further settings and use your CR-100 USB unit’s other functions (see section 7.1). -
Page 22: Getting Started And Recordings With The Cr-100 Usb
NOTE: This entire chapter is about handling the CR-100 USB for recordings directly to the PC or laptop via USB-connection. Once you have connected your CR-100 USB unit as per section 3 and installed all of the required software components, you can start using it and experimenting with your first recordings. -
Page 23: Basic Software Settings
Via ‘Enable automatic recording’ you cause the software to begin making a recording to file as soon as a start signal is relayed from the CR-100 USB (this can be produced by the press of a button or automatically at the start of every conversation – see section 7.1). - Page 24 Removing of recordings can be done into the recycle bin by the option ‘Remove to recycle bin, otherwise the recording will be deleted finally. © VIII-2011 BEYERTONE GmbH CR-200 / CR-100 USB Ver. 2-3 - Installation and User Guide 24/64...
- Page 25 To launch the help display, simply highlight the element you want help on and press the F1 key on your PC. © VIII-2011 BEYERTONE GmbH CR-200 / CR-100 USB Ver. 2-3 - Installation and User Guide 25/64...
-
Page 26: Recording Telephone Conversations
(see section 4.1), you can now start to record telephone conversations. To do this, the PC software must be running and the CR-100 USB unit must have an active connection to your PC or laptop (the yellow ‘USB’ LED on the appliance should be lit up and the symbol on the taskbar should be coloured green). - Page 27 You can choose to have the recording stopped automatically by the CR-100 USB unit if no more audio signals are received for a given period, or you can manually press the ‘Start / Stop’ button to stop it (depending on how the CR-100 USB is configured – see section 7.1).
-
Page 28: Monitor Function For Telephone Conversations
4.1), then once a recording has finished you can listen to the last recording made via the CR-100 USB itself by clicking on the green playback button. For easy searching and playback of previously saved recordings, use the archive function, which is described in detail in chapter 6. -
Page 29: Recording In-Room Conversations
1.5 to 2 metres. NOTE: If the ‘Mic’ switch is in position ‘on’, the ‘Monitor’ function of the CR-100 USB is automatically disabled to avoid acoustic feedback. Moreover, if the ‘Mic’ switch is in ‘on’... -
Page 30: Tapi Control
4.5 TAPI control If you’re using the CR-100 USB on a telephone which is connected to a telephone system and if your PC is connected to the telephone system by a so called “TAPI” interface (which e.g. enables dialling telephone numbers from the PC), then you can also control the CR-100 USB via the TAPI interface. - Page 31 CR-100 USB by clicking ‘Display line state”. As an option, you can also ‘Show contact data’, when a number has been recognised by the TAPI interface and there is already an entry in the archive of the CR-100 USB matching this number.
-
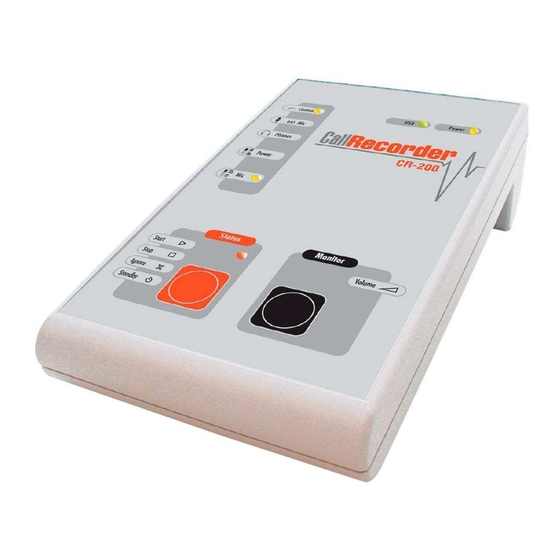
Page 32: Getting Started And Recordings With The Cr-200
You will see the displays and controls shown below on the top of the unit: activity Power supply Control input Loudspeaker (bottom) Microphone activated Status indicator Start / Stop Monitor button / button Volume © VIII-2011 BEYERTONE GmbH CR-200 / CR-100 USB Ver. 2-3 - Installation and User Guide 32/64... - Page 33 USB port of the CR-200 3x flashing USB flashdrive stick ready yellow light read/write data flashing no flashdrive stick inserted or stick removed © VIII-2011 BEYERTONE GmbH CR-200 / CR-100 USB Ver. 2-3 - Installation and User Guide 33/64...
-
Page 34: Settings Of The Unit / Date And Time
By using this mechanism, also user- dependent settings are possible, because the file will be kept on the flashdrive stick. © VIII-2011 BEYERTONE GmbH CR-200 / CR-100 USB Ver. 2-3 - Installation and User Guide 34/64... -
Page 35: Recording Telephone Conversations
‘Start / Stop’ button (according to configuration settings and software version of the device, see section 7.2). © VIII-2011 BEYERTONE GmbH CR-200 / CR-100 USB Ver. 2-3 - Installation and User Guide 35/64... -
Page 36: Monitor Function For Telephone Conversations
NOTE: You can also configure your CR-200 so that the monitor function is permanently activated. You can also set the standard volume level for this. You will find details on these settings in section 7.2. © VIII-2011 BEYERTONE GmbH CR-200 / CR-100 USB Ver. 2-3 - Installation and User Guide 36/64... -
Page 37: Recording In-Room Conversations
NOTE: After recording an in-room conversation do not forget to put the ‘Mic off-on’ switch back into the ‘off’ position, if you subsequently want to record telephone conversations again with your CR-200. © VIII-2011 BEYERTONE GmbH CR-200 / CR-100 USB Ver. 2-3 - Installation and User Guide 37/64... -
Page 38: External Control
The external control can also be used together with the internal or an external microphone. The automatic start or stop function of the CR-200 by audio signal will be deactivated, when the external control function is used. © VIII-2011 BEYERTONE GmbH CR-200 / CR-100 USB Ver. 2-3 - Installation and User Guide 38/64... -
Page 39: Playing Back Recordings
For installation, please refer to chapter 3.3.1. NOTE: With the CR-100 USB you can play back recorded conversations via your PC / laptop’s soundcard or – especially if your PC has no audio facility – via the CR-100 USB unit’s built-in loudspeaker. -
Page 40: Import Of Recordings From The Usb Flashdrive Stick (Cr-200)
6.1 Import of recordings from the USB flashdrive stick (CR-200) While the CR-100 USB directly records files onto the PC, the CR-200 will save recorded files independently on a USB flashdrive stick. For playing back and archiving these recordings, you first have to import them into the archive of the CallRecorder software. - Page 41 NOTE: The password is stored in the CR-200 unit and can be changed by configuration of the unit (see chapter 7.2) The default password upon delivery of the unit is „1234“. © VIII-2011 BEYERTONE GmbH CR-200 / CR-100 USB Ver. 2-3 - Installation and User Guide 41/64...
-
Page 42: Recordings In The 'Archive' Window
‘Open’: Enter a path for recordings (button: • ‚Import‘: Import recordings from the CR-200 (button: , see section 6.1) • ‘Close’: Close the archive window © VIII-2011 BEYERTONE GmbH CR-200 / CR-100 USB Ver. 2-3 - Installation and User Guide 42/64... - Page 43 © VIII-2011 BEYERTONE GmbH CR-200 / CR-100 USB Ver. 2-3 - Installation and User Guide 43/64...
- Page 44 The ‘Delete’ and ‘Delete all’ functions respectively delete one ore more highlighted records or all of the recordings in the opened archive. © VIII-2011 BEYERTONE GmbH CR-200 / CR-100 USB Ver. 2-3 - Installation and User Guide 44/64...
- Page 45 ( ). Below these is an adjuster for playback volume, which you can slide back and forth with your mouse (only applicable if the PC’s soundcard is selected for ’ playback - when playing back via the CR-100 USB unit, please use it’s ‘Monitor -button for volume setting).
- Page 46 This option is not available on playback via the CR-100 USB unit itself, but only on playback via the soundcard in a PC or laptop (for settings see the start of section 6).
-
Page 47: Sending Recordings By E-Mail
NOTE: If you do not specify a valid profile here, there may be an appropriate prompt for one when the CallRecorder archive function opens. © VIII-2011 BEYERTONE GmbH CR-200 / CR-100 USB Ver. 2-3 - Installation and User Guide 47/64... - Page 48 In this case, set ‘Soundcard’ as the playback device in the software (see also the start of chapter 6). © VIII-2011 BEYERTONE GmbH CR-200 / CR-100 USB Ver. 2-3 - Installation and User Guide 48/64...
-
Page 49: Special Settings And Software Updates
7. Special settings and software updates Both the CR-100 USB and the CR-200 can - if required - be set with individual parameters differing from the delivery status. To do so, the CallRecorder PC software is needed to create the individual settings and transfer them to the device. -
Page 50: Cr-100 Usb Configuration And Settings
The save commands let you save the CR-100 USB’s configuration on your PC as a file (with a ‘.crc’ extension) so that, if you need to, you can open it again at a later date and transfer it back to the device. - Page 51 It can then only be controlled from the PC. When the PC software is running, a check is made at the ‘Interval’ frequency set under ‘Control PC interface’ to make sure the CR-100 USB is available on your PC’s USB port and ready for use.
- Page 52 ‘Enable call detection’ in the ‘Start’ section lets you choose whether a start trigger is automatically produced by the CR-100 USB whenever the acoustic signals on the telephone exceed a certain threshold. In the PC software this can automatically trigger the start of a recording or automatically launch the record dialog window.
- Page 53 • The ‘Play’ tab: Set the default here for the ‘Volume’ at which the CR-100 USB unit should start off when in monitor mode or playing back recordings via the built-in loudspeaker (in each case you can adjust the volume through a range of levels by pressing the ‘Monitor’...
- Page 54 NOTE: By clicking the button you can restore the delivery settings of the hardware. After that, carry out the command ‘Communication / Send Parameters’. © VIII-2011 BEYERTONE GmbH CR-200 / CR-100 USB Ver. 2-3 - Installation and User Guide 54/64...
-
Page 55: Cr-200 Configuration And Settings
The various settings of the CR-200’s configuration are explained below. Please note that here too you can get a brief explanation of each element via the software by pressing the F1 key on your PC. © VIII-2011 BEYERTONE GmbH CR-200 / CR-100 USB Ver. 2-3 - Installation and User Guide 55/64... - Page 56 CR-200 and starting up and reading the flashdrive stick takes some time. So, you should set the value the clock will be set to a little time ahead here. © VIII-2011 BEYERTONE GmbH CR-200 / CR-100 USB Ver. 2-3 - Installation and User Guide 56/64...
- Page 57 Reduce this level if your recordings are distorted and increase it if they are too quiet. Alternatively, you can also enable ‘Automatic level control’, set with the desired action. © VIII-2011 BEYERTONE GmbH CR-200 / CR-100 USB Ver. 2-3 - Installation and User Guide 57/64...
- Page 58 (in each case you can adjust the volume through a range of levels by pressing the ‘Monitor’ button). © VIII-2011 BEYERTONE GmbH CR-200 / CR-100 USB Ver. 2-3 - Installation and User Guide 58/64...
- Page 59 The next tab ‘Administrator’ provides settings, which should only be changed when advised by the technical support. NOTE: By clicking the button you can restore the delivery settings of the hardware in the current window. © VIII-2011 BEYERTONE GmbH CR-200 / CR-100 USB Ver. 2-3 - Installation and User Guide 59/64...
-
Page 60: Software Updates
7.3.1 Updating the PC software You can always find the latest PC software for the CR-100 USB and the CR-200 on the www.beyertone.com website under “Support / software”. Download the installation file you want onto your PC. -
Page 61: Troubleshooting
8. Troubleshooting 8.1 No USB connection to the PC (CR-100 USB) • Is the CR-100 USB unit’s USB driver installed correctly? (section 3.3.2) • Is the device receiving power? (green ‘Power’ LED, section 3.2.5) • Is the PC software running? (sections 3.3.1 and 4) •... -
Page 62: Technical Data
Unit housing material ABS Dimensions 175 x 105 x 25/55 mm Weight c. 250g (excl. cable) * Normally closed contact required for functionality (n.c.) © VIII-2011 BEYERTONE GmbH CR-200 / CR-100 USB Ver. 2-3 - Installation and User Guide 62/64... - Page 63 ‘Windows’ is a registered trademark of the Microsoft Corporation. • CE-Conformity The CR-100 USB complies with the EU directives 2004/108/EC and 2006/95/EC by fulfilling the requirements of the relevant provisions of ΕΝ 55022 / ΕΝ 55024 and EN 60950 (power supply of CR-200).
- Page 64 ® BEYERTONE www.beyertone.com BEYERTONE GmbH Max-Volmer-Str. 29 D-40724 Hilden/Germany Tel.: +49 (0) 2103 / 2480-0 Fax: +49 (0) 2103 / 2480-40 info@beyertone.com www.beyertone.com © VIII-2011 BEYERTONE GmbH CR-200 / CR-100 USB Ver. 2-3 - Installation and User Guide 64/64...
Need help?
Do you have a question about the CR-100 USB and is the answer not in the manual?
Questions and answers