Autoquip American Lifts P-25-005 Manual
Hide thumbs
Also See for American Lifts P-25-005:
- Installation, operation and service manual (46 pages)
Table of Contents
Advertisement
Available languages
Available languages
Quick Links
Advertisement
Table of Contents

Related Manuals for Autoquip American Lifts P-25-005

Summary of Contents for Autoquip American Lifts P-25-005
- Page 1 MANUAL DE INSTALACIÓN, OPERACIÓN Y SERVICIO ELEVADOR COMPACTO 1058 West Industrial Avenue • Guthrie, OK 73044-1058 • 888-811-9876 405-282-5200 • FAX: 405-282-3302 • www.autoquip.com Artículo 830AMP Versión 4.0...
-
Page 2: Table Of Contents
11/2017 Contents INTRODUCCIÓN Y GARANTIA .......................... 3 Introducción ..............................3 1.1.1 Identificación ............................. 3 1.1.2 Inspección ..............................3 1.1.3 Programa de mantenimiento planificado ....................3 Responsabilidad de propietarios/usuarios ......................4 1.2.1 Comba ..............................4 1.2.2 Inspección y mantenimiento ........................4 1.2.3 Retirada del servicio .......................... -
Page 3: Introducción Y Garantia
Si tiene dudas, llame a un distribuidor local o a Autoquip Corporation al 1-888-811-9876 o al 405-282-5200. Registre la información siguiente y consúltela al llamar a su distribuidor o a Autoquip. Número de modelo:________________Número de serie: ___________________ Fecha de instalación _____/_____/_____... -
Page 4: Responsabilidad De Propietarios/Usuarios
Al exceder este número de ciclos se acorta la duración del elevador y de la garantía. 1.2.8 Modifications or Alterations Modifications or alterations to this equipment may be made only with written permission of Autoquip. Unauthorized modification or alteration will void warranty. - Page 5 Garantía Limitada, se limita al reemplazo del equipo. Esta garantía no se debe aplicar a ningún elevador de Autoquip o piezas del elevador de Autoquip que hayan sido dañadas o se hayan roto durante el transporte/envío, o debido directa o indirectamente a usos indebidos, abusos, impactos en el vehículo, negligencia, instalaciones...
-
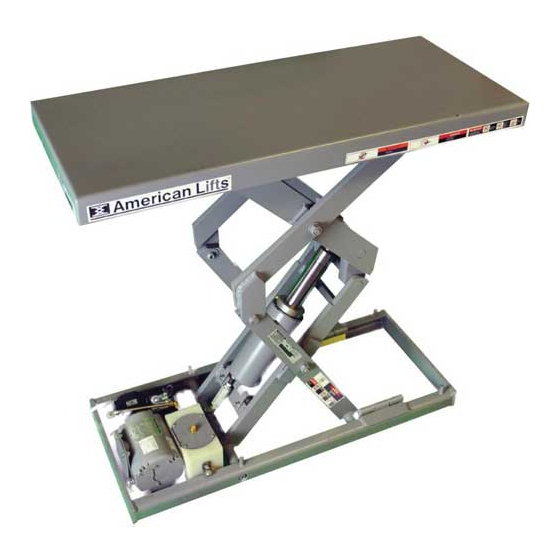
Page 6: Specifications
2. ESPECIFICACIONES 2.1 Modelos Modelo Capacidad Despla- Altura Altura Carga Carga Plataforma Tiempo Peso de levanta- zamient bajada subida máxima lateral estándar miento o (pulg) (pulg) (pulg) máxima mínima subida cilindros envío (lb) extremo (lb) (pulg) (seg) (lb) (lb) 12 x 25 P-25-005 1000 6.25... -
Page 7: Unbalanced Loading
– o aproximadamente 60.000 veces (ciclos) por año. Esto se considera servicio “normal”. El usuario es responsable de notificar a Autoquip siempre que una aplicación específica exija probablemente un servicio “por encima de lo normal” del elevador. El servicio por encima de lo normal requiere típicamente características de diseño complementario para mejorar la duración y... -
Page 8: Safety
3. SEGURIDAD 3.1 Palabras de señales de seguridad Este manual del propietario cubre el elevador T1 Torklift producido por Autoquip. Antes de instalar, operar o efectuar el servicio del elevador, debe leer, entender y seguir las instrucciones y advertencias de seguridad de este manual. Es posible que el elevador no disponga de algunos equipos opcionales mostrados en este manual. -
Page 9: Operation
No drene ni vierta fluidos o lubricantes en el suelo. Pida a la información de desechado correcta a las agencias medioambientales locales, a los centros de reciclaje o a su distribuidor Autoquip. - Page 10 i PRECAUCIÓN En cualquier momento en que se accionen los fusibles de velocidad, investigue la causa del accionamiento y verifique las acciones correctoras necesarias que se hayan tomado antes de la operación del elevador. i ADVERTENCIA Impida lesiones graves o la muerte. No trate de quitar el fusible de velocidad hidráulica (HVF) hasta que el dispositivo de mantenimiento soporte firmemente el elevador y se haya aliviado toda la presión hidráulica.
-
Page 11: Maintenance
3.6 Modificaciones i ADVERTENCIA Impida lesiones graves o la muerte. No modifique el elevador. Autoquip no puede prever y no es responsible de lesiones o daños que se deban a modificaciones desautorizadas o al uso indebido del elevador. -
Page 12: Labels
3.7 Etiquetas i WARNING To protect against death or serious injury, all labels must be on lift and must be legible. If any of these labels are missing or cannot be read, call Autoquip for replacement labels. - Page 13 1 – 36401487 2 – 36430050 3 – 36401560 4 – 36403230...
- Page 14 5– DECAL_CAPACITY 6 – 36403343 7 – 36400257 9 – 36433670...
-
Page 15: Installation
4. INSTALLATION 4.1 Pit Installation i WARNING Do not install lift in a pit unless pit has a bevel toe guard or other approved toe protection. A shear point may exist which can cause severe foot injury. Lift platforms traveling below floor levels may create a toe hazard as load passes top edge of pit. - Page 16 3. Verify installation area is clean before starting. Check mounting surface of pit floor with a level or straight edge. If floor is not level, add shims or grout under entire perimeter of base to achieve a level and flat base installation. A level base is essential for proper wheel tracking and smooth lift operation.
- Page 17 3475 30 MIN Sound Level – Approximately 67.5 dB(A) 5. Temporarily connect electrical service and hydraulic hoses. 6. Fill hydraulic reservoir with proper type and volume of fluid. 7. Press “UP” operator control and raise lift one foot. 8. Press “DOWN” operator control and lower lift. Continue to hold down control for 60 seconds. Repeat procedure five to seven times to bleed air out of hydraulic system.
-
Page 18: Shimming And Anchoring Lift To Concrete
14. Clean up debris and spilled oil from area. Dispose of oil in an environmentally safe manner. 15. Touch-up paint is available from Autoquip for repair of damaged paint surfaces. 16. Train personnel on lift operation, all safety features and procedures. -
Page 19: Remote Power Unit Installation
3. Because an Autoquip "Super-Torque" motor actually delivers substantially more horsepower than the nameplate rating, it must always be wired for heavier current-draw than standard motors of the same nameplate rating. -
Page 20: Operation
5. OPERATION 5.1 Raise And Lower Lift i WARNING Prevent serious injury or death. Before operating lift, all personnel interacting with lift must read, understand and follow instructions and safety warnings in this manual. NOTICE Adjusting safety relief valve may result in premature motor failure. Do not adjust safety relief valve. -
Page 21: Maintenance
6. MAINTENANCE 6.1 Maintenance Devices i WARNING NEVER go under a raised lift platform until load is removed and lift is securely blocked in raised position with maintenance devices. Lock-out/tag-out power source. This procedure describes the only factory-approved method of working under a lift. Follow these instructions EVERY time you plan to reach or crawl beneath the lift to perform service or maintenance –... -
Page 22: Routine Maintenance
i DANGER If for any reason you are unable to lower the lift completely onto the maintenance devices, stop immediately and consult the factory. Failure to properly use the factory approved maintenance devices could result in severe injury or death. 5. -
Page 23: Every Day Or 10 Hours Of Operation
i WARNING Pressurized fluids can penetrate the skin. Hydraulic hoses can fail from age, damage and exposure. Do not search for hydraulic leaks without body and face protection. A tiny, almost invisible leak can penetrate the skin, requiring immediate medical attention. Use wood or cardboard to detect hydraulic leaks, never your hands. -
Page 24: Every Year Or 1000 Hours Of Operation
Outdoor locations: 10 degrees F below 0 to 5W 20 or 5W 30 Multiviscosity Motor Oil 100 degrees F. Cold Storage Warehouse: 10 - 40 degrees F. Contact local Autoquip Service Rep. Note: All oils are detergent type. 6.2.5 Oil Capacity Oil capacity varies between models. -
Page 25: General Maintenance
6.3 General Maintenance 6.3.1 Hydraulic Cylinder Repair 6.3.1.1. Cylinder Removal 1. Raise lift to its full height and engage maintenance devices. See “Maintenance Devices”. 2. Disconnect electrical power to lift. Follow lock out-tag out procedure. 3. Disconnect hose on cylinder base end and insert into oil-fill hole of reservoir. - Page 26 i DANGER Do NOT used compressed air to push piston out of cylinder. 1. Remove the Spirolox ring from rod guide. 2. Drive rod guide back into ram using a soft hammer. 3. After rod guide has passed wire lock ring, remove ring from groove in cylinder. 4.
- Page 27 6.3.1.4. Disassemble & Assemble Cylinder - Style ‘B’ 6.3.1.5. Disassemble & Assemble Cylinder - Style ‘C’...
- Page 28 i DANGER Do NOT used compressed air to push piston out of cylinder. 1. Remove set screw (A). 2. Unscrew gland (C) using a spanner wrench. 3. Slide rod out of barrel. 4. Remove set screw (B) from end of piston and unscrew piston from rod. 5.
-
Page 29: Bleeding Air From System
1. Bleed air from system by raising lift to 50% of full travel, then lower completely. 2. Hold “DOWN” operator control for 60 seconds. 3. Repeat procedure 5-6 times. If this does not bleed all air from system, contact Autoquip. 4. Clean up any spilled oil. Dispose of spilled oil in an environmentally safe manner. -
Page 30: Hose Orientation
4. Check all fitting connections for hydraulic leaks and tighten as necessary. 5. Bleed air from system. See “Bleeding Air From System” in this section. 6.3.4 Hose Orientation To prevent damage to cylinder hoses, it is necessary to establish a correct hose shape and pattern of movement as follows: 1. - Page 31 Generic Hydraulic Schematic (½ & 1 HP)
- Page 32 Generic Hydraulic Schematic (1-½ & 5HP contractor)
- Page 33 Generic Hydraulic Schematic (5HP Heavy Duty Power Unit)
- Page 34 General Electrical Schematic (1/2HP 115V)
- Page 35 General Electrical Schematic (1/2HP 115V)
- Page 36 General Electrical Schematic (1 & 1-1/2HP 115V)
- Page 37 General Electrical Schematic (1 & 1-1/2HP 115V)
- Page 38 Generic Electrical Schematic (Controls)
- Page 39 Generic Electrical Schematic (Controls)
-
Page 40: Troubleshooting
7. TROUBLESHOOTING i WARNING Prevent serious injury or death. Disconnect and/or lock out electrical supply to power unit prior to any maintenance being performed. i WARNING Prevent serious injury or death. Never go under lift platform until load is removed and scissors mechanism is securely blocked in open position. - Page 41 PROBLEM POSSIBLE CAUSE AND SOLUTION Lift Raises, Then Lowers Down solenoid may not be seating. Remove solenoid coil and Slowly. check. If lift does not hold with solenoid coil removed, remove and clean down valve cartridge or replaced as necessary Oil line, hose, or fitting may be leaking.
- Page 42 60 seconds to bleed air from system. This step may need to be repeated several times to fully remove air in system by raising the lift to 50% of its travel and lowering. If above steps do not correct problem, contact Autoquip to obtain instruction for further action.
- Page 43 Inadequate wiring can starve motor even when source voltage is ample. Most of Autoquip’s standard motors are rated for intermittent duty. If a single-phase motor is being run more than 15 – 20 motor starts per hour, or a 3-phase motor more than 200 starts per hour, the problem may be motor over-heating.
-
Page 44: Parts Lists
8. PARTS LISTS Standard Power Unit Contractor Style Power Unit... - Page 45 Heavy Duty Power Unit...
- Page 46 Lift Parts Diagram...
Need help?
Do you have a question about the American Lifts P-25-005 and is the answer not in the manual?
Questions and answers