Table of Contents
Advertisement
Quick Links
Advertisement
Table of Contents

Related Manuals for Luminite OCULi


Summary of Contents for Luminite OCULi
-
Page 2: Table Of Contents
Contents Quick Start - Product Overview - Getting Started with Wireless Logic - Creating an Account - Powering up the Unit - Installing the Speaker Web Portal - Events - Sites - Units - Help - Users - Admin iOS App - Logging In - Events - Sites... -
Page 3: Product Overview
Product Overview • High quality VGA 640 x 480 colour/monochrome camera with IR LED illuminator, giving unrivalled day and night clarity • Uses the 3G network to stream images to the server and provide Rapid Visual Verification just a few milliseconds after the event has occurred •... -
Page 4: Getting Started With Wireless Logic
Getting Started with Wireless Logic • Before OCULi can be used, you need to activate your SIM card with Wireless Logic • To activate the SIM card, download and print one of the OCULi SIM contracts found at the bottom of the registration page at www.oculi.online... -
Page 5: Creating An Account
Underneath the registration page are the Wireless Logic SIM contracts and our Data and Battery Usage Calculator. Once you have registered your account, you can call the OCULi Help Desk to link your SIMs to your account. Alternatively, you can request SIM activation in the Admin tab of the web portal. -
Page 6: Powering Up The Unit
SD Card Micro SIM Card Slot • Take off the battery cover using a cross-head screwdriver and insert the blue Luminite ER34651M batteries, taking care to ensure the batteries are fitted positive pips down. - Page 7 • Replace the battery cover with the unit facing downwards and the unit will start up. 1. LED 4 should illuminate 15-30 seconds after start-up to indicate that a connection to the server has been initiated. 2. LED 6 will illuminate shortly after to show that the 3G modem has started correctly.
-
Page 8: Installing The Speaker
Installing the Speaker • Remove the connector from the speaker and feed the cable through the gland on the OCULi case, making sure to tighten the gland so that the case remains water tight. • The speaker connects to pins 3 & 4 ( the middle two pins ) of the connector;... - Page 9 Challenge and Stay-Online on the same unit. • Only detections enable the Voice Challenge mode. • The OCULi unit will listen for incoming phone calls for 2-3 minutes and answer them using the internal microphone and external speaker. • There is a Voice Challenge button on the Event panel in the browser with the phone number linked to it.
-
Page 10: Events
The Oculi Web Portal Events This is where you can see the images captured by your OCULi units after various triggered events. These events are colour coded and, the key can be found to the right of the screen. This information can also be found at the bottom of the Help tab. - Page 11 (where the Clear Event tab was) and selecting Delete Event. If you have enabled Voice Challenge and installed a Speaker to your OCULi unit, a Voice Challenge button will appear to the top of the Save as Images button when an OCULi unit registers a Detec- tion event.
-
Page 12: Sites
Clicking Copy will copy across the arming schedule from Sunday to Monday. The OCULi unit can be armed all day for every day of the week by clicking the 24/7 button. Please be aware that having the unit... - Page 13 To set up a custom arming schedule, select an ‘on’ time using the dropdown menus, and an ‘off’ time. Up to 3 on/off times can be added per day. To create an arming schedule that arms the unit only during regular non-working hours, you would set the unit to be ‘on’...
-
Page 14: Units
Units OCULi units will show here once you have linked your SIMs to your account. Units will appear automatically once it has established a connection to the server. You can change the unit name, see its’ SIM number, Unit ID and firmware version, and assign it to a specific site by selecting the target Site from the ‘Change Site To:’... - Page 15 Detection event. During this time, a Voice Challenge button will appear underneath the video footage captured. Clicking the button will allow you to call the OCULi unit. The Heartbeat determines the frequency at which the unit will connect to the server to receive updates and can be adjusted in the web portal.
- Page 16 When a heartbeat is missed, 5 email notifications are sent out to the site users. A missed heartbeat can indicate a fault with the server connection to the unit and it is recommended that the unit is checked. Individual units can have their own arming schedules. This can be set up the same way as the SITES arming schedule, however, if the Site has Master Schedule ticked, it will override the individual units’...
- Page 17 There are two dials to show battery and data usage. This tool allows you to predict when you will need to change the unit’s batteries, as well as how much data the unit is predicted to use. When the batteries have been changed, click the ‘Tick When Battery Changed’...
-
Page 18: Help
Help In this tab, you can download the OCULi instructions and view the web portal tutorial video. You can download new SIM contracts from this page, as well as use the Data and Battery Usage calculator. -
Page 19: Users
You can see all your SIMs, which unit they are assigned to, and their data usage on this page. There is also the option to request activation of your SIMs. This sends a request to the OCULi helpdesk to link your SIMs to your account. -
Page 20: Logging In
The Oculi iOS App Logging in Download and install the OCULi app by searching for ‘oculi’ in the app store. Once you have created an account on the Web Portal, you will be able to log in to the OCULi app. -
Page 21: Sites
Tapping the book icon will show you which Unit, Site and Event were registered, and the refresh icon reloads the video. Tapping Comment shows the unit name, site, date, event type and user assigned to the site. You can leave a comment within the app but it will not be visible in the web portal. -
Page 22: Units
Bluetooth The Bluetooth tab is where you can use the Walktest feature to test the connection and positioning of your OCULi Unit. In order to discover your units, you must first load them by opening the Units tab. Once your units have loaded, you can go to the Bluetooth tab. - Page 23 Unit.Tapping Update makes the Unit to connect to the server to update the current arming schedule. OCULi BLE Settings This shows the name of the Unit, which Site it’s assigned to and the strength of the Bluetooth signal.
- Page 24 PIR Settings The PIR settings for the Unit can be adjusted within the app. Be sure to tap Save settings in order to keep your new PIR settings. Camera The GSM signal indicates the Unit’s connection strength to the server. When take image is tapped, the Unit will connect to the server and take an image and the modem status will change to ‘Busy’.
-
Page 25: Faq
(25MB, 50MB, or 100MB) and complete all 5 pages. Your SIM may have been de-activated if the transfer has not been made. Please talk to the OCULi Help Desk to check. Can my SIM data be pooled if I have several units? - Page 26 How quickly will I receive notification of a detection? We use PUSH notification for the delivery of images to your mobile phone; as long as your OCULi has a good 3G signal you will receive the notification in seconds. My alarm events keep flashing – how do I stop this? You must sign off the event as actioned.
- Page 27 How do I integrate with another platform such as IMMIX? Go to the Sites tab on the OCULi portal and click on Platform Integration. There is a drop-down list of all available integrations.
-
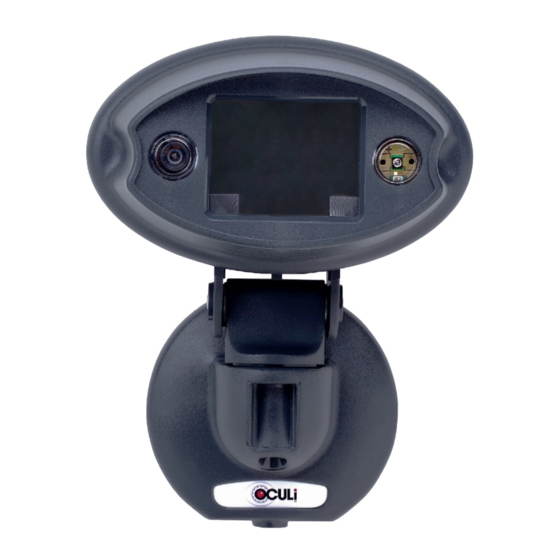
Page 28: Product Information
Dimensions Lens Pattern System Overview... -
Page 29: Technical Specifications
Technical Specifications Detector Information Basic Information Motion detector type Passive infrared 2 x Lithium D cells Power requirements (supplied) Sensor type Quad pyro 3G network to dedicated Mobile data Lens type Fresnal cloud server Detection range 15 metres x 90° Local wireless network Long range Bluetooth®...
Need help?
Do you have a question about the OCULi and is the answer not in the manual?
Questions and answers